We will fix errors in Windows 10. But approximately the same will need to be done in Windows XP, 7 and 8. In Windows 7 and later releases, the developers have improved the recovery system for startup problems. In older versions of the system, serious errors often have to be resolved by reinstallation.
Disable peripherals
Try to remember what changes you recently made to the system: did you install new devices or switch something. There may be a problem with one of the hardware components. Try disabling:
- USB drives.
- Card readers.
- Printers.
- Scanners.
- Cameras.
- All other external devices.
If this does not help, disconnect the keyboard and mouse: you need to exclude all possible sources of malfunction.
It may also be due to internal components, such as RAM. On a desktop PC, you can check the performance of the RAM by connecting the strips one by one.
Check power
If the computer does not turn on at all, pay attention to the power cable and sockets. Don't forget the power switch on the back of your desktop computer.
If everything works at this level, but the computer still does not turn on, then most likely the problem is in the power supply, which you are unlikely to be able to fix yourself: you will have to replace it or have it repaired by a specialist.
It is possible that the computer turns on, but only for a short time. This is the same problem with the power supply.
Configure the disk to boot the system
Errors may appear during startup: An operating system wasn't found. Try disconnecting any drives that don’t contain an operating system. Press Ctrl+Alt+Del to restart or Boot failure. Reboot and Select Proper Boot device or Insert Boot Media in selected Boot device.
The BIOS or UEFI settings may be set to boot from external device or another logical partition, and not from the system disk. You can restore default settings like this:
- Restart your computer.
- Immediately after restarting, press system key, for example F2. This may be another key: usually during system boot it can be found at the bottom of the screen with the logo of the laptop or motherboard manufacturer.
- In the settings, set the desired disk to the first place in the boot.
- Select the Save and Exit option to save your changes.
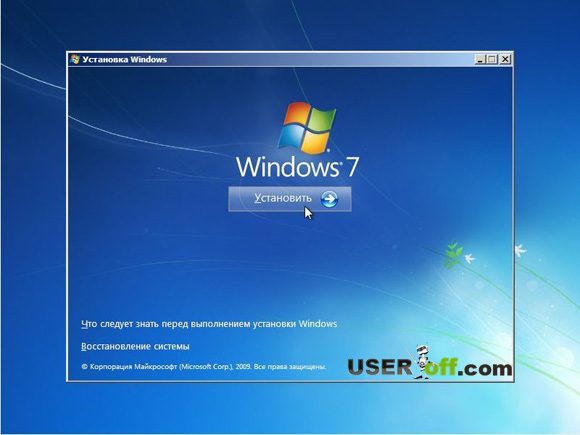
If the above does not help, you will have to restore the system bootloader. To do this, you will need a bootable USB flash drive or recovery disk with a system of suitable capacity. How to do bootable USB flash drive or disk, read Lifehacker about installing Windows.
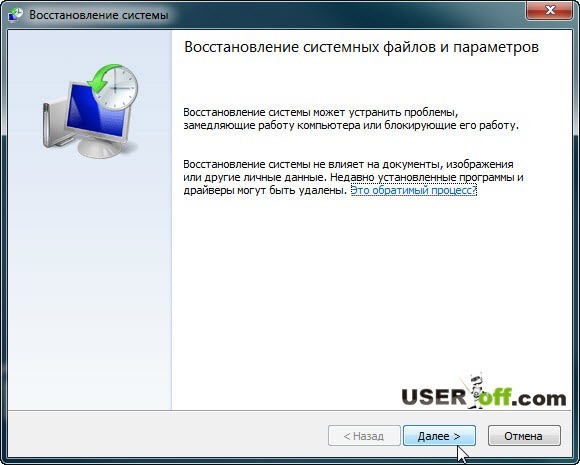
Start the system from a flash drive or disk by selecting the desired option in the boot menu. In the menu that opens Windows installations select "System Restore".

From the recovery menu, select Troubleshooting → Advanced options → Startup Repair. After this, the system will try to automatically fix the bootloader. In most cases this solves the problem.
The same can be done manually via command line, but it is better to choose the automatic option so as not to aggravate the situation.
If this method does not help, the problem probably lies in the hardware: the hard drive is damaged.
From the recovery menu, select Troubleshooting → Advanced Options → Command Prompt.

At the command line, you need to enter the following commands one by one: diskpart → list volume (be sure to remember the name of the Windows disk) → exit.
To check the disk for errors and damage, enter the command chkdsk X: /r (where X is the name of the Windows disk). The check usually takes quite a long time, you will have to wait.
Start Windows in Safe Mode
Due to a sudden shutdown of the computer during the installation of operating system updates, cleaning of viruses and unnecessary entries in the registry, or due to the fault of utilities to speed up Windows, Windows may become damaged system files. In this case, when the system boots, “ blue screen death."

Try starting Windows in safe mode without loading drivers and programs in startup. If the computer is running in this mode, you will have to remove the drivers, perform a system rollback, and scan for viruses.

If you have restore points, this problem is quite easy to solve. You just need to roll back to the previous stable configuration.
Reinstall system files
The steps above may not help. Then you'll have to reset Windows settings and reinstall the system while saving the files. Unfortunately, all programs will need to be reinstalled.

In the recovery environment, select Troubleshoot → Reset this PC → Keep my files → Reset.
The system will roll back to the original settings.
The topic that I want to discuss in this article is very popular and talking about it in detail so that you understand how and what to do is not so simple. But still, I will try to describe possible ways What to do if Windows 7 does not boot on your laptop or computer. We will also find out why this could happen?! The task ahead of us is not an easy one, namely, to correct the current situation, but there is no need to be afraid. Just follow the clear instructions and everything will be great! Some points may be suitable for other operating systems, but I will focus on Windows 7.
Dear reader, if you really want to solve the problem, then I strongly recommend reading the article in full, and then drawing some conclusions. I cannot talk about all the nuances in one paragraph.
Safe Mode and Last Known Good Configuration
This is a must try! Reboot the computer, press the F8 key continuously.
Attention! In Windows 8, login to safe mode happens a little differently, and therefore it is better to follow the link below to find out all the details. In the list that appears, we are interested in the item called “Last Known Good Configuration (advanced).” Select and press Enter.
About how to enter safe mode on different systems:
What to do if the information above did not help you? We repeat the steps described in the previous paragraph, but select “Safe Mode”.
Next, you can make a choice: fix the problem due to which Windows 7 does not boot manually, or try to do it in semi-automatic mode. Usually I do everything manually, for example, if Windows does not boot after installing the drivers, then I delete the drivers and try to boot. I think you understand that manual method requires more knowledge from you, so Windows offers you another option, which I will describe below.
If everything loads, go to the Start menu, Control Panel, System and Security. In the “Support Center” tab, click on the inscription “Restore the computer to a previous state.” See the “Run System Restore” button? Great, then you've come to the right place.

Now click it and follow the instructions.
Next, you will need to select a restore point. In my case, I am asked to select a point on the 23rd, and now the calendar shows the 29th. Therefore, you need to click on “Search for affected programs” to find out what actions you will need to take after recovery.


So, you have familiarized yourself with the affected software when restoring the system and now you can close this window. After closing the window, click "Next".
If you were unable to enter safe mode to restore Windows operation, then there is no need to despair. Below we will look at another method.
Note: at the very beginning, when Windows 7 was just coming out, there was one strange glitch that you might have too. When you turn on the computer, the welcome screen follows and a black screen appears. As I remember, it seemed like there was still an arrow, but nothing else was visible. The cure was very simple - go into safe mode and restart the computer as usual. After that I was able to log into my account without any additional manipulations with Windows.
You may need to reinstall Windows
This option should be considered when you have tried to revive Windows, but all attempts have produced no results.
The very first thing that comes to mind for many, and for me too, is reinstalling Windows 7. But this method, you see, is very long, and if you are a busy person, then access to the computer should be almost constant. Reinstallation is suitable for those who have a lot of free time, or do not have time to understand faster methods, or for those who will not be helped by any of the methods I have listed below for restoring the Windows operating system.
I will not dwell in detail on installing Windows, since I wrote about this on my blog:
Here brief instructions: since you do not have access to the desktop, go to the BIOS, look for the Boot or Advanced BIOS Features tab, or search for it yourself. Then in it we find the line “1st Boot Device”, set the value to CD-ROM. What have we done? What we did is that now when the computer boots, it will boot from the disk that is installed in your CDRom, and not from hard drive. After turning it on, when the inscription “Press any key...” appears on a black background, press any button and get into the Windows installation wizard. Then follow the instructions on the screen.
You can read more about how to boot from disk in my article: “”.
I decided to talk about the installation at the very beginning, because if you were going to reinstall Windows, then perhaps this is some kind of sign to implement it))). But as I said at the very beginning, we will now try to bring your Windows back to life without reinstalling it.
System Restore
First of all, you can use the function that is in the installation disk “System Restore”. I will give an example of the Windows 7 system, but if you have a different system, then this is not a reason to think that you cannot do on your system. The names of the buttons may differ, but the principle remains the same.
So for this procedure we need installation disk with Windows or its image (can be downloaded on the Internet). If you are unable to download the image or do not have a disk, then write to me by email [email protected] or contact your friends who have already installed Windows themselves.
If you don’t have a working disk drive or don’t have one at all, then the article “” will help you create a bootable flash drive.
When do you have stock Windows distribution, then insert it into the drive and restart the computer. If the BIOS is configured for installation, you will see the line:

When it appears, press any key.
If it is not there or Windows boots as usual, then you need to make manipulations in the BIOS. Namely, set loading priorities. Usually the hard drive is set in the BIOS settings, since that is where your Windows is installed.
In order for the computer to start booting from the disk that is in your drive, you need to go into the BIOS and specify CDRom as the first device to boot. I have already talked about this above, if you have not read this point, then it’s time to do so.
So, you pressed any key, now a window will appear where you click “Next”.

In the next window you need to click “System Restore”.
A search will occur. installed systems. If you have one system installed, then accordingly there will be one in the list operating system. Select it and click Next.

Often at this stage, a message may appear in which you will be asked to restore the system. If this message will be displayed on your screen, then click “Fix and restart”. After that, try to log into your account.
If the message does not appear, then in the next window you select your system and click “Next”.
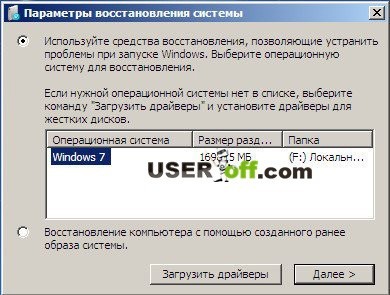
After this, a window will appear where you can select system recovery methods.

– automatic solution problems.
System Restore – you can use this method, but on the condition that this function was turned on.
Restoring a system image – if you have Windows image for recovery.
Command line– using certain commands you can revive Windows. This method will be discussed further.
Now click “Startup Repair”. Now you need to wait a bit for the utility to try to automatically find the problem and solve it.
System Restore via Command Line
Then enter and press Enter.

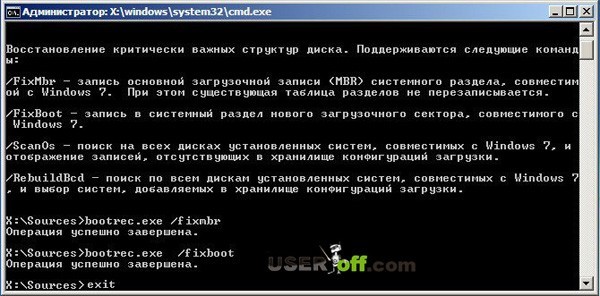
A list of commands that can be used in this utility will appear; now you need to enter: Bootrec.exe /FixMbr and press Enter.
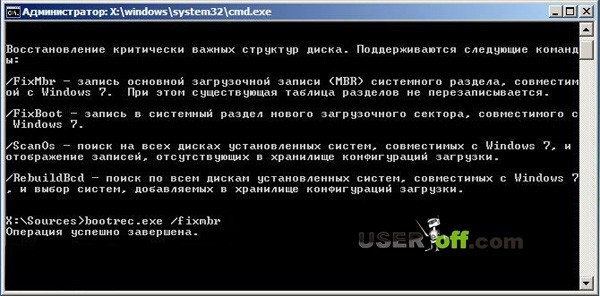
Now enter . exe / , then clicking on Enter. Next, exit the utility by typing exit and pressing Enter. Now you can try to log into your account, since the recovery work is complete.
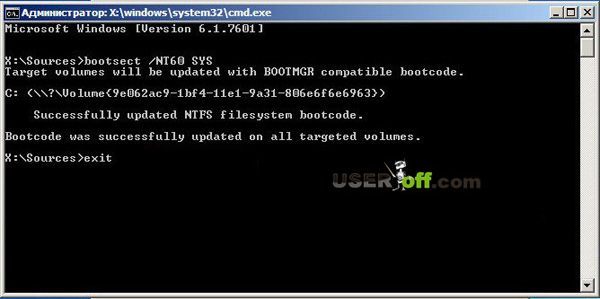
You can also try updating the boot code by entering the command bootsect /NT60 SYS. Then leave as a team Exit.
If the above commands did not help you, then go to the command line and enter Bootrec.exe /RebuildBcd. With this command, you will scan your hard drive to find the systems installed on it.
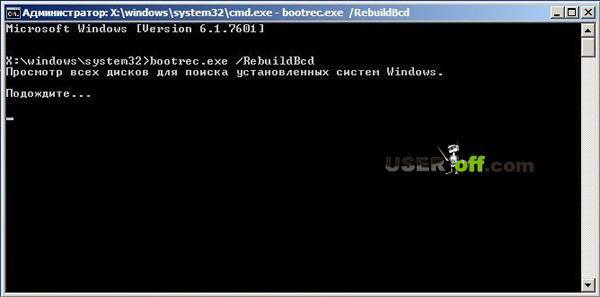
When the scan is finished, a list of installed operating systems on your hard drive will appear. To add it to the download list, click Y And Enter. After successful completion of the operation, enter Exit and press Enter.

So, we have dealt with the command line. In principle, this should help to get your system to boot.
Inactive hard drive partition
This situation does not occur often, but it is still necessary to talk about it, otherwise the article can be said to be truncated. Let me give you an example, after which you will understand what's what.
Let's say you have several operating systems installed on your computer. Windows systems, which are installed on different hard drives. If the sections hard drives assign incorrect attributes, then you will have problems loading a particular version of Windows.
To check or fix this, you can use the Acronis boot disk Disk Director to change partition attributes. So, download and burn boot disk Acronis Disk Director and boot from it. How to do this? Insert the disc into the drive, restart the computer, and it will begin booting from the disc in the drive. But before that, check your download priorities. There should be a CDRom, just like when installing Windows. We have already talked about this in this article above.
When the program loads, pay attention to the checkboxes that are on the hard drive partitions.

In the image above we see that the checkboxes are on the second partitions of the hard drive. You need to make sure that these checkboxes are on the first sections. We got to practice ;). You need to click on every first hard section disk right click mouse and select "Mark as active".
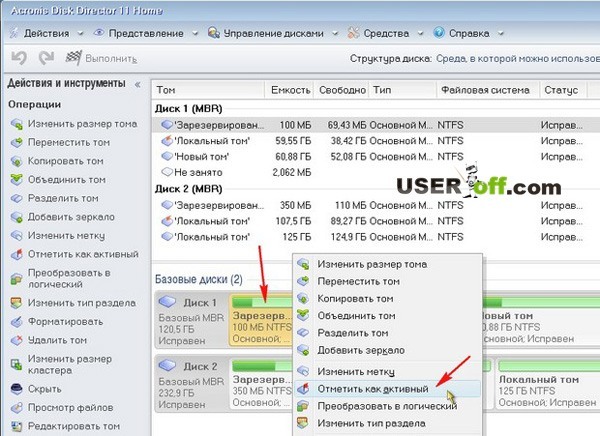
A message should appear where you click “OK”. This is what it looks like after the whole procedure:

Now all that remains is to click on the “Run” checkbox, wait for the operation to complete and restart the computer. Be sure to remove the disc from the drive.
Hardware problems, BIOS and viruses
Hard drive. If your system unit, or rather, the hard drive makes suspicious sounds: clicking or tapping, that is, there is a possibility that the hard drive needs to be replaced. To make sure of this, you need to open the cover of the system unit, turn on the computer and listen to work hard disk. Also check the connection of the wires with hard drive. It is possible that the wires have become disconnected and the computer cannot see the hard drive.
If you suspect that the problem is with the hard drive, then you need to copy all important data to another medium. Otherwise, you may lose them completely.
BIOS. Go to BIOS settings and put the hard drive first so that the download starts from there. Above we looked at an example where we set up a CDROM; you do the same with a hard drive. Just don’t forget to save the changes in the BIOS by pressing the F10 key.
The second method – you won’t believe it, but it actually works! Just go into the BIOS and, without changing anything there, exit, saving the changes that in fact did not exist (by pressing the F10 button). I personally once fixed my friends’ laptop this way, and when they asked me how I did it, my answer was: “Magic and nothing more 😉.” So give it a try, maybe everything will be much easier than you think.
Viruses. Sometimes viruses prevent Windows from booting. If there are viruses on your computer, you need to scan the entire disk for viruses. Here are articles that will be useful to you: “” and “”.
Of course, if you check your hard drive for viruses, you will need to disconnect it and connect it to another computer, since in your case Windows will not load. Or you can use special boot programs, with which you can check your computer for viruses even if you cannot boot your Windows. Here are a couple of them: and.
Attention! There are cases when, after installing updates, Windows 7 stopped loading! Therefore, you may want to try uninstalling recent updates that were installed before the Windows boot problem occurred.
Important! If you see a specific error on your screen, I recommend using a search in Google or Yandex. You can enter into the search not only the error code, but also the words that are used in it. Thus, you will save your time searching for the problem and its solution.
Important! If the system unit makes squeaks when turned on, then you need to use this squeak to determine the problem. Ask how? Here's an article on this topic: "".
That's all I wanted to say. The article turned out to be long, and I sincerely hope that at least one of the methods I described helped you.
Says a lot of unnecessary things, but there is useful information for you:
Hello dear friends! This weekend I came across a computer on which I needed to install Windows 7. But a problem appeared that I encountered for the first time. When I started the installation of Windows 7, the installation window did not appear (first window, language selection). And then the seven took a very long time to install. If you have the same problem when Windows 7 takes a long time to install, And The installation window does not appear, then now I will write how to solve this. At least I’ll tell you how I solved this problem.
I'll probably start from the beginning. They called me and asked me to come and look at the computer, otherwise: the Internet does not work (Intertelecom there), the antivirus always shows some window, nothing starts, etc. In short, a complete set of all sorts of different breakdowns. And I’ve already dealt with this computer, such a powerful “machine”, new, only Windows XP is installed on it, not that it’s bad, it just surprised me. And when I asked the owners why Windows XP was installed, they said that they installed it in the store. I said that it wouldn’t be a bad idea to set it to seven, after all, it’s newer, and on the same hardware.
I came a second time, turned it on, and there was something incomprehensible there. Perhaps it was a virus that worked this way, or maybe it was children :), but Avast threw in some kind of warning, there were almost no icons on the notification panel, the Internet did not react in any way to an attempt to open a connection, the theme was changed, and it was not possible to return to the standard one. And many more different unpleasant moments.
I looked and decided that it would be easier to demolish everything, format the C and . After explaining everything to the owner of the computer, we decided that we would do just that.
Everything is fine, the computer rebooted and booted from the installation disk. The file loading bar appeared when installing Windows 7, and when the language selection window should appear, nothing happened. The window did not appear, there was only a splash screen (well, the same as when installing seven) and a cursor. I waited about three minutes and restarted the computer. I realized that something was wrong. I decided to go into the BIOS again and look at the settings. Now it’s clear why the store installed Windows XP; most likely, installing Windows 7 failed.

I eliminated the problems with my installation disk immediately, I have installed it more than once. Yes, I had it too exact copy, with which the Windows 7 installation window also did not appear. I didn't see anything strange in the BIOS, and... It didn't help Windows 7 was not installed, the language selection window did not appear. I decided to open the system unit and see how and what is connected there. I didn't see anything interesting there. By SATA interface The hard drive and optical drive were connected.
I tried to run the installation again. I launched everything the same, only the background, but there is no window with a choice of language. I decided to wait. About 5 minutes later a window appeared with a choice of language, well, at least it’s something, I thought. I clicked next and the message appeared “Starting installation...”, and that's it. The computer was “thinking”, I understood this from the fact that the cursor was spinning (something was loading), I decided to wait a little.

About 10 minutes later a window appeared in which I selected clean install system, again waited 5 minutes, formatted the partition for Windows 7 and started copying files. They took longer to copy than expected, it seemed to me. In short, with grief in half, I installed Windows 7. Then I realized what a long installation of Windows 7 was :).
Slow but established
The computer worked as expected from such hardware, very quickly. All that remains is to configure it. But I didn’t have a driver for the modem, so they decided to take the system unit to me and pick it up the next day.
Finding reasons for slow Windows 7 installation
At home, I set everything up, and decided to torture the computer a little more and find out why it was taking so long to install Windows 7, I was interested. Moreover, I did not find a specific answer to this question on the Internet, only guesses.
Setting up a SATA hard drive in BIOS
To begin with, I opened the system unit and changed the hard drive and drive connections. I connected the hard drive from SATA 0 to SATA 1. And the CD/DVD drive is in SATA 3.
Then I went into the BIOS again. I was interested in the settings SATA controller. Chapter .

Against OnChip SATA Controller the parameter was Enabled. Okay, then we see the item, I have the Native IDE option. This is not very good for a SATA hard drive, as it will not show all its capabilities.

Changed the parameter value to AHCI (the most best option for SATA drives). I tried to turn on the computer. The drive was not detected at all, and as soon as Windows 7 started loading, the blue screen flashed and the computer rebooted.

I decided to put RAID in the parameter instead of AHCI (combines disks into an array), nothing worked (I knew it was useless, but decided to try), everything is the same as with AHCI.
Installed it back Native IDE. All these experiments did not help. Although it is very strange why AHCI did not work, I never understood it.
Disable Drive A
I also saw that opposite the Drive A table there was a parameter “1.44MB, 3.5”. This is a disk drive, and this computer does not have one. So I set it to “None” to tell the system that it is missing.


I saved the settings by pressing F10. I installed the installation disk with Windows 7 and tried to run the installation again to check how the seven would install, just as slowly or faster.
And to my surprise, everything worked as expected, a window quickly appeared with a choice of language and so on, I quickly got to formatting the disk. Of course, I didn’t format it, since the computer was already set up and should have been picked up by now.
How to solve the problem of slow installation of Windows 7?
Let's summarize, otherwise I've scribbled a lot of text :). There was a problem with installing Windows 7, it took a very long time to install, and I had to wait a lot until the window with the choice of language appeared, and then “Starting installation...” hung for a long time.. If you have such a problem, then you can just wait and everything will be installed. I have it installed.
If you want to try to solve this problem, then:
- Try setting AHCI next to the item in the BIOS (most likely it didn’t help me).
- Change SATA connectors for the hard drive and drive.
- Disable Drive A (disk drive).
I did the last two steps, and the installation of Windows 7 went quickly. I can’t say with 100% certainty that this is what helped restore the normal installation speed of Windows 7. But in any case, you need to try.
Sorry that there was so much text, I just wanted to describe everything in as much detail as possible. I hope that my experience was useful to you, if you managed to solve this problem, in this or some other way, write about it in the comments, it will be interesting and useful. Good luck friends!
Also on the site:
Windows 7 takes a long time to install. The Windows 7 installation window does not appear. updated: January 12, 2015 by: admin
Most of the capabilities that the average owner of desktop computers and laptops use are available to humans thanks to the use of special operating systems on the equipment. The most popular OS is a product from Microsoft. Therefore, if Windows 7 or one of the other OS variants does not boot, the user faces serious problems.
There are many reasons why Windows 10 (7, 8, XP) does not load. Often in this case, an unpleasant situation is accompanied by a message about a specific error. But what to do if Windows 10 (7, 8, XP) does not load on a laptop or regular PC without such messages? There are several universal methods treatments that can lead to a way out of the current situation.
Selecting the download type
This is the simplest fix method if Windows 7 or another type of operating system from Microsoft does not load. What you need to do:
- Start rebooting the computer.
- Press the “F8” button.
- In the proposed list, select the launch item with the most successful configuration.
In some cases, this action is quite sufficient when Windows 7 (8, 10, XP) does not load.
Windows Recovery
So Windows won't boot. You can try to return Windows to full functionality using the recovery menu. To do this, of course, you will need to have a boot disk with the desired OS option on hand. What actions should the user take in this case if Windows 7, 8, 10 and XP does not load:
- Insert the source into the drive.
- Change the priority in BIOS. That is, the operating system should not be launched from a hard drive, but from a DVD-ROM.
- After starting the process, you will need to press the “R” button.
- Select the option to restore.
- Wait for the results. Restart the equipment one more time.
Windows XP (7, 8, 10) still won't load early? Next option.
Recovery within the OS itself
If previous operations have been carried out, but Windows 7 still does not boot, you can try to restore it directly using the tools of the operating system itself. It's quite simple:
Naturally, at the end you will need to restart the computer to check whether Windows 10 (7.8, XP) does not boot or whether the problem has been successfully resolved?
Boot file disinfection
If after Windows updates 7 won't load, then possible reason The trouble lies in a damaged Boot.ini boot file. To fix the problem you will need to follow these steps:
- Start the PC using the same external source.
- In the recovery menu, go to the command line.
- Enter the phrase “Bootcfg/add”.
Wait for the process to complete and initiate another reboot to check whether Windows 8 or its equivalent of a different version does not boot, or whether the treatment helped in this predicament?
Boot record defect
Another option for trouble with Windows. Windows won't load? The boot record may have become corrupted. In this situation, you will need to repeat almost the entire procedure described in the previous paragraph, but enter a completely different phrase into the command line. Namely: “Fixmbr\Device\HardDisk0”.
Perhaps this action will be quite enough when Windows 7 does not load and freezes on the logo.
Damage to the boot sector on the hard drive
This nuisance can lead to a situation where, for example, Windows 7 does not load beyond “Welcome”. Here the treatment is also quite simple - the steps are repeated by running the command line from the computer user, into which you should type “Fixboot” and then the letter that is responsible for the hard drive partition where the installed OS version is located.
Quick reinstall
Sometimes, if the computer does not boot beyond the Windows 7 splash screen, only reinstallation can help. But it is not at all necessary to launch a full-fledged procedure that lasts quite a long time. You can speed up this process. This is very powerful tool treatment, since he is able to cope with most of the troubles that arise.
What is required from a person:
- Start again from the boot disk.
- Press the “R” button, then the “Esc” key.
- Choose quick reinstallation operating systems.
It is important to understand that this procedure can only work if identical versions of the OS are located on the disk and hard drives. That is, if, for example, Windows 10 does not boot after the update, you should not try to quickly reinstall it using a boot disk with Windows 7 or 8 for this purpose.
Conclusion
A special case similar situation There may be a constant automatic reboot of the OS. Naturally, this option excludes the possibility of any therapeutic processes. To break this sequence, you will need to press the “F8” button the next time you start the system and go to the “Advanced Settings” menu. After this, disable the OS reboot procedure and if failures are detected. Well, then you can use one of the treatment options described above.
All described methods are universal. That is, they are recommended to be used only when it is not possible to accurately determine the root cause of the malfunction. Most often, the user can see a message on the monitor screen indicating a specific error code. And each of them has their own method of correcting an unpleasant situation. Most of them can be easily found on this Internet resource dedicated to answering questions related to OS damage from Microsoft.
Windows 7 has become a classic for home use; it is installed on every second computer, despite the development of new operating systems from Microsoft. Having entered the market in 2009, the “seven” still cannot get rid of problems during the launch, which pretty much spoil the nerves of the multi-million user audience. To simplify the life of a user whose computer is running “Seven”, this article was written. In it we will look at how to restore Windows 7 if it does not start.
BOOTMGR is missing
The most common problem that appears during the launch of the “seven”.
The reasons for its appearance may be:
- damaged sectors of hard disk or non-working cells SSD memory, on which Windows 7 is installed (in most cases, you can restore them);
- spontaneous power outage or reboot of the PC using the “Reset” key;
- virus activity (very rare);
- incompetent handling of utilities by the user breaking down hard disk.
There are several ways to make the error disappear. We will look at how to restore a computer using the OS itself.
- If problems arise during Windows launch 7 Press F8 to open a menu with a list of additional computer startup options.
- Select the “Troubleshooting…” option.

- Select Russian language and click “Next”.
- Select an account with administrator rights.
- Click on “Startup Repair” so that the operating system tries to find and fix the problem on its own.

- If the error is not corrected, launch the command line from the OS renewal options window.
- We enter the commands sequentially:
"bootrec.exe /FixMbr" – MBR entry to the system partition;
“bootrec.exe /FixBoot” - creates a boot record on the system volume.
- Reboot and start the computer.
If after completing the steps above, the PC still does not detect Windows 7 installed during startup, run the bootrec.exe command with the “RebuildBcd” attribute through the command line.
It will scan all devices installed on your computer long-term storage information on the presence of OSes installed on them that are compatible with the “seven”, and will allow you to add them to the download list.
And in the very last case, when nothing helps to restore the launch of the “seven”, reserve the old BCD folder, which is responsible for starting the PC, and create a new one. This is done using the following chain of commands:

"Disk boot failure" problem or message with the text "Insert system disk"
The startup error is caused by one of several reasons, the essence of which is as follows: the computer is trying to find boot entry on a disk that is not bootable. Factors that prevent Windows 7 from starting:
- The device from which the computer starts to boot is not system disk– try disconnecting all flash drives, phone, camera, including external ones hard drives, and reboot the system.
- Check the BIOS settings that are responsible for the priority of boot devices - there is a high probability that the computer starts booting from a disk that is not the system one. Also look in the BIOS or through one of special utilities, on which Windows 7 is installed.
- Reconnect the HDD to a different cable and power cable; perhaps the problem lies in the unreliability of the connection or damage to one of the cables, for example, due to its significant bend.

The list of reasons can safely include the lack of installed Windows 7 due to the fact that the disk with it was formatted due to the carelessness or inexperience of a novice user, and reinstalling it or restoring a deleted partition will help here.
If none of the options brings the desired result, try restoring the OS as described in the previous paragraph, and also make sure that the hard drive is working.
Inability to start Windows due to damaged registry files
Among other things, Windows 7 may not boot due to damaged files registry

As a result, the computer will inform the user about the problem and launch an application that allows you to restore the operating system.

But the means for automatic Windows recovery 7 is not always effective and, for example, in the absence backup copy damaged data, the user will have to manually restore the operating system.
- Call up a window with an extended list of Windows launch options using F8.
- Select “Troubleshooting...”.
- Next, click on the link: “System Restore.”


