Android. Installing the Android SDK+ Eclipse+ ADT emulator
To develop applications for Android OS on personal computer you need to install an emulator that allows you to develop these applications without accessing mobile devices.
This lesson covers in detail all the stages of installing and configuring the Android SDK + Eclipse + ADT kit.
SDK(from the English software development kit) - a set of development tools that allow you to create applications.
SDK developers sometimes replace the word “software” with something else. Examples:
- Oracle - Java Development Kit (JDK)
- Microsoft and Apple provide Driver Development Kit (DDK)
- Google Android SDK.
To develop applications we need the following tools:
- Java SE JDK
- Android SDK
- Eclipse development environment
- ADT is a plugin that customizes the Eclipse development environment for using Android SDK
Java SE JDK
We take it from the official website: http://www.oracle.com/technetwork/java/javase/downloads/index.html. (Button JDK Download).
The figure shows the download screen for Java Development Kit (JDK) version 7 on the official Oracle website for various operating systems. Download the file corresponding to your operating system. Installation JDK passes without problems, after which it is advisable to reboot.

Android SDK+ Eclipse+ ADT
The website http://developer.android.com/sdk/index.html has a ready-made development environment that includes Eclipse + Android SDK + ADT. It is also possible to download the Eclipse, Android SDK and ADT tools separately, and then install and perform the necessary settings for each tool as a single system.
Selecting a ready-made environment. Go to the site http://developer.android.com/sdk/index.html, then DOWNLOAD FOR OTHER PLATFORMS, table ADT Bundle file Windows 32-bit
adt-bundle-windows-x86-20130219.zip, size 425487608 bytes
Features of installing Android SDK+ Eclipse+ ADT
After unpacking the downloaded archive, two directories and an executable file SDK Manager.exe will be created

Directory eclipse– contains the development environment.
Directory SDK- includes Android SDK toolkit
File SDKManager.exe manager for installing SDK components.
When unpacking the archive, you need to consider the following features:
- Directory where the archive will be unpacked adt-bundle-windows, is the installation-executable directory that will contain configuration files and executable files. If you subsequently move it to another location, you will have to reconfigure the development environment.
- The Start menu does not contain links to executable files, control and configuration files.
- It is not allowed to use Cyrillic when writing the path to the unpacking archive.
Therefore, for the directory into which we will unpack the archive, select the following name: <имя диска>:\
SDK Manager.exe
After unpacking the archive, launch the manager - SDKManager.exe .
We need a manager in order to install the following components:
Android platform . For each official release of the Android OS, an SDK component is released, which includes runtime libraries, a system image for the emulator, and other version-specific tools.
In addition, for each platform there are: SDK add-ons, USB driver for Windows, examples, documentation, which are installed using the manager.
On first launch SDK Manager will connect to the repository server and receive a list of available packages. We will choose Android 4.2.2 package (API 17) and press the button Install Package. (Install package). The package weight is up to 200 Mb, so it will take some time to install the package.

In the next window, you must accept the license information for the selected SDK components and continue the installation process with the button Install. Then you need to wait until the package is downloaded from the server and installed.

SDK Manager can be launched at any time to update components or install new ones.
Eclipse
After unpacking, you can pin a shortcut in the Start menu to the eclipse executable file to launch the environment, located in the directory eclipse .
If this is your first time launching Eclipse, you will most likely be shown a standard welcome window, where you can find basic help on using this IDE, in particular, creating your first project. Collapse or close this tab (standard "x" button in the tab title). You can always open the welcome window using the menu item Help -> Welcome.

Now you see the main window of the Eclipse environment.
When you first start the environment, you will be prompted to define a directory for your workspace.

A workspace in Eclipse is a directory containing projects. You can use one space for all projects or multiple spaces as you see fit. When writing the path to a directory, the use of Cyrillic is not allowed.
A quick tour of the Eclipse environment
Eclipse is an open IDE that you can use to develop an application in various languages. Usually, when people say Eclipse, they mean Java.
User interface (UI) is associated with two concepts:
performance , which is a separate interface component (for example, a code editor, console, or object inspector);
perspective - a set of individual views that are needed for various development tasks (for example, code editing, debugging, analysis, synchronization, version control, etc.).

Eclipse for Java comes with a set of pre-installed perspectives. The most important of them are Java and Debug. The Java perspective is shown in the figure. It contains a Package Explorer view on the left, a view for visual design or code editing in the middle, a Palette view, a Properties view, an Outline view, and a set of tabs that organize the Problems views. (Problems), Javadoc and Declaration (Announcement), Console (Console).
Views within a perspective can be moved as desired by simply dragging them, and can also be resized. In addition, the set of views is not fixed - it is possible to add them to or remove them from the perspective. To add a view, go to Window->Show View and either check something from the list or select Other to get a list of all available views. To switch to another perspective, you can go to the Window->Open Perspective menu and select the one you need. A faster way to switch between open perspectives is available to you in the top left corner of Eclipse. Here you can find out which prospects are already open and which one is active. As additional prospects are discovered, they will be added to this list.
The DDMS perspective is designed for debugging and analyzing Android applications and complements the standard Java and Debug perspectives. In addition, the ADT plugin adds several views to the environment, including LogCat (output of activity log from any connected device or emulator).
Creating a Virtual AVD
Android Virtual Device (AVD) allows the developer to test their applications without having an Android phone at hand. You can create multiple emulators - AVD devices, with different types of configurations to emulate different types of real phones.
For ease of use, it is recommended to download and install the Intel x86 Atom System Image package; this is done in the same way as installing the SDK examples given above. This system image is slightly faster than the standard one.
Let's start:
- Let's launch Eclipse
- Let's go to the menu Windows > Android Virtual Devices
- A window opens, click the button New
A form appears containing the following options:

In the dialog that appears, you need to specify the parameters of the virtual device to be created; we will consider each of them.
AVD Name- Device name. You can specify whatever you like, I recommend specifying something simple, in Latin, without spaces (in the example newDevice ).
Device- Device. Here the “model” of the virtual device being created is indicated, in fact - the screen parameters and some other hardware parameters. These hardware parameters are collected as device definitions ( Device Definitions) on the corresponding tab of the Android Virtial Device Manager window.
Target- Target Android version. The API version for which the application is targeted is indicated. Let's select the newest one (and the only one available by default), i.e. Android 4.2.2 - API Level 17. If you need support for older versions, then you need to download and install the appropriate packages before creating a virtual device (in the same way as the installation of examples from the SDK described above).
CPU/ABI- Processor/Application Binary Interface ( Application binary interface ). The hardware platform of the created virtual device is selected, i.e. hardware image. This is where you should choose Intel Atom (x86) the image that we installed additionally.
Keyboard- keyboard. Enable the hardware keyboard view. Let's use this point.
Skin- emulator skin. Enable the display of hardware controls in the emulator window ( hardware buttons). We will also use this item to see the device buttons in the emulator window.
Front Camera And Back Camera- device cameras. Enable emulation of cameras (front and main), if desired, you can display the image from the web camera through them. Let's leave the default values - None, since in simple training examples cameras are practically not used, and “combat” applications that use “complex” hardware capabilities are more reliably debugged on real devices.
Memory Options- memory options. This indicates how much operational ( RAM) memory will be available in the emulator, as well as the size VM Heap- the amount of available memory for one application instance. It is recommended to specify these values based on the resources of real devices, so we will leave the default values (512 and 16). However, if you increase these parameters, the application in the emulator will run faster, but you should remember that you are developing an application for a real device, where the amount of RAM is hard-coded by the device manufacturer and cannot be changed.
Internal Storage- internal storage. The volume of the internal storage device is indicated here; again, indicate a value that is possible on a real device (i.e., you should not indicate hundreds of gigabytes here; such mobile devices most likely do not exist yet). For example, let's take 200 MiB (millions of bytes), which is slightly less than 200 megabytes.
SD Card - SD card. Here, if required, you can specify the parameters of the virtual SD memory card used (which are used everywhere on real devices to expand internal storage). Let's leave the Size field empty - we won't use an SD card for now. For the convenience of the programmer, here you can specify a ready-made SD card image in a file, if there is such a need.
Emulation Options- emulator options.
Snapshot- system snapshot - when this option is enabled, the virtual device emulator will save its state upon restart, i.e. after turning on (booting) you will receive the device in the same state as before turning off (unloading) the emulator. We will not touch this option for now; we will leave it disabled.
Use Host GPU- use of hardware graphics acceleration when running the emulator. It is recommended to enable this option - this will make the graphics in the emulator work faster.
Override the existing AVD with same name - Overwrite an existing virtual device with the same name. An option that will appear if you try to use a name for a new virtual device that has already been assigned to another device; when you enable the option, the parameters of the old device will be overwritten by the new ones.
Slow launch of the emulator
There are two ways to solve this problem
- use hardware virtualization capabilities ( Intel® VT), allowing you to significantly speed up the Android emulator
- turn on Snapshot(“snapshot”)
First way. Using virtualization technology
The processor must be Intel with support for virtualization technology VT-x (Intel Virtualization Technology for x86 VT-x ) (these parameters are set in the BIOS). Otherwise, using this method is not possible.
Installation
For CPU Intel You need to install the following packages using SDK Manager:
Intel x86 Atom System Image
Intel x86 Emulator Accelerator (HAXM)


He is here
\sdk\extras\intel\Hardware_Accelerated_Execution_Manager.
Installing Intel HAXM
During the installation process, you will be asked to determine the amount of RAM allocated. You can leave the default value. If during operation you want to change this value, run the installation again.

If the mode is not enabled or not supported, a message box will appear:

In this case, check the settings in the BIOS; virtualization may be supported by your system, but disabled by default.
Creating a virtual device
After installing the emulator image Android for x86 you need to create a new virtual device using Android Virtual Device Manager. To do this:
Let's launch ADV Manager

Second way. Using the Snapshot option
Snapshot– a “snapshot” of the emulator’s file system. To do this, you must enable the Snapshot option when creating or editing emulator settings.
After creating the emulator, you need to run it. To do this, select our device and press the “Start” button. In the window that appears, you must enable the “Launch from snapshot” and “Save to snaphost” parameters and then press the “Launch” button (launch, start, start, start).

The first launch of AVD will be slow (3-5 minutes) - you will need to create a “snapshot of the emulator file system”, but all subsequent ones will occur in an acceptable time - 5-10 seconds.
Let's move a little away from the topic of markings. Everything has changed a lot on the alma mater website. Now the environment for developing Android applications is Android Studio. But since many examples and tutorials are focused on Eclipse, it’s still worth having in your arsenal.
In addition, Java 8 has been released. And in connection with all this, we will once again install the JDK, Eclipse + ADT, and then Android Studio and JetBrains IntelliJ IDEA 14.0.2. Well, and of course Genymotion.
And so, let's go!
1) Install JDK
And select JDK Download
We agree with the license

And select the version to download depending on the bit depth of your Windows (I have Win 8.1 x64).

Downloaded, run JDK for installation


during the installation process the JRE will also be installed


We all click Close. This completes the JDK installation.
Checking the JDK installation using the command java –version.

If we see a similar command output (yours may differ if you downloaded a different version or build of java), then everything is fine. Let's move on.
2) Install Eclipse

And download Stand-alone SDK Tools


We download the zip archive with the SDK and then unzip it to C:\android-sdk-windows (you can use another directory, whichever is convenient). We see approximately the following

This completes the SDK installation.
4) Installing the ADT plugin for Eclipse
Launch Eclipse. Select Install New Software

And in the window that opens, enter the address https://dl-ssl.google.com/android/eclipse/

Press Enter. We are waiting for Eclipse to find packages to install. Mark everything as on the screen and click Next

We wait a little and click Next again

We agree with the licenses


This warning might come up:

Just click OK
After installation, Eclipse will prompt you to restart for the changes to take effect.

We agree and after a restart we see this picture

ADT complained that he does not see the Android SDK and this is normal, since he does not know where it is. But we'll tell him.
Click Close and Eclipse will prompt you to enter the path to the Android SDK

Select the path where we unzipped the Android SDK and click Next

And click Finish
He can swear like that

Click Open SDK Manager

Now it is important to choose what is marked in yellow. Other packages can be installed at any time.
Click Install...

We agree with the licenses and click Install again and wait until everything is downloaded and installed
During installation, a log may be shown

There's no need to be scared
Downloading and installing Android SDK packages may take some time.
At the end you should see a window like this

Which can be closed. Also in this Eclipse window you can click Close

And start Eclipse again

Now we see that Eclipse started without problems and errors, and we can also see that it sees the Android SDK.
Now all that remains is to tidy it all up a little and launch the first test application to check the operation of this entire facility.
5) Installation additional packages Android SDK
Packages are installed on the basis of need. Those. if you want to develop and test your programs under different versions Android, then you need to install the necessary packages. They can be removed or added at any time.
For the first time, you can install these packages (or whatever you see fit)
After downloading these packages, the folder with the Android SDK began to weigh almost 7.5GB

So consider the space on your disks.
6) Setting up AVD storage location (Android Virtual Devices)
By default, the Android SDK creates and stores AVD files in the directory
C:\Users\USER\.android\avd
This is not very convenient for me, so I will move this folder to the directory C:\AVD
For this
1. Create a folder C:\AVD
2. Create a Windows environment variable with the name ANDROID_SDK_HOME and a parameter pointing to our directory

3. Copy the .android subdirectory to the H:\AVD directory
4. Launch AVD Manager and see that its directory is in the new location where we specified


We don't have AVDs created yet, but we'll fix that.
In the meantime, you need to install and configure Intel® HAXM
7) Installing and configuring Intel Hardware Accelerated Execution Manager (Intel® HAXM)
System Requirements and installation instructions here:
You can install it either manually or via the Android SDK. But I chose to install manually, since the Intel website usually contains a more recent version of HAXM.
And so download HAXM here (at at the moment version 1.1.1 and the file weighs only 1.7MB):
Unzip and run the installation file


In order to check that everything is installed correctly and works, you need to run on the command line:
sc query intelhaxm
After running this command you will see the current status of the service

A way to stop the service may also be useful:
sc stop intelhaxm
Start the service:
sc start intelhaxm
With this we only prepared for the launch of AVD. Now you need to create an AVD device
8) Create AVD
Launch AVD Manager

Let's create an AVD. In CPU/ABI select Intel Atom

After clicking OK, information about the created AVD will be displayed

And as a result we see our AVD

And launch it by clicking Start...

As a result, we see the emulator at work

The Android 2.2.3 emulator started up quite quickly and also works almost without any brakes. Let's create an Android 4.x AVD and see how it behaves

This one has been running for much longer

It is clear that HAXM is working

But one way or another, the speed of AVD on Android 4.1.2 is quite decent. Much better than it was a year ago.

And one more trick. If you set the RAM memory size for an AVD too large

As we see, a yellow triangle icon appears with exclamation point. And when starting, the emulator complains about this and may not start

This can be treated quite simply. You need to open the file \.android\avd\


However, the startup time is still much longer than on AVD 2.x
Now all that remains is to check whether the actual program is running on the AVD.
9) Run test program on AVD
Launch Eclipse and create a test application


The master generated a project for us

Well, let's run it on AVD 2.x

Everything works. But AVD is a very capricious and unpredictable thing. Therefore, it’s better to install Genymotion.
10) Installing Genymotion
Installing Genymotion consists of two stages: installing VirtualBox and installing Genymotion itself. Genymotion uses VirtualBox to install Android virtual machines.
And so we download VirtualBox from the manufacturer’s website https://www.virtualbox.org/wiki/Downloads

and install it


A warning will come out and we agree with it.


Setting up VirtualBox


We indicate where the virtual machines will be stored

And that's all. Just in case after VirtualBox installations It's better to restart your computer.
Now install Genymotion
And register (if not already registered) to download free version

Currently the version of Genymotion is 2.3.1
And so we install


Setting up Genymotion

Now we need to add virtual devices

To do this, we once again enter our login and password that we created when registering on the site

After this we will get a list of devices that can be downloaded and installed

They can be filtered by Android version and device

Here we see that only devices with Android 2.3.7 are shown to us
But before downloading devices, you need to configure Genymotion a little. To do this, click Cancel and go to the Genymotion settings

And specify the path to the pre-created directory where the virtual machines will be stored

And also the path to the directory with the Android SDK

Now click OK and start adding devices

I chose Google Nexus One 2.3.7


And also Google Nexus S 4.1.1
This is what they look like installed

To start the device, press start. I launched Google Nexus One 2.3.7 and checked the launch of the test application on it.

In principle, you can easily launch applications in Genymotion from Eclipse without a plugin, but for convenience, we integrate Genymotion with Eclipse.
To do this, install the Genymotion plugin in Eclipse


Press Enter, wait until the plugin appears, mark it and press Next


After the reboot we see the Genymotion launch icon in the Eclipse toolbar

We click on it and see such disgusting

You must specify the path to the Genymotion directory. Click OK and specify the path to the directory

Now when we click on the Genymotion icon on the panel we will see this

Well, that's almost all. Now there are some minor cosmetic tweaks left. appearance Eclipse, which I usually always do. Well, you can, in principle, delete all the images of the AVD virtual devices that we downloaded in the SDK Manager, since, by and large, there is no need for them, and they eat up a lot of space.
Go to Help –> Eclipse Marketplace

And in the search we type in Jeeeyul and then install this plugin.

Well, with its help we can color everything the way we want.
My Eclipse after settings looks like this

What I like about this plugin is that you can create themes and then export and import them.
Now let's remove the Intel AVD device packages.
The SDK folder weighs 7.5GB before deletion

After removal it weighs 3GB

Total difference is 4.5GB... not a little
That seems to be all. Now let's add to this kit Android Studio, but that's in the next topic.
How does the Android development process work? Let's highlight a few basics:
- In Java files, you describe program logic—what you want your application to do.
- In XML files you develop layouts - the appearance.
- Once the application is written, you need to use a build tool to compile all the files and package them together into an .apk file that can be run on Android devices and/or publish on Google Play.
- All utilities and files that are used to create an Android application are combined into an integrated development environment (IDE). An IDE is a program that you will open to edit your code files and compile and run them.
- Previously, the standard IDE for Android development was Eclipse, but it has now been replaced by the more functional Android Studio, a Google product.
You will, of course, find deeper processes going on behind the scenes of the above steps. For example, advanced users will want to know the role virtual machine Dalvik. At the end of the article there will be links to useful resources that every Android developer should be familiar with. The first one is the official documentation from Google.
- Let's download and install Android Studio.
- Let's learn about launching and testing applications on Android devices and emulators.
- Let's create a simple Android application that displays "Hello World" on the screen of a mobile device.
At the end of the article, you can read useful recommendations from the company for novice developers.
Installing the Android Studio development environment
It's really tempting to start reading documentation and writing code to find out what the platform is capable of. And we will do it soon! However, to start working with the Android platform, you need to set up a development environment.
For those new to Android programming, it is especially important to take your time and methodically follow each step. Even if you follow the steps correctly, you may need to troubleshoot a small environment setup issue depending on your system configuration or product version. To do this, use search services. One can especially highlight the resource StackOverflow.
It is important not to let any pitfalls hinder your ultimate goal of learning Android programming. It is known that even professionals sometimes experience certain problems with setting up their working environment. In such cases, it is important to know command line. If you'd like to become more familiar with this tool, there's a link to a good introductory one below.
Along with training in syntax, it is important to train yourself to have the mindset of a successful programmer that will not accept the file X error message not found the final verdict. This kind of thinking is easily trained by you in cases where you do not give up and look for a solution to the problem that has arisen.
Go to Android page Studio developer.android.com/studio/index.html and find the download button latest version for your platform.
Click on the download button and you will be asked to read the terms and conditions of use software product. After carefully reading (as you always do) and accepting, the download begins. This will probably take a few minutes. After this, you can install Android Studio just like any other program. On home page The download contains installation instructions for Mac and Windows.

Now that you have Android Studio installed, let's launch it! Launch Android Studio. The program will ask if you want to import your settings. Since you're starting from scratch, just select the second option and continue.

You should see a beautiful loading screen in Material Design style.

Once the download is complete, you will be taken to a welcome screen.

Even if you just downloaded Android Studio, you may not have the latest version. To avoid problems with versions in the future, click the "Check for updates now" button and, if necessary, follow all instructions to obtain the latest version. Sometimes Studio will automatically inform you that there is an update with a screen like this:

In this case, always select Update and Restart. Great! We have successfully completed the installation of the development environment.
Creating the first Android project
It's time to create the first project. Let's start with something simple. Programmers usually call the first program “Hello World”. Let's follow this tradition and then make a few small changes to make the app use your name as a greeting. At the end, you can download it to your device and show it to your friends. Android Studio has a small step-by-step tool that will help you create your project. Click "New Project" on the start screen:

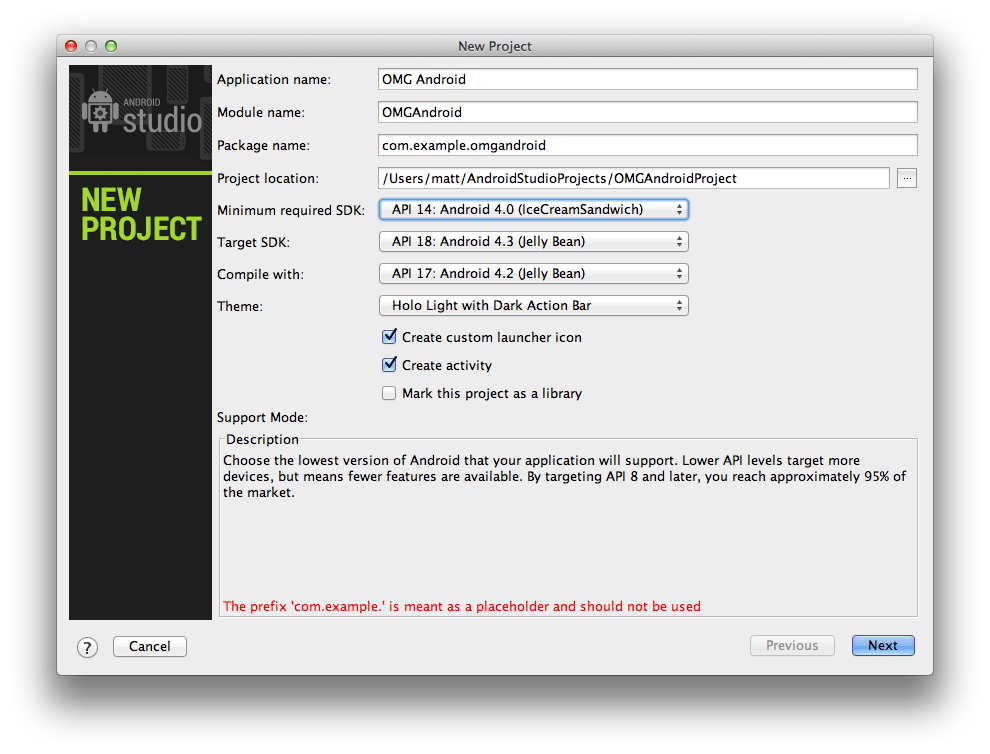
Fill it out like this. Feel free to replace "example" in the package name with something else to remove the warning at the bottom of the screen. You can also set the project location by pointing to any folder on your hard drive
For drop-down SDK versions, note the Description section at the bottom of the dialog box. It explains what each setting does.
Install the minimum required SDK as shown in the screenshot. This sets the minimum Android version required to run the application. Choosing this value for your own projects is a matter of balancing the SDK capabilities you want with the devices that will be supported.
To receive additional information about API versions and their use, there is a special Dashboards page on the website for Android developers https://developer.android.com/about/dashboards/index.html.

After selecting the version, the starting template selection screen opens. You can create an application that already interacts with the api google maps and displays the map. In our test example, select the Empty Activity and click the “Next” button.

And now you are at the last step of the application creation process. Before you click Finish, pay attention to a few things. This is the first time you come across references to the main architectural components of any application.
- - this is the first, but not the last mention of the word Activity. In the context of Android, an Activity is usually thought of as a "screen" in your application. This element is very flexible. When Android Studio creates the MainActivity class, it inherits it from the Activity class in the Android SDK. Those familiar with object-oriented programming will understand this concept, but for beginners, this basically means that your MainActivity will be a customized version of the Activity.

- Layout Name- the layout of what will be shown to the user is defined in special form Android XML. You'll soon learn how to read and edit these files.
Click Finish. It will take some time to create and download the project. After a while Android time Studio will complete the build of your project. Of course, the project is still empty, but it has everything you need to run on an Android device or emulator.

After loading the project, you view the layout file in XML format. Before we move on to Android programming, let's talk about how we can run this application. It's time to say "Hello world!"

Running an application on an emulator
Now it's time to say a few words about the emulator. Android Studio comes with software that can emulate an Android device to run apps, browse websites, debug, and everything else on it.
This feature is provided by Android Virtual Device (AVD) Manager. If you wish, you can set up multiple emulators, set the screen size and platform version for each new emulator. This functionality is very useful because it saves developers from having to buy multiple devices to test programs.
Click on the Run button in the form of a green arrow.

You'll have to wait a while for the emulator to load and once it's ready, you'll see something like this:

Congratulations! You've made your first Android app!
And so... Why and how did it work?
To start making changes and adding interesting features, it is necessary to gain a working knowledge of what is happening behind the scenes. Take a look at the Android Studio project section with files and folders on the left side of the screen. You may need to click the small tab on the edge (see below) if the project explorer is not currently visible.

Browse your folder structure for a few minutes and double-click on files to see their contents in the main window. If this all seems mysterious, don't worry!
Android project structure: Team
Each good team consists of people who perform their assigned roles. Do you want to get the job done right? You need the right team. Android projects have several key elements, and each of them has a specific role to play:
Java: Professional
This is the part of your code that is responsible for the application logic. Your code will be located in the src\main\java directory in the main project folder. To learn Java, I recommend Bruce Eckel's book "The Philosophy of Java";
Resources: Artist
It's not enough to just do it Android application, it should also be stylish. Your app will never stand out if it doesn't have clear icons and images, well-designed layouts, and maybe even smooth animations.
When initialized, the folder contains the following folders:
- drawable, which stores icons. Now there is only the standard application icon.
- layout with XML files, which are screen designs.
- menu with XML files of lists of elements that will be displayed in the action panel.
- values with XML files containing sizes, colors, string constants and styles.
AndroidManifest.xml: Boss
This XML file informs your system of hardware requirements and software application and contains its version name and icon. The manifest also contains information about all Activities in the application. Do you need the work done by your application? Talk to your boss first.
Making changes
Navigate to res/values/strings.xml and double-click the file. When you open the file, you will see two string resources in XML.
These resources are used in different places, but it is very convenient to have all the text used in your application in one file. If you need to translate it, or if your fellow marketer asks you to remove all the unnecessary links, it's easy to make all the changes here.
Change the hello_world string that the application displays on the screen. Change the content to something more personal, such as using your own name. You'll get something like:
Click Run. The application should restart and you will see a personalized message:

We congratulate you - you have completed your first project and learned how to edit the source code. The first step in Android programming has been taken. We wish you good luck on this difficult but incredibly interesting path! If you need professional Android application development, contact Infoshell specialists.
Problem
Do you want to use the Eclipse environment to develop your application for Android platforms.
Solution
Install the Eclipse environment and the AndMore plugin. Then create your project and start writing the application. Build it and test it using an emulator in Eclipse.
Discussion
Before you can start building an application using the Eclipse framework, you need to install three items:
- Eclipse IDE
- Android SDK
- AndMore module
For more information about installing these elements, see.
Once you have done this, create a new Android project using the File → New menu and you will see a screen like the one in Fig. 1.
Select the SDK version for the target device (Figure 3). Version 4.0 covers almost all devices in use today; later versions provide even more features. It's up to you!

Rice. 1.

Rice. 2.

Rice. 3.
In Fig. Figure 4 shows the project structure expanded in the project panel on the right. It also shows to what extent you can use Eclipse autocomplete on the Android platform - I added a gravity attribute to the label, and the Eclipse framework suggests full list possible attribute values. I chose central-horizontal so the shortcut should be centered when the app launches.

Rice. 4.
If you set the gravity attribute in the LinearLayout to center_vertical and in the TextView to center_horizontal , the text will be centered both vertically and horizontally. Listing 1 shows the corresponding main.xml layout file (located in the res/layout directory).
Listing 1. File HelloWorld. java
As always when you save source file, the Eclipse environment generates a compiled version. In an Android project, it also creates a compiled APK package that is ready to run, so you only need to run it. Click right click mouse on the project and select the command Run As → Android Application (Run as → Application for the Android platform) (Fig. 5).