If your operating system does not boot, then your main task is to identify the cause and, if possible, eliminate it. There are two possible scenarios: damage to the computer hardware and the need to replace a component, or simply a system failure, which can be solved by a simple rollback. Let's look at how to determine what caused the error, as well as how to fix the problem.
Attention!
All of the steps below are strongly recommended only if you fully understand everything stated, so as not to harm your computer.
If after turning on the computer nothing happens and you do not see the OS loading process, then most likely the problem is a malfunction of some components of the device. The first step is to check whether all computer components are connected. To do this, disconnect the computer from the network and turn off the power supply using the toggle switch on the back wall. Open the case.
Reason 1: Hard drive failure
If after performing the steps described above the problem does not go away, then proceed to checking hard drive. Very often the cause of the problem is a media failure. You can check its functionality only by connecting the component to another computer. There are three possible scenarios here.

Option 1: HDD is detected by another computer and Windows boots
Everything is fine! Your hard drive is working fine and the problem is not there.
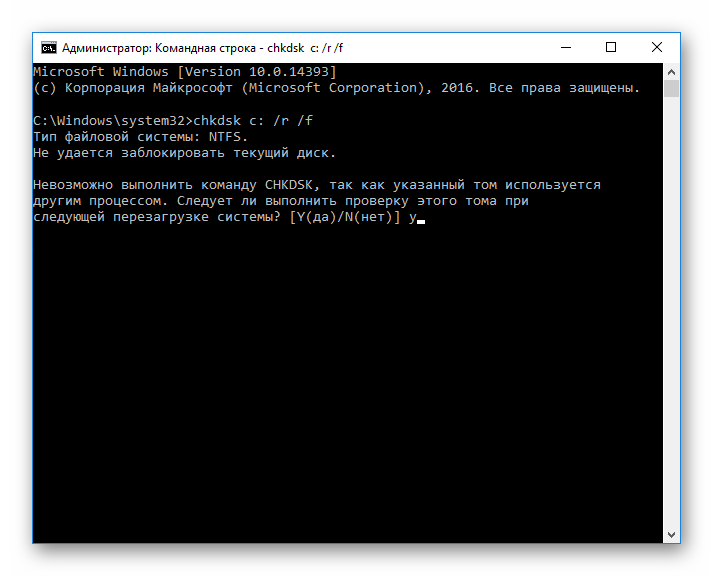
In this case, you need to check the disk for bad sectors. You can do this using special program Crystal Disk Info. It is completely free and will help you perform a complete diagnostic of your hard drive. Run it and pay attention to points such as Remapped sectors, Unstable sectors, Uncorrectable sector errors. If at least one of these items is highlighted in yellow, then bad sectors there are and they need to be corrected.

To recover bad blocks, run "Command line" on behalf of the administrator. To do this, use the key combination Win + X open context menu and select the appropriate item.

Then enter the following command:
Click Enter. You will be prompted to perform a recovery after rebooting the system. Enter Y and press again Enter. After this, restart your computer.
Option 3: HDD is not detected by another computer
This is the worst option. In this case, you will have to purchase a new hard drive, since the old one most likely cannot be restored. But before you do anything, consult your service center. Perhaps yours hard drive you can still return it to working condition. Otherwise, they will recommend you which drive is better to take and offer replacement services.
Reason 2: Some components are not connected
If your hard drive is working properly, then check the following components:
- Hard drive power cable;
- A cable that connects the hard drive and the motherboard;
- Are the memory modules seated tightly in the connectors?

Reason 3: Motherboard failure
If the actions taken above did not have any result, then the problem is not in the cables and the hard drive, but in motherboard. It is better to entrust this problem to specialists and take the computer to a service center.

The system tries to boot, but nothing happens
If you turn on your PC and see any signs that the system is trying to boot, then this is a great sign. In this case, you can avoid costs and solve the problem yourself.
Reason 1: Error starting explorer.exe
If the system boots, but you only see a black screen and a cursor, then the problem arose when the explorer.exe process was launched, which is responsible for loading the graphical shell. Here you can either start the process manually or perform a system rollback - at your discretion.
Launch operating system V safe mode- one of the most common ways to diagnose problems. Previously, you could get into safe mode by clicking on boot, but this triggers automatic recovery. What if you need safe mode?It's still possible to boot into safe mode, but you'll have to dig into the settings to do so. Windows recovery 8. The key now launches automatic recovery, but if you click + instead when loading, it becomes possible to manually select recovery options. However, it’s even easier to hold down and select the “Restart” command in Windows itself or on the login screen.
There are several ways to get into safe mode - it all depends on whether the system boots and whether you can enter it. Let's start with the simplest.
If the login screen is available

If the boot successfully reaches the login screen, you can hold down the key and select the “Reboot” option from the shutdown menu. The Diagnostic Tools screen will appear, allowing you to enter Safe Mode. How exactly - read below.
If the system does not boot, but there is a recovery disk

If you have another computer on hand with the same version of Windows, you can create a USB recovery drive and boot the faulty PC from it to access diagnostic tools, including safe mode (more below).
If the login screen is not available
If the boot doesn't even get to the login screen, a recovery screen will usually appear automatically. If this does not happen, try holding down the key while loading and press until it boots new mode recovery. When the recovery screen appears, click the Advanced Options button.
The problem is that this screen does not always appear. Many computers, especially new ones, do not display it.

Using advanced options to boot into Safe Mode
Whichever of the described methods you use, on the recovery screen that appears, click the “Troubleshoot” button.

Now select Advanced Options.


Finally, click the Restart button.

After the reboot, by some miracle, the familiar boot options screen will appear, where you can select Safe Mode.

Launching Safe Mode directly from Windows 8
There is another way to get into safe mode, but it will only work if Windows is already loaded. Press the +[R] keys, enter the command “msconfig” (without quotes) in the window that appears and press .

In the window that opens, go to the “Boot” tab and check the “Safe Boot” checkbox.

You can also select options secure boot:
"Minimal"– normal safe mode.
"Alternate Shell"– safe mode with command line.
"Recovery Active Directory» (Active Directory repair)– safe mode for restoring a server that is a domain controller in local network.
"Network"– safe mode with network connection.
Once you have selected the option you want, click OK and restart your computer.

The system will automatically boot into safe mode.
OS name: Microsoft Windows 8.1
Official website: www.microsoft.com
Developer:
Interface language: Russian, English, etc.
Treatment: Required.
System Requirements: ()
Processor: 1 GHz or higher supporting PAE, NX and SSE2
RAM: 1 GB (32-bit) or 2 GB (64-bit)
Free space Hard disk space: 16 GB (32-bit) or 20 GB (64-bit)
Graphics card: Microsoft DirectX 9 with WDDM driver
Screen resolution min: 1024 x 768 pixels
Internet access (fees may apply)
Some functions require account Microsoft
Official way to download original for free ISO image Windows 8.1 from Microsoft website.
Where can I download the original Windows 8.1 image for free?
 For owners genuine Windows 7, 8, 8.1 and 10.
Many users wonder - Where can I download the original Windows 8.1 image for free?
You can find it on many websites on the Internet Pirate builds Windows, which have a changed theme, disabled, removed or changed functions, images built into the system, signatures of the authors of assemblies, preinstalled programs and other applications that the user will not need.
How to download the original Windows 8.1 image for free
Attention! Our instructions (read below) were released at a time when it was possible to download a Windows 8.1 image from the Microsoft website only in this way, namely “Download the tool”. Now it’s even easier, you don’t need to download anything first, just select the edition you need and download it to your computer!
- First, you need to go to the Microsoft website, to the download page software Window 8.1 download and click “Download tool” (Fig. 1).
 Fig.1
Fig.1 - The file will be downloaded to your computer (Fig. 2) Media Creation Tool- This proprietary utility from Microsoft Corporation, allowing you to create boot images Windows 8.1 operating system directly from the company server.
 Fig.2
Fig.2 This program has greatly simplified getting the version of Windows OS you need, without requiring complex settings and providing the ability to select the required architecture.
 Fig.3
Fig.3 - After launching the utility, select the OS language (Fig. 3), edition type (home, Pro, etc.) (Fig. 4) and architecture (32-bit or 64-bit) (Fig. 5).
 Fig.4
Fig.4  Fig.5
Fig.5 - Next, when we decided on the choice of operating system, in this case we chose, language - Russian, bit depth X-64. (Fig.6)
 Fig.6
Fig.6 - Select the location on the computer where we save the operating system image. If you have a USB flash drive inserted, you can immediately write to it (Fig. 7). At selecting USB flash drive The bootable USB flash drive will be created without a preliminary ISO image. A bootable flash drive prepared in this way can be used at any time, on any computer, to update or.
 Fig.7
Fig.7 - To burn an image to DVD disc, or simply save the original image of Windows 8.1 on your computer, select step 2 - ISO file(Fig.8)
 Fig.8
Fig.8 - Select where we want to save the ISO image (Fig. 9)
 Fig.9
Fig.9 - Click “Save”, then the original will be downloaded Windows images 8.1 (Fig. 10, 11, 12). It will take some time for the image to be completely downloaded from the Microsoft website to your computer, it all depends on your Internet speed. By the way, you can check your Internet speed.
 Fig.10
  Fig.11
  Fig.12
 - When the image is completely downloaded, the following window will appear (Fig. 13), where you can click “Finish”.
 Fig.13
 - You can insert a blank DVD into your drive to immediately burn Windows 8.1 to a disc (you need to click " Open DVD burner") (Fig. 14). Thus, the disc you record will be no different from a licensed disc purchased in a store.
The only thing you will need during the installation process is key product to yours Windows versions, and after installation Activation of the system itself.
 Fig.14
 - Now that you have original image of Windows 8.1 Professional, written to disk or made a bootable USB flash drive, and of course the purchased key, plus activation in your name, you can safely install the fresh original Windows 8.1 operating system.
Attention! If you are installing the operating system for the first time, you will need a Windows product key (xxxxx-xxxxx-xxxxx-xxxxx-xxxxx), which you purchase from the Microsoft website (License Key).
System Description:
(formerly known as " Windows Blue") is a comprehensive update for Windows 8. In the new Microsoft versions does not deviate from the Modern UI interface (the correct name for the interface previously called Metro). Windows 8.1 adds to user interface There are plenty of tweaks, along with some new and updated apps, all to help users enjoy the new Windows environment longer.
Additional information:
Additional information:
Windows 8.1 features a familiar desktop with a taskbar and Start button, plus a stylish new Start screen where you can add your favorite apps, people, and sites for one-tap access.
In addition, you will be able to use the built-in cloud storage, allowing you to access photos and files anywhere and anytime, enjoy convenient full screen viewing With Internet Explorer 11 and an exclusive collection of built-in apps like Photos and Mail. More apps can be downloaded from the Windows Store.
- What's new:
Quick Start: We've brought back the Start button to the desktop - tap or click to go to the Start screen. If you like, you can switch to the desktop immediately after you turn on your computer, or use the same background for your desktop and start screen. You can also go to the list of all downloaded applications. - Smart Search:
Bing Smart Search searches everywhere at once—the web, settings, files, and apps on your device—and lets you quickly jump to results. Play a song, call a friend, open an app or your favorite website. (Not all features are available in some regions.) - Get more done:
Chat while gaming, shop while watching a movie, and work while listening to music. Depending on your screen size, you can open up to four apps at once and easily switch between them. - Download more apps:
In the updated Windows Store you'll find apps built specifically for Windows 8.1 and new recommendations. This update also includes new pre-installed apps like Reading List and Cooking. Now you can install apps on all your Windows 8.1 tablets and computers. - All files at hand:
Automatically save documents, photos and other files to SkyDrive so they're always at your fingertips wherever you are, from any device. They will never be lost, even if something happens to your device. - Enjoy surfing:
Internet Explorer 11 loads websites faster, allowing you to full screen mode open two sites, place them side by side and view them simultaneously. Also new browser Notifies you about updates to your favorite sites right on the home screen.
Can't boot Windows 8 or Windows 8.1 in Safe Mode? Are you pressing F8 or Shift+F8 but it doesn't do anything? Loading the new operating system from Microsoft has become so fast that it is not always possible to interrupt it with keystrokes.
You can login securely Windows mode 8 or 8.1 5 in different ways, any of them will allow you to run the system on Windows 8-8.1 safely!
Safe Mode in Windows 8 and Windows 8.1 is practically no different from that in earlier versions of the OS.
The operating system still loads only the most basic drivers and services. The only noticeable difference is that the minimum screen resolution in Safe Mode has increased from 800x600 pixels to 1024x768 pixels.
1. Use the System Configuration tool (Msconfig.exe)
As with , the easiest way to boot into Safe Mode is to use the System Configuration program, also known as msconfig.exe.
Launch it, go to the “Boot” tab and in the boot options activate the “Safe Mode” option. Then click on the "OK" button.
Next, you will see a message stating that you need to restart your computer. Click Restart or Quit Without Reboot, depending on whether you want the computer to restart now or later.

The next time you start Windows 8 (Windows 8.1), it will boot into Safe Mode.
2. Use the combination Shift + Restart
Click the power button on the Windows login screen or in the Settings Charm. Then press and hold the SHIFT button on your keyboard and click Restart.

Windows will prompt you to select an option. Select "Diagnostics".

On the Diagnostics screen, click the Advanced Options button.

On the More Options screen, click Boot Options.


When your computer restarts, a list of 9 options will appear on the screen, including three types of Safe Mode.

Press F4 on your keyboard to enable Safe Mode, F5 to enable Safe Mode with support network drivers and F6 to enable safe mode with support command line. After this, Windows 8/Windows 8.1 will be downloaded according to your selection.
3. Boot into safe mode using CD/DVD to restore system (Windows 8 only)

On Windows 8, but not Windows 8.1, you can . So, if you have such a disk, you can boot from it.
After booting from the recovery disk, you will be prompted to select a keyboard layout. Select the one you want to use. You will then see the options screen. All further steps will be identical to those described in method 2.
4. Boot into USB Safe Mode to Restore System

Windows 8 and Windows 8.1 allow . Detailed instructions can be found at the link. Using such a disk you can also boot the OS in safe mode. To do this, boot from your System Recovery USB drive and follow the instructions from the previous method.
5. Use F8 or Shift + F8 (does not work when using UEFI BIOS and SSD)
In the case of Windows 7, just press F8 just before starting the operating system to get to the menu with additional options download, from where you can already boot the operating system in safe mode.

For Windows 8 and 8.1, some sites advise using the keyboard shortcut Shift + F8, which launches recovery mode, allowing you to boot into safe mode. However, the problem is that neither Shift + F8 nor just F8 often work.
In a post on its official blog, Microsoft explains that this behavior is due to the very fast boot process. Steve Sinofsky once said: “Windows 8 has a problem. It loads too quickly, so quickly that you don't actually have time to interrupt it when you turn on your PC. The operating system simply does not have time to detect pressing the F2 or F8 keys.”
In general, if you have modern computer With UEFI BIOS and SSD, you are unlikely to be able to interrupt the boot process with keystrokes. On older PCs with a classic BIOS and no SSD, pressing these keys still works.
Have a great day!
The Windows 8 recovery disk or Windows 8.1 recovery disk is designed to troubleshoot problems with the operating system when the computer cannot boot. From the recovery disk, recovery tools are launched to carry out work to restore Windows functionality.
While working on a computer, sometimes problems arise due to various reasons. Malfunctions occur due to abnormal operation of equipment, software errors, and, perhaps most common reason: incorrect user actions.
If serious problems occur, the user can launch system recovery in different ways:
- Recovery system files and settings using previously created system restore points.
- Restoring your computer (Refresh) without deleting personal data.
- Removing all data and reinstalling (Reset) Windows.
These recovery options are launched directly from the operating system. If impossible Windows startup, it is possible to start recovery by booting from bootable flash drive or with DVD disc with the operating system image, and if the user does not have Windows image, then booting from the recovery disk.
An installation DVD or bootable USB flash drive with Windows 8.1 (Windows 8) can also be used as a recovery disk by entering the operating system recovery environment.
You will need a Windows 8.1 system repair disc in the following cases:
- the user does not have installation disk or a bootable USB flash drive with the Windows1 operating system (Windows 8);
- in case of a serious computer failure;
- if impossible Windows boot.
After booting from the recovery disk, using the recovery tools, the user can carry out the necessary troubleshooting work on the computer.
Creating a Windows 8.1 Recovery Disc
The user can independently create a Windows 8.1 recovery disk and burn it to a USB flash drive.
When creating a Windows 8.1 recovery disc, follow these steps:
- Go to “Settings”, then click on “Control Panel”.
- Enter "Recovery", select "Create a recovery disk".
- The next window asks you to copy the recovery partition from your computer to the recovery drive. If such a partition exists on the computer, the user can check the box next to “Copy recovery partition from computer to recovery disk” in order to use it to restore or return the computer to initial state.
- Click on the "Next" button.

- The application will check your computer for connected drives. In Windows 8, it is possible to burn to a CD/DVD disc (to do this, you will need to run another application); in Windows 8.1, a recovery disk is created only on a flash drive.
- Then a window opens with available drives. Select required disk with USB drive. The size of the flash drive must be at least 256 MB, all information from USB devices will be deleted.

- Agree to delete all data from the flash drive. Transfer data (if any) from the USB device to another drive in advance.
- Click on the “Create” button.
- Next, the service files are formatted and copied.
- The recovery disk is ready, click on the “Finish” button.

Remove the USB flash drive containing the Windows 8.1 recovery disc from the computer.
A bootable USB flash drive with a Windows 8.1 system recovery disk has been created. Now, in the event of an operating system failure, the user will have a chance to return the computer to working condition.
Windows 8.1 bootable USB flash drive for system recovery
Now let's see how to start recovery in Windows 8.1 from the installation disk or from a bootable USB flash drive. The recovery disk (not the installation disk) will start in a similar way, only without the windows for installing Windows 8.
Select in the BIOS or UEFI the priority for booting the system from the connected disk ( USB storage or DVD disc), or directly enter the boot menu to launch the disc from there.
In the window " Windows installation 8" click on the "Next" button. Here, by default, the language and keyboard layout are already selected correctly.

In the next window, click on “System Restore”.

The “Select Action” window offers two action options:
- Diagnostics - system recovery, returning the computer to its original state, or using additional tools.
- Turn off your computer.
Select Diagnostics.

The Diagnostics window offers the following actions:
- Restore - restore the system while preserving personal files.
- Reset to original state - reinstallation of the system with loss of personal data.
- Advanced options - use other recovery tools.
Select Advanced Options.

The following system recovery tools are available in the Advanced Options window:
- System Restore - restore Windows using previously created restore points.
- System image recovery - restores Windows using a previously created backup system image.
- Startup Repair - fixes a glitch that prevents the operating system from loading.
- Command Prompt - Launch a command prompt to troubleshoot problems.
Choose the right tool to solve your computer problem.

Conclusions of the article
User can create boot disk Windows 8.1 (Windows 8) recovery, which will help you run system recovery tools if serious problems occur with your computer or Windows cannot start.