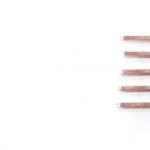
light manager. The moment you receive a letter or message, your phone will try to get your attention with a built-in indicator. But by the flickering of the LED, you will never determine what kind of event has occurred, and you still have to take it in your hands. Until you install Light Manager.
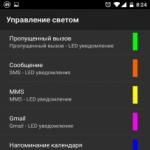
Light Manager is an Android program that will help you customize your gadget's LED indicator. With this application, you will teach it to react with different colors to certain events, such as a new WhatsApp message or an event from your calendar.
By default, the program already contains a number of settings for the most popular events. But you can at any time delete the signals that are irrelevant to you and add the necessary ones. To do this, simply touch the desired element, and you will be taken to the notification settings menu. Here you can set the blink rate, choose the color of the LED and immediately check the settings you have set in action.
If the program you want to receive notifications from is not in the list, you can add it yourself. To do this, switch to the alternative mode of operation of Light Manager, and then select the "Add application" item. You will see a list of all programs installed on your smartphone. Select the desired app and add an LED notification for it.
Please note that Light Manager can report not only about program events, but also about various system events. For example, the app can notify you when your battery is low, there is no network signal, or the silent mode is on. It will not be superfluous to also look into the advanced settings of the program, where you can set the signal flicker frequency, enable sleep mode (the time of day when the Light Manager will not disturb you) and change the time for the automatic shutdown of the LED activity.
Setting the LED indicator for notifications of various events:
Download the Light Manager app for Android you can follow the link below.
Developer: MC Koo
Platform: Android ( Device dependent)
Interface language: Russian (RUS)
Condition: Full (Full version)
Root: Not needed
Was in an electronics store the other day. Sometimes various used radio components at a low price appear in it. This time I saw a microcircuit, as it cost a penny, I bought it without hesitation. I decided to make a simple mono signal indicator. Why mono and not stereo? Because there is only one chip. I'll finish the second channel later...
Having printed the diagram on glossy paper using a laser printer, we will proceed to transfer the toner (ink) to the board. We do this as follows: we put the paper on a board well cleaned with sandpaper and run it over the board with a heated iron for 10 minutes. We wait until the board cools down and carefully remove the paper under hot water. You should get the following:

Then we poison the board in ferric chloride. About an hour later, my board was completely etched. With the help of a solvent, we get rid of the paint and with sandpaper we give the board a more rectangular look.

We're making a payment. After we start soldering the parts. First soldered the chip. After the LEDs, and then the rest of the details. Photo of the finished board:

Circuit operation
Briefly describe the purpose of the parts. Using R2, we adjust the input signal level. Through the capacitor C1, the signal is fed to the base of the transistor VT1, which serves as an amplifier. Resistor R3 sets the bias to the base of the transistor. Further, the amplified signal through the capacitor C2 "comes" to the diodes VD1 and VD2.

A negative signal goes to minus, a positive signal goes to pin 5 of the microcircuit. C3 and R4 serve as a filter. The higher the voltage on pin 5, the more LEDs will light up. By the way, if you close the 9th leg to a plus, the LEDs will light up linearly. On the video you can see how this thing works.
Video of the LED indicator
It does not allow you to directly turn on / off the LED indicator or the camera flash, some phones have this option.
How to programmatically blink multi-colored lights, how to write your own "Flashlight" or what other device LEDs you can control - you will learn about this below.
It all started with the fact that, while exploring the file system of my HTC Desire using ES Explorer, I accidentally stumbled upon curious directories: /sys/class/leds/blue , /sys/class/leds/flashlight, etc.
What else blue?! I only saw an orange and green indicator. But the most interesting thing is that inside these directories there was a brightness file with write permission! Which I immediately took advantage of.
In fact, this is not a simple file, but an interface for working with an LED driver. So, by writing a positive number to the /sys/class/leds/blue/brightness file, we will turn on the blue indicator on the phone case, writing 0 will turn it off. Similarly with indicators amber and green. By turning on two LEDs together, we get new colors: amber + blue = purple; green + blue = aqua.
And now how is it all programmed
public void ledControl(String name, int brightness) (try(
FileWriter fw = new FileWriter("/sys/class/leds/" + name + "/brightness" );
fw.write(Integer.toString(brightness));
fw.close();
) catch (Exception e) (
// LED control is not available
}
}
// Turn on the magenta indicator
ledControl("amber" , 255 );
ledControl("blue" , 255 );
// Make the display darker
ledControl("lcd-backlight" , 30 );
// Turn off the button backlight
ledControl("button-backlight" , 0 );
// Organize a flashlight of medium brightness
ledControl("flashlight" , 128 );
An example application with source codes can be downloaded.
Conclusion
All! Now the phone glows like a Christmas tree. The code has only been tested on HTC Desire running Android 2.2, but it could probably work on other devices as well. Write to me if the focus on your phone will work or not.Back in 2014, Nokia installed LED indicators in the Lumia 730/735. Now Windows 10 Mobile already supports LEDs, but smartphones have not yet received a firmware update that includes this feature. That is why many users will want to activate it themselves.
How to turn on the LED indicator on your Nokia Lumia 730/735?
The principle of operation is the same as with. You will need to install a CAB file on your smartphone, then do Interop Unlock and add several values \u200b\u200bto the registry.
A warning: following these instructions can lead to a variety of consequences. We are not responsible for what you can do with your smartphone, and we are not responsible for any damage caused to your smartphone.
Warning 2: it will be possible to return the smartphone to its original state only using the Windows Device Recovery Tool. Resetting the settings will only reset the registry values, but all drivers will remain in the system.
The indication will definitely work only in Lumia 730 and 735! Better not try to "turn on" it on other models, if you are not sure of its existence.
- Download . Unpack it and run the installation package.
- Download .
- Connect your phone to your computer.
- Press Win + X and launch Command Prompt with administrator privileges. Depending on the bitness of your OS, enter one of the following commands:
64-bit: CD C:\Program Files (x86)\Windows Kits\10\Tools\Bin\i386
32-bit: CD C:\Program Files\Windows Kits\10\Tools\Bin\i386 - Don't close the command line.
- Copy the address of the cab file folder that you downloaded from the Microsoft Update Catalog. Important: note that the file must be in a separate folder, without any other files. The folder name must not contain spaces or Cyrillic letters.
- Go back to the command prompt and type the following without the square brackets:
iutool-v-p [address of folder with cab file that you copied from the previous paragraph] - If you did everything correctly, the smartphone will reboot and start installing updates. This will take no more than 10 minutes. In no case do not touch the smartphone and do not disconnect it from the PC until the end of the process.
- Now do Interop Unlock according to the instructions "". If you already have it, skip this step.
- Download the registry file for your device and place it on your SD card. The file for Lumia 730/735 is .
- Login to the app Interop Tools, select This device, then Import Registry File.
- Select the file you just downloaded, agree to import. If an error occurs, try installing older versions of Interop Tools.
- Restart your smartphone.
After performing these actions in the notification settings for programs ( Settings - System - Notifications and actions - Application) a checkmark will appear, including LED indicator for them. By default, the LED will blink when a notification is received from any app and turn off after viewing the notification.
How to set up the LED indicator?
- Go to Interop Tools, select This device, then in the hamburger menu Registry Browser.
- Go to branch HKEY_LOCAL_MACHINE\SOFTWARE\Microsoft\Shell\Nocontrol\LedAlert. 3 keys are used to set up the indicator: Intensity, period and Cyclecount. The first parameter controls the brightness of the diode, the second - the duration of one flash in milliseconds, the third - the number of flashes. You can try editing these values.
Please note that there are limits that should not be exceeded.
- Intensity: 0 to 100.
- Cyclecount: 1 to 2147483647.
How to enable LED indication on Lumia 830?
On the Lumia 830, you can turn off the backlighting of the hardware buttons, instead making the central button (Start) blink when receiving notifications.
To do this, follow all the instructions described above, and then:
- Go to Interop Tools, select This device, then in the hamburger menu Registry Browser.
- Go to branch HKEY_LOCAL_MACHINE\SOFTWARE\ OEM\Nokia\Display\ColorAndLight.
- Change the parameter value UserSettingKeyLightEnabled on the 0 .
- Restart your smartphone.
When you update the system, all the functionality associated with LED notifications does not disappear. After resetting the settings, you will need to re-enter the values in the registry.
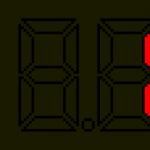
Display symbols on scoreboards, digital clocks and more. An LED indicator is a simple design that displays alphabetic or symbolic characters. Structurally, it is an assembly of LEDs, where each element illuminates a sign-segment indicator.
Design features and types
LED indicators consist of integrated circuits that display various information. Operating voltage ranges from 2V to 8V. They may be:
Segment;
- Matrix;
- Linear scale;
- Single
The first variety is used most often and is the standard type. Depending on the model, the assembly of the structure can be made from 1-4 seven-segment groups. The size of the object, the number of displayed characters depend on their number. So, one seven-segment group will show only one number or letter. Four groups are used in electronic watches. When choosing a circuit for home-made use, the buyer should pay attention to the presence of a common anode and cathode.
In addition to small indicators, there are those that can be seen in public places. To increase their brightness, series-connected LEDs built into each individual component are used. In order for the indicator to show a certain number or symbol, a voltage of 11.2 Volts is applied. The elements have their own names: A, B, C, D, F or G. Operation is due to digital shift registers and decoders.
Data encryption and integrated circuits
Such elements are installed on a board that controls the voltage supply. The work is due to the appeal to the program code and the use of special microcontrollers. Through programming, the timing is set, which affects the display of components at a certain time.
The integrated microcircuit converts the binary and binary-decimal code supplied to the scoreboard. Common schemes for controlling domestic indicators are K514ID2 or K176ID2, in imported models 74HC595. Management is possible in two ways:
Directly, through microcontrollers;
- Using shift registers
The first option is less successful due to the need to connect many pins. In addition, the current consumption can be higher than is possible with microcontrollers. Large seven-segment indicators depend on the MBI5026 chip.
Features of segment indicators
In electronics, they are used for visual inspection. The design consists of the following elements:
A sign-synthesizing indicator is a device in which visual information is displayed using one or more components;
- Data display field - numbers or other symbols are displayed within it;
- Display element - a constructive part with its own control;
- Segment - an element of information display, presented in the form of straight or curved lines;
- Familiarity - the space required to display one character
All electronic devices perform the main tasks:
1. Visual information.
2. They have a complete design.
3. Equipped with electronic control
Segment modifications differ from matrix modifications in that each element is unique. The shape of the characters is designed specifically to display certain numbers or characters. The latter are not based on seven, but on nine, fourteen or sixteen segments. When the number exceeds 7, it is reasonable to use dynamic switching indication. LED display, indication is also possible in two-colour form. Light bulbs of different colors are used and connected to the general circuit. By combining the conclusions, a combined shade is obtained.
Conclusion
Indicators cannot work without LEDs. Such devices are relevant not only for radio equipment, but are successfully used for signs, timers and signs. As a display of information, devices of various types of circuit and control can be used.
Share information on your pages on social networks regarding this topic.