Despite the abundance of applications for Android devices, some users may be interested in running familiar Windows programs on their device. One of the most obvious ways to do this is to install an emulator of the desired operating system.
A QEMU
On at the moment There are three most stable WinOS emulators for Android. QEMU is the fastest, but also crash-prone choice. Among other things, it will allow you to run a shell similar to Windows 95 or 98, that is, no modern frills. To launch we will need the files SDLapp.apk (install), SDL.zip (unpack to sdcard), as well as an OS image in *.img format (for example Windows 95 or Windows 98). We put the latter in the “SDL” folder of the sdcard directory. We directly launch Windows via SDLapp.apk. Among other things, it is worth mentioning that the Win95 image works better and is more adapted to interact with touch screens, however, QEMU emulation does not have sound, network support, and work on further development of the project has been stopped.
Windows applications on Android – emulator BOCHS
Slow, clumsy, but reliable and stable emulator that supports Windows startup XP (in theory, you can run any i386 OS). It is installed by analogy with the first point: download and run Bochs2_5_1.apk, unpack SDL_for_BOCHS.zip into the SDL folder on the sdcard, and put the operating system image in it (QEMU will not work). We launch through the application installed first. This emulator supports access directly to the data storage of your Android device, making it easy to launch games and programs for Windows. However, BOCHS still does not have a network connection. In addition, on weak devices the emulator can take several tens of minutes to load.
Windows applications on Android – emulator aDOSBox and others
In addition to Windows images, this emulator will help you run old games designed for DOS. To install on Android, take aDosBox-v0.2.5.apk, install, unpack
At the moment, unfortunately, most Windows emulators provide much less functionality than the original systems. They run old games perfectly, but other than that their functionality is very limited.
Wine, which allows you to run Windows applications on Linux and UNIX systems, has been around for more than twenty years. The latest versions of Wine cope with this task so well that it can be used to work with most popular applications and play almost all games that support DirectX 9. Wine has recently appeared for Android - a commercial version of CrossOver. And we, of course, could not ignore this event.
Wine is a recursive acronym for Wine Is Not an Emulator. And it's really true: Wine is an alternative implementation of the Win32 API written from scratch. CrossOver is a commercial version of Wine that is designed to run primarily Microsoft Office and games for Windows on UNIX-compatible systems and provides all the necessary optimizations and compatibility settings for this. In CrossOver, applications often work more stable and require less fiddling with settings. In other words, CrossOver is an improved Wine. And expensive: the developers are asking $50 for it.
In 2013, one of the Wine developers, Alexandre Julliard, demonstrated a preliminary version at the Free and Open source Software Developers’ European Meeting. software for mobile operating room Android systems, which makes it possible to run a variety of Windows applications. Portable devices with an Intel x86 processor and there was practically no Android on board at that time, so the project was interesting solely as a proof of concept.
However, the story did not end there. In October 2015, CodeWaves opened registration for testing CrossOver for Android, where I happily signed up. The release was planned for the end of 2015. But there was no news either at the end of 2015 or at the beginning of 2016. The beta version appeared only on August 25, 2016 and is currently only available to testers. Moreover, immediately in the version for Android and for devices with Chrome OS (which have Play Market).

So, in this article we will look at what CrossOver for Android is.
Test computer characteristics:
- CPU: Intel Core i5 4200H
- Video processor: Intel HD Graphic 4600
- RAM: 8 GB (1600 MHz)
- Disk: SSD ADATA Premier Pro SP920 256 GB (22 GB allocated for Android)
- CrossOver: 15.5.0 alpha4
1 Desk

Desk
Immediately after launch, we are presented with a desktop with a blue background. At the bottom is the “Start” button, in the upper left corner is the inscription CrossOver, and in the upper right is the main Install Application button. After clicking on it, a window will open with the choice of application. Moreover, there are only four programs in the list itself: Steam, MS Office 2007 and 2010, WinZip 14.0, which is depressing. But it’s enough to uncheck the Only know-good applications box, and a list of more than a hundred programs and games will appear before us.
Many of them can be installed via the Install button, but some will still have to be downloaded separately. You can find some pretty interesting games on the list: Bioshock Infinite, Tomb Raider 2013, Star Wars: Battlefront, World of Tanks, Dota 2, Batman Arkham City... Among the programs there are Adobe Photoshop CS3, Adobe Acrobat Reader XI, Autocad 2013, Total Commander. The links contain those versions that should definitely work.
All programs run in windows. But if you wish, you can collapse them into the task bar, like in Windows. There is also a tray; some programs can be minimized there and run in the background. Quantity at one time running applications, apparently limited by the amount of RAM on the device.

The integration with Android OS is amazing. For example, you can open a browser and run YouTube video, press the Home button and playback will continue in the background. The clipboard is shared. You can copy text in the Android app and paste it into text editor, running in CrossOver.
If you go to “Start → Control Panel”, then there we will find interesting items:
- Game controllers. Setting up joysticks and switching between them.
- Internet settings. Setting up a home page for the browser (there is no browser itself in CrossOver, but there is an HTML engine that applications can use to display web pages), managing history, cache, cookies. There is also certificate management and security settings for different types Internet connections.
- Installing/removing programs. The name speaks for itself.

The “Start → Run…” command does the same thing as pressing Win + R in Windows itself, that is, it opens the launch bar. The regedit command will open the registry editor (yes, there is a full-fledged registry), cmd will open the command line (bat files work), explorer is primitive file manager.


2 Application tests

- Steam. CrossOver offers to install it immediately after launch. Works great, without freezes or lags. You can watch, download, buy any game. Which of them will work is a big question. So you'll have to try.
- Notepad++. The x64 version could not be installed. There is no support for x64 programs here. But the version for Windows x32 worked just like on Windows... No problems with plugins or settings. Only on devices with a very small touch screen there will be serious difficulties with control.
- SMath Studio. Requires NET Framework 2.0, after installation it launches successfully, although it has problems with graphics: they are not displayed mathematical signs and mesh. But all calculations can be done.
- Total Commander. The version from the official website could not be launched. But the version from the CrossOver repository (unfortunately, this is not the latest 8.52a) worked perfectly.
- GPU-Z And CPU-Z didn't earn any money.
- AIDA64 gave an error during installation.
- It was not possible to install the version from the site (5.36), but version 3.16.166 was installed from the repository (it’s the only one there) and even found some garbage.
- Firefox version 47.02 worked great, but after updating to version 49 it stopped running.
- LibreOffice. Latest version It was installed from the official website and started working without any problems.
Support for MS Office 2010 has been officially announced. And in the repository you can even find the 2013 version (based on experience, I will say that the 2016 office is unlikely to work). Also, Mathcad, Wolfram Mathematica and other complex applications that are highly integrated into the system will not work yet.

WOT Blitz from Steam failed to launch, although the native version of the game for Android worked perfectly. Desktop installer World versions Of Tanks also failed to launch. And the version offered for installation by CrossOver itself is intended for European server. By the way, even in it I could not find the “Install” button in the installer.

3 Settings

Graphics Settings
You can open the settings by clicking on “Start → Builtin Tools → Wine Configuration”. Everything here is exactly the same as in standard Wine for Linux:
- Applications. Here you can select the version of Windows OS that CrossOver will transfer to the application for its identification. The choice is available both for each application individually and for all at once. You can install all versions from Windows 2.0 to Windows 10! Windows XP is installed by default. After switching to Windows 10, Steam stopped working. No other changes were noticed. Windows version settings can be applied on a per-application basis.
- Libraries. Standard settings Windows DLLs. For each library, there is a choice of two versions: “Built-in (Wine)” and “Third-Party (Windows)”. The point here is that Wine's built-in libraries are often not fully implemented and may not be compatible with some applications. In this case, you can download the native Wine library, put it in the C:\windows virtual folder and select this library as a third-party one. You can find out which libraries certain applications and games may require in the Wine database of compatible applications.
- Graphics. There are settings for the font, mouse interception by windows, as well as some other graphics parameters.
- View and integration. There are theme settings here (however, there are no themes in the built-in directory at all). And here you can independently configure many parameters, for example, desktop color, window frames, font. In fact, it is a tool for creating your own themes. Also here you can change the folders used for documents, music, pictures, videos. By default, they are very interestingly integrated with the Android environment. I don't even want to change.
- Disks. Creating and editing virtual disks. By default, there is a C drive (system drive, located somewhere inside the application itself) and a Z drive, which refers to the root directory (/). So, if you need to install an application from a memory card, you need to open the Z:\sdcard folder.
- Audio. Configuring audio input and output devices and testing their operation.
Also in the Builtin Tools menu you can find:
- Command Shell- command line. True, it has almost no functions;
- Notepad- notepad from Windows;
- File Explorer- a primitive file manager.

4 Problems
- CrossOver can only run on x86 processors. So even the most powerful devices on ARM in flight.
- There is no support for x64 programs, despite the fact that there is a version of Android for x64 processors.
- There is no support for full-screen mode for all applications (it is not known how to remove the line with the name CrossOver and the point to go to the application repository).
- Support for DirectX 9 only. In the near future, the developers promise to add support for DirectX 10 and 11. But DirectX 12 is unlikely to be available at all in the coming years.
- Memory capacity - the same MS Office occupies about 3 GB on disk. And if you install Adobe Photoshop, Audition, Mathcad, then there will be too little space left. Even in a device with 32 GB of memory.
- Most of the programs available through the CrossOver catalog are on English and/or are European versions without Russian localization, linked to Euroservers.
- No task manager. This makes it somewhat difficult to manage processes.
- Joystick emulations, as, for example, on emulators game consoles, No. So on devices with a touch screen without a joystick, it’s unlikely that you’ll be able to play anything.
- Multi-window mode only works within CrossOver. So there is no optimization for Remix OS and Chrome OS yet.
5 Conclusion
The Wine project for Android is now, unfortunately, unlikely to replace devices based on desktop Windows. But you can run some useful and interesting applications. The project is still in the closed beta test stage, so by release, I think, many of the shortcomings will be eliminated, and the list of working programs will expand several times. We can also hope that the release will include support for DirectX 10/11 and Vulkan API.
The only thing that darkens the picture is that on a mobile device, desktop applications are not that much use. And you can only play games if you have a joystick or a mouse with a keyboard. Added even more fuel to the fire Intel company, when it left the smartphone market.
Technology platform Android applications turned out to be universal and developer-friendly. You can develop an Android application and publish it on the store Google Play with minimal restrictions. This concept has led to the rapid development of popular Android applications, some of which are not available on iOS and other platforms. To run an Android application, you usually need to use a smartphone or tablet with this OS - this is obvious. What to do if you want to try using Android without buying a device?
Fortunately, you have this opportunity; Android can be run even on an old desktop computer. There are several ways to accomplish this task, each of which has its own advantages and disadvantages.
Perhaps the easiest way to run Andoid apps on a Windows computer is to use the ARC Welder browser app Google Chrome. The application was developed by Google and can be used not only on Windows computers - this method Works also on Chromebooks and Macs. The launch process is practically independent of the platform used. Just go to the Chrome Web Store and install the ARC Welder app from the catalog.
The ARC Welder application is in beta and is intended primarily for developers. However, the process of downloading the app is quite simple. You need to upload the APK file to ARC Welder. The APK file can be obtained using backup applications on physical Android device or by downloading from various third party sites on the Internet. We do not recommend downloading paid applications and games from dubious sites. There are resources that archive free apps, such as APK Mirror.
Once the required APK file is downloaded and ready for download, you can open ARC Welder from the list of extensions in Google Chrome and point to the file. Then you need to choose how to display applications - landscape/portrait mode, smartphone/tablet mode and clipboard access method. Not every Android application will launch this way, and some applications may lose some of their functionality. ARC Welder unfortunately does not have native support at the moment Google services Play (if you are not an application developer and do not have access to the source code), so Google apps and some third party applications will refuse to work.
Applications or games that run in ARC generally run smoothly. You can get full functionality from Evernote, Instagram and even Flappy Bird. You can only have one application installed in ARC Welder at a time; to launch another application you need to return to the installation dialog.
The application deployment process and the limitation of running only one application at a time create barriers to everyday use tool. However, the extension is suitable for the needs of developers and testers, or simply to get acquainted with the capabilities of the mobile platform.
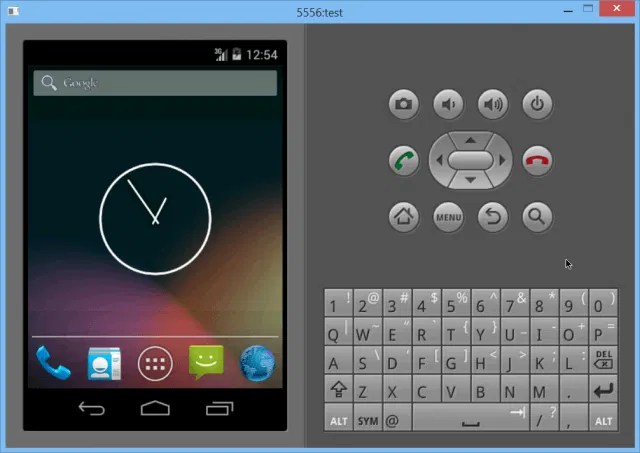
The next easiest way to run Android apps on a PC is to use an Android emulator developed by Google as part of its software development kit (SDK). The emulator can be used to create virtual devices with any version of Android on board with different screen resolutions and hardware configurations. The first disadvantage this method can be called a rather complex installation and configuration process.
Neither product is perfect - you need devices supported by the tools, such as the Dell XPS 12 in the case of the Intel version or the Lenovo ThinkPad x61 for Android-x86. You can install these environments on top of Windows, but this is not a good idea. The smartest way is to create a separate hard drive partition and install Android on it.
If your PC configuration is not supported by these products, you can try installing them in VirtualBox or VMware virtualization environments, which are faster than Android emulator. These products may still not be suitable for testing games, but most applications will install and work correctly. You will need to install applications yourself, because... There is no Google Play integration in these products. For help, you can use the instructions on our website - Installing Android in VMware Workstation.
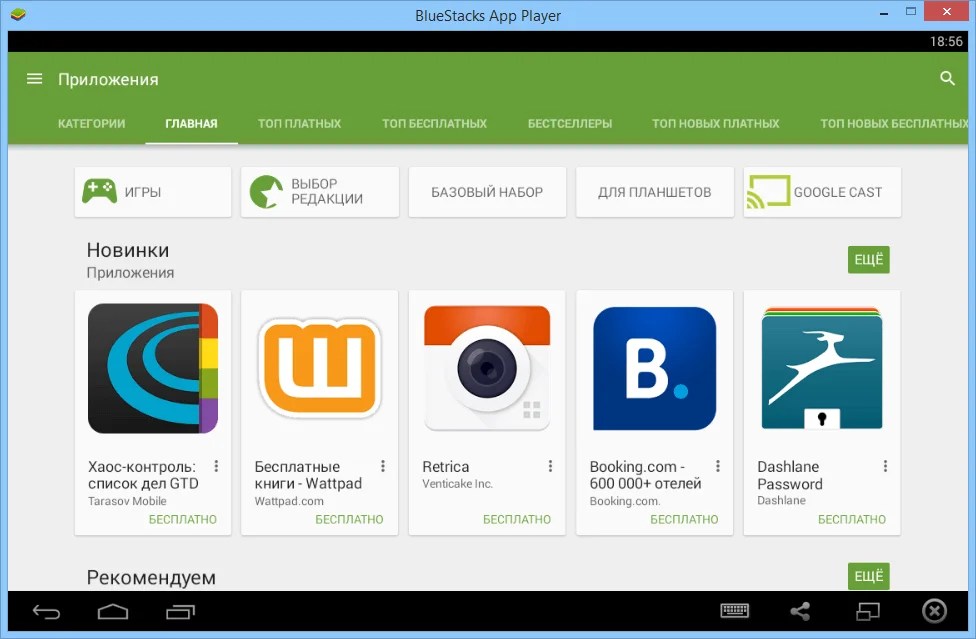
If you're looking for a way to run multiple Android apps and games at once, and it's easy to install and configure, then BlueStacks is your choice. represents one of the most simple ways to launch applications. However, the product applies heavily modified version Android for launching applications. BlueStacks contains a built-in Google Play store, and you have access to all purchased paid applications. The program is added to the list Google devices Play called Galaxy Note II.
A separate BlueStacks window contains a list of applications divided into categories: games, social networks, etc. When searching for an application or clicking on the icon of a specific application, the unexpected happens - the Google Play client in tablet mode is displayed. The user can navigate the interface as they would on a regular Android device, making BlueStacks more than just an “app player.” In fact, the user can install third-party launchers such as Nova or Apex from the app store and select them as the default launcher. Home screen in BlueStacks with app categories is a home screen option. Thus, by replacing it, you can feel like the owner real device Android.
Full access to the Google Play store eliminates problems with application deployment, and BlueStacks itself works stably and quickly. You can play most games, but you may have problems using the mouse. If your computer has touch screen, You will be able to use applications that support multi-touch. BlueStacks can turn a Windows 8 tablet into an Android tablet. The technology used in BlueStacks is called “LayerCake” because Android applications run in a separate layer on top of Windows.
The only drawback of BlueStacks is the use of a modified build of Android. All changes made by the product developer to run Android applications on a PC may cause crashes and failures in the application. This modified environment is of little value to developers - there is no guarantee that applications that display and run correctly on BlueStacks will behave the same on a physical device. The service uses a freemium monetization model - you can either pay $2 for a subscription or install several sponsored applications.
Which way is better?
If you want to test an application before installing it on physical devices, the Android emulator offers best way to pre-test the application on your computer. The product is quite slow, but it is standardized, so the developer can see how the application will behave on a real smartphone or tablet. Porting Android to PC can provide decent performance, but there may be issues and glitches and it requires compatible hardware.
If you need to get several Android applications on your computer at once, the best solution will be BlueStacks App Player. The product provides full access to Google Play, works quickly and supports Windows devices with multi-touch. Don't forget about ARC Welder as a way to run one application at a time. The extension is free and easy to install.
Android, one of the most powerful operating systems for mobile gadgets, is distinguished by a wide variety of various applications and games. But even this amount of content cannot always satisfy the needs of discerning users, who often feel nostalgic for the games and programs that were so attractive for OS Windows.
How to open on Android exe file that starts installation of applications or opens them in OS Windows? In today's article, especially for our blog readers, we will answer this question.
The .EXE extension means an executable file containing machine codes. In other words, we are talking about a tool that runs programs on Windows, Symbian, DOS, etc. Any file with the .EXE extension in OS Windows, as a rule, can be opened double click mice.
OS Android has its own analogue, only with the apk format, which, although it has a completely different composition and structure, is designed to perform the same functions as .exe, only on Android devices.
It is impossible to open an .exe file on Android (just like an apk on a computer) without additional software. Which one exactly? Read on.
Open a file in .exe format on Android
The simplest and safest way to open the installation file.exe, which means using programs for Windows on Android devices, is to install special software - software emulators. All of them have their pros and cons, but one thing needs to be taken into account - none of them will support both network protocols, and Internet connection. But with the help of an emulator you can run most of the standard programs and play your favorite games (albeit quite simple ones).
Below are some of these programs, the most common.
BOCHS Emulator
This program is considered the best in its segment. It is stable, but, unfortunately, the speed of operation will not allow you to run powerful operating systems, although the availability of lightweight distributions will allow you to launch Windows XP in a reasonable period of time.
What we need:
Download Bochs emulator (file Bochs2_5_1.apk), remembering to allow installation from unknown sources, since this application is not available in the Play Store:

We will also need a notepad, a file manager (ES Explorer), a browser (any) and a hacker keyboard (preferably).
So, download the archive SDL_for_BOCHS.zip(which contains BIOS firmware, as well as video card drivers, etc.). Then create a folder in the root of the memory card and name it SDL and unpack the archive in it SDL with extension .zip. Now download Windows image and put it in a folder SDL(best to use Windows 95 or 98):

Now open Notepad and select “Input Method”, where you need to select the hacker keyboard. If it is not installed, then in the “Language and Input” section we find the hacker keyboard, check the box, and select the input language.
The next step is to go to the folder we created SDL, open bochsrc.txt, then, using ES conductor, removing «#» enter the line ata0-slave: type=disk, mode=vvfat, path=/sdcard/HDD, journal=vvfat.redolog:

By the way, in order not to have to worry about typing, you can launch a browser on your smartphone, open this page and copy it directly from here, and then paste it into the desired place.
Now we return to the sdcard, create a HDD folder in the root and drop some file into it so that it is there (to the image) that we can send the files we need with games and programs:

So, now, after all the manipulations, you can reboot the device and launch Bochs. It remains to tell what the management will look like. To open the keyboard, click on the lower left corner of the display, turning the device to the desired position:

The role of the right and left mouse buttons is played by the volume key (up/down). There are problems with double-clicking, so it’s easier to do this by highlighting the desired fragment and pressing the “Menu” button, since this button will be used as “Enter”, “Esc” - the “Back” key. Controlling the cursor resembles actions on the touchpad - wherever we drag it, it will stop there.
We talked in detail about installing the Bochs emulator and working with it. The same principle applies to working with other emulators, so below we will briefly talk about other programs that can be used to solve the problem of how to run an exe on Android.
QEMU emulator

The program, just like the one described above, launches Windows and other operating systems on Android. The installation file in this case will be called SDLapp.apk,
There is also a support program - Qemu Setting, which will help you correctly configure QEMU itself for a specific device. In this case, you will need to choose windows version, set the value of RAM, and also, if desired, connect an additional hard drive and CDRom.
DosBox emulator

Dos Box launches files with the .exe extension. On your tablet or phone, a command line opens, reminiscent of DOS. If on modern computer Enter cmd using the Windows key combination + R, then you can open something similar.
There is also paid version DosBox Turbo is an optimized port of the latest emulator for Android DOSBox v0.74. Able to quickly launch old DOS games. Provides full support for keyboard, mouse, as well as sound and analog joystick emulation.
It should be taken into account that to launch you will need at least 50MB of free memory and access to the SDCARD (like any of the emulators).
As an afterword
Unfortunately for retro lovers, emulation good quality For most games, it is, alas, impossible to obtain. There may be no sound, it is possible that operation will slow down, freeze, etc. Sometimes, even trying to play simple Warcraft II can be a fiasco.
Therefore, before starting the procedure, it makes sense to think about whether it’s worth “fencing the garden”:

However, there is no doubt that the progressive Android platform will definitely delight its users with the excellent performance of Windows applications on Android smartphones and tablets. It's probably just a matter of time.
However, the desire to experiment can only be welcomed. Good luck!
![]()
Games for mobile devices are developing by leaps and bounds. Just five years ago, users had primitive projects like Candy Crush Saga, Talking Tom, and self-made quizzes. After a couple of years, games appeared with more exciting gameplay, graphics and even plot. These include:
- Asphalt 8;
- Dead Trigger 2;
- Modern series.
Even then, questions began to arise about how to run Android games on a PC. But even here, development has not stopped, and the market now offers full games like X-COM: Enemy Within and GTA San Andreas, desktop analogues MOBA– Mobile Legends or Vainglory and real ports, for example, Hearthstone: Heroes of Warcraft and others. Such abundance cannot but please active users of mobile devices, but it causes envy among many PC gamers, especially considering the fact that most games are for tablets and smartphones distributed free of charge, monetized only through in-game purchases. Therefore, solutions for playing on a computer in Android were not long in coming. They existed before, but now they are tailored for specific purposes - getting a full gaming experience from mobile games on the computer.
Android games
First of all, it is worth saying that we're talking about exclusively about how to run games on Android, because iOS devices They do not provide the ability to install games from external sources at all.
Apk files which are installation packages, you can’t just run it on Windows systems. This is due to completely different libraries and frameworks used in different OSes. Therefore, the option that is used is emulators.
The concept of an emulator
They represent themselves virtual mobile devices , running inside your desktop system. " Computer in a computer" Of course, to launch them, and subsequently to operate the games, you will need enough advanced hardware, therefore, if you are hoping to play mobile games because of their low demands, you will have to discard this idea. Or play something really primitive that doesn’t consume a lot of computer resources.
There are already quite a lot of paid and free emulators. They offer various possibilities and interact differently with your device in terms of performance. If your goal is just to try the game, choose something simpler and faster. If you want to play constantly, then you should aim wisely. AND don't forget about performance. To the resources consumed by the program itself, you need to add those that the game will need.
The last caveat is that many emulators are launched using virtualization technologies, which differs depending on the manufacturer of your PC chip. To enable it or make sure that it is active, you need to go to BIOS.
Perhaps, the most popular solution running mobile games on Windows is . This is not full emulator and it is designed specifically for games. It is written entirely in Russian and has a very nice interface. This is not a virtual smartphone on your screen, but a full-fledged PC program that skillfully hides its roots. And the process of working with it is ideally designed specifically for players.
To use BlueStacks, download the program installation file and run it. After installation, open the application and you will see the start window. Here in the process will be formed personal recommendations and find all the installed games, but now you should use the search. Download the desired game from Google Play and launch it. It will open in a new tab, allowing you to quickly and easily navigate throughout the program and switch between games. Of course, you can always launch the desired apk if it is not in the store. On the left side there is an extremely convenient toolbar for taking screenshots, changing orientation, and so on.
From additional features – streaming of a running game process directly to Twitch and syncs with your Android device.
The next one, this time a full-fledged one, not just a game option - . This is already a real emulator, but it looks just as high quality and is extremely pleasant to use. Plus, it is also as close as possible to the experience of a regular smartphone or tablet. In this case, it is an add-on for Android called CyanogenMod and the Nova Launcher.

The user has full access to the settings of the emulator itself, where you can specify the desired resolution, performance level and other details; and device settings for choosing a language, etc.
Of course, here also, in addition to standard Google Play, you can use the apk to install applications, take screenshots and run multiple programs at the same time.
– also a real emulator, but it comes even closer to the standard form Android interface, however, only version 4.0. All the same features of other programs mentioned before are relevant for this solution. Google Play, apk, screenshots and full support for the hardware of your PC.

Finally, it wouldn’t hurt to consider an option that would be suitable not only for gaming, but also, for example, for development. Genymotion is an emulator that interacts with integrated development environments on Windows and thus allows you to test software or games almost in real conditions. You can choose it if, in addition to games, you are a developer of your own projects.

Additionally worth noting is Leapdroid. This is a solution, the quality and performance of which was noted by many real users on the network, but having appeared recently, it just as suddenly ceased to be supported by developers. Of course, it won't be difficult to find working distributions, but be extremely careful with malicious files.

There are also from Chinese developers, but the official website of the program is not working at the moment, so the program cannot be fully recommended. However she gives excellent performance, and uses your PC to its full potential. Theoretically, any, even the most complex games will launch and work at 100%. Mistakes are possible, but this is a fair price.

Also considered a fast and convenient solution for launching Android programs, but it looks pretty sparse and offers minimal functionality, so it's mentioned for information only.

Conclusion
Launch mobile applications on PC are really in demand now, given the quality of their performance. The only thing you need to remember is to compare the power of your device with the requirements of the emulator and the program being launched. If your needs are minimal, choose a program with the simplest requirements and start playing. Each of the solutions mentioned in the review is worthy of becoming your desktop solution. It is worth highlighting only Genymotion, which has a wider range of capabilities. And once again remind you about the possibility of infecting your device when downloading installation files not from the official developer sites.