Over time, the appearance of the "Desktop" can be pretty boring. Many users are limited to a simple change of wallpaper. The fresh picture of the main window, however, can be supplemented with new shortcut icons. How to change different types of icons, we will consider in this article.
Standard or third-party icons in ico format
First you need to decide which icons you need: classic ones from Microsoft, which are already stored in the PC's memory, or third-party images. In the second case, you must first create a picture yourself or find an image on the Internet. The main condition is that it must be small and have an ico extension.
You can find ready-made icon files with various designs on third-party resources and download them from there, and then install them using any of the methods below, depending on the type of icon (folder, application shortcut or main Windows icon). To search, use Google or Yandex services: enter the query "Desktop icons for Windows 10" in the line. The variety of icons available for download on the Internet is quite large: copyright, thematic, standard for certain versions of Windows, and so on.
You can change the icons for all shortcuts at the same time using an icon pack - a separate collection of icons packaged in a single file with the dll extension. Such packages can also be downloaded from various sources. However, be careful when searching for and downloading such files: trust sites that indicate that the files have been checked by antivirus. Otherwise, you run the risk of downloading a malicious program along with the file.
Photo Gallery: Desktop Icon Sets
Desktop shortcuts may be non-standard, but they must be in ico format. On the Internet, you can find many original icons for folders. The Aero icon pack is suitable for users who love modern design.
How to change the appearance of the main icons on Windows 10
The main Windows icons on the "Desktop" are icons with the names "Recycle Bin", "My Computer", "Network", "User Files", "Control Panel" and some others. They are placed on the "Desktop" by default after installation. You can independently determine which of them should be present on it and which should not. You also have the right to change their appearance in the "Settings" system window or using third-party utilities.
Through the Windows Settings window
The easiest way to change the appearance of the main icon is to go to the system settings window:
- In order for the “Options” window to appear on the display, the easiest way is to simultaneously press two keys: Win + I. But this combination may not work. In this case, there is another way: click on the "Start" button in the lower left corner of the screen, and in the menu itself, select the second icon from the bottom - the gear.
 Click on the gear icon in the start menu
 - We find ourselves in a large menu "Options" with many sections. We need the last tile in the first row - "Personalization".
 In the "Settings" window, click on the "Personalization" section
 - The tabbed section will open. You can launch the same window in a different way: click on the “Desktop” on the area free from icons, and select the very last item in the context menu - “Personalization”.
 Click on the item "Personalization" in the context menu of the "Desktop"
 - Go to the "Themes" block.
 Immediately go from the "Background" tab to "Themes"
 - In the right column with links to other windows and sections, click on the line "Desktop icon settings".
 Click on the "Desktop Icon Settings" link on the right side of the window
 - A small window will open on top of the "Parameters" - select the desired icon from the menu with the left mouse button, for example, "This computer". Next, click on the "Change Icon" button.
 Click on the icon you want to change and click on the "Change Icon" button
 - In the third window, select an icon from the list of standard Windows icons or upload your own using the "Browse" button.
 Select an icon from the available ones or upload your own using the "Browse" button
 - If you chose the second option (upload your own icons), the File Explorer window will appear. We are looking for a folder with the desired icon file in ico format. Click on the "Open" button, and then click OK.
 Find the desired ico file in the "Explorer" and click on "Open"
 - In the "Icon Options" window, first click "Apply" for all changes to take effect. If you want to change the icon for the other main Windows icons, repeat the same procedure for each of them. Click Apply again and then OK to close the window.
With the help of special utilities
There are many applications from various developers that allow you to change the icons of both the main shortcuts and other icons, such as folder icons, beyond recognition. In programs, you can change both individual icons and all icons at once, that is, install the whole package.
IconPackager: convenient and fine-tuning of icons appearance
IconPackager is a product from Stardock, which develops utilities for customizing the Windows Desktop interface. There are several icon packs preinstalled in this utility. It is also possible to upload your own and change the icons in the available collections, that is, create your own unique packs.
The utility supports versions of Windows above the "seven". Its disadvantage is that it is paid, but at the beginning it offers a month of free testing. Although the interface is in English, using the application is quite convenient:
- Open the official website of the app developer. To download the installer, click on the blue Try It Free button.
 Click on the blue Try It Free button to download the installer
 - Run the installer and install the program by following the simple instructions in the window.
- Click the Finish button to bring the application window to the display.
 Click on Finish to close the "Installation Wizard" and open the program window
 - To start using the trial version, click on the Start 30 Day Trial button.
 Click on Start 30 Day Trial to start using the program for free for a month
 - If you want to upload a third-party icon that you have previously downloaded from the Internet, in the Look & Feel tab, click on the Icon Package Options drop-down menu. We select in it the penultimate item Add Icon Package, and then - Install from disk.
 Click on Add Icon Package and then select Install from disk to download your collection
 - In "Windows Explorer" find the file with the icon pack and click on "Open" - the collection will be added to the list of currently available ones.
- You can also select a theme from the list. Let's try to put, for example, Delta.
 Click on the Delta package below
 - Click on Preview to see a preview of all the icons in this pack. If you like them, close the second window and boldly click on the Apply icons to my desktop button.
 Click on Preview to preview the entire collection of icons
 - If you want to get old Windows icons back, just apply the first theme in the list - Windows Default Icons.
- In the Colors tab you can change the color, hue, brightness of the icons.
 In the Colors tab, customize the color scheme of the available icons
 - With the I want to adjust the color of my Icon Package item, you can adjust the icons to the theme of your "Desktop" and to the color of the "Taskbar". For example, they can completely change the color to red if there is a theme on Windows with such a shade. After all the changes, click on Apply icons to my desktop.
 Icons can take on the color of the current Windows theme
 - In the Live Folders section, you can put separate icons for folders - live icons. To do this, check the box to the left of Always use the Live Folder icons selected below. Then just select the type of folders.
 In the Live Folders block, select individual folder icons
 - The Customize tab allows you to create your own icon packs. To change a specific icon, click Change this Icon.
 The Customize section allows you to create your own collections and change those presented in the program
 - In a new small window, select among the available ones or add your own icon using the Browse button.
 In the Change Icon window, select an icon from the available menus or upload your own using the Browse button
 - When all changes to the package have been made, click on Save Icon Package.
 Save changes to the icon pack using the Save Icon Package option
 - In the small window, confirm that you want to make changes to the package. After that, all settings should be saved successfully.
 Click "Yes" to confirm your intention to save changes
 - There are additional settings in the Settings section. In particular, you can determine which Windows icons should be changed and which should not be touched. Here you can enable Cursors to change the mouse pointer.
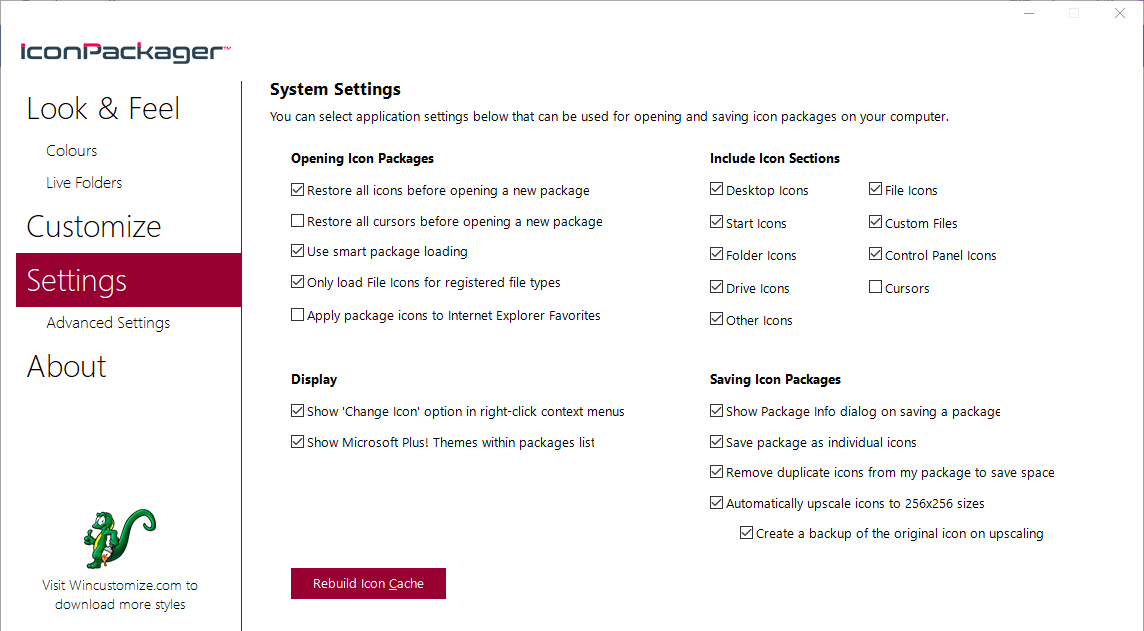 In the Settings tab, you can configure the change for certain types of icons: folders, files, main Windows icons, and others
Video: how to install new icons using IconPackager
Se7en Theme Source Patcher: a free utility and a large selection of packages
The application is designed to replace all classic desktop icons, local hard drives, folders, and Control Panel icons. Initially, the program was created for the "seven", but now it supports other versions of Windows, in particular, our "ten".
The program uses the popular 7z compression format. The disadvantage of the utility is that icon packs are not initially built into it. You need to download all collections on the same site from where you download the application, and then add them yourself to the utility database for further use. Nevertheless, the choice of packages on this resource is very large.
The advantage of this program is that it is free. Before replacing the icons, the utility creates a restore point and a backup copy of system files so that you can return all Windows icons to the classic ones:
- Let's move on to apps. Click on the "Download" button.
 Click on the "Download" button to download the program's executable file
 - Your browser will download the archive - open it, and right-click on the file in it and click on "Extract to ..." in the menu. Select a folder and unzip the archive.
 Click on "Extract to the specified folder" in the context menu of the file
 - Find the extracted file, right-click on it again, and in the context menu, click on the "Run as administrator" link.
 In the context menu of the unpacked file, click on "Run as administrator"
 - Allow this application to make changes to the PC by clicking on "Yes" in the system window that appears. The application does not require installation, so its window will open immediately.
 Click "Yes" to allow the program to make changes to the device
 - Pre-select and download your favorite themes from the same site.
 Download the icon pack you like from the developer's website
 - In the application window, click Add a Custom Pack.
 Click the Add a Custom Pack button
 - In Windows Explorer, select the downloaded icon pack archive and click Open.
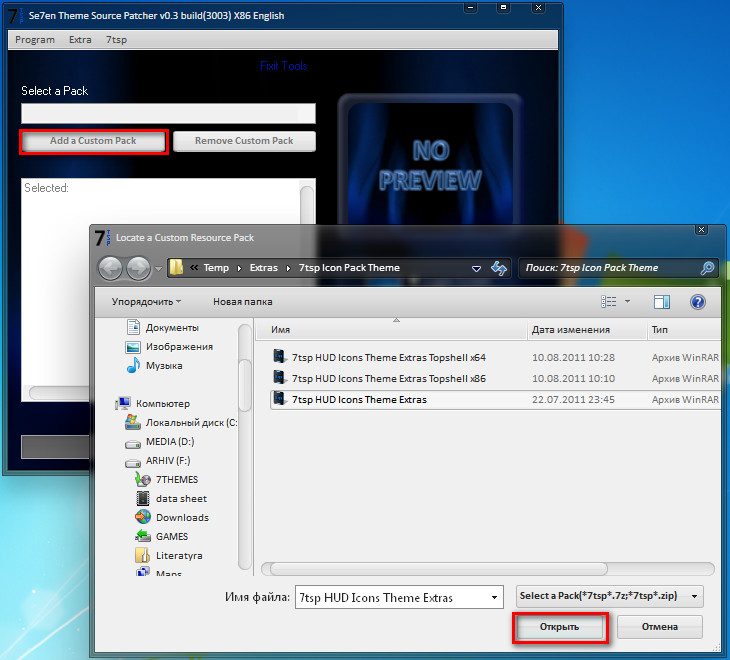 Find the icon pack file and click "Open"
 - The collection will appear in the menu. At the bottom of the window there will be a Start Patching button. Click on it. The utility will ask if you need to create a restore point. Be sure to create - click "Yes".
 Give permission to create a backup before installing new icons
 - Wait for the procedure to complete. After that, you need to reboot the device twice for the changes to take effect.
- Icon packs from this developer contain not only icons, but also some other elements of the Windows interface, such as pictures to replace the clock, date, and even the Task Manager window. If you do not need them, before installing the collection, click on the Extra item. In the Option Menu, uncheck the items you don't need and click Save.
 In the Option Menu, remove unnecessary items that you do not want to change and click on Save
 - If you want to restore classic Windows icons, click on the Restore button in the lower right corner in the program window. In the new window, check the box next to the first item and click OK.
 To return the default Windows icons, click Restore and then OK
It is imperative to install a new icon pack on a clean system, that is, on classic Windows icon images, and not on third-party icons. Therefore, make a preliminary recovery using the Restore key if you have icons that are different from the standard ones.
Video: how to put icons using Theme Source Patcher utility
IconTo: application with built-in instructions for use
IconTo is a free application from the developer AleXStam that can change icons for system items, folders, hard disk partitions or even their groups.
 In IconTo you can change the icons of folders, system objects and hard disk partitions
 It has the following advantages over other utilities:
- Over 300 built-in icons. It is also possible to upload your own icons.
- Instructions for installing icons: at the bottom of the window you will see hints.
- There is a conversion of png, jpg, ico formats, as well as an option to extract images from files in dll, exe and some other formats.
- The program interface is completely in Russian.
IconTo is suitable for all versions of Windows, from Windows 98 to the modern "ten". The size of the downloaded installer does not exceed 15.1 MB, so the utility can be used on computers with a small amount of memory. The application is available for download on the official website of the developer.
How to change folder icon on Windows 10
If you want to highlight a certain folder against the general background of icons to make it more recognizable, follow these steps:
- Click on the folder shortcut with the right mouse button. In the menu that appears, click on "Properties".
 In the context menu of the folder, select "Properties"
 - A window with various sections will immediately appear on the display - go to the "Settings" tab. In the last section, click on the "Change Icon" button.
 In the "Settings" tab, click on the "Change Icon" button
 - Select an icon from the available ones: scroll the list of icons to the right to see all the shortcuts. If you have your own image with the desired ico format and you want to put it exactly, click "Browse".
 Select an icon from the suggested ones or click on the "Browse" button if you have your own icon
 - In the additional Windows Explorer window, find the folder where the image is stored. Left-click on it to select it, and then click on "Open".
 Find the desired icon in the form of a file with the extension .ico in "Windows Explorer"
 - For a convenient search, you can use the line with a magnifying glass - just enter the name of the icon file or the ico extension.
 Enter ico in the search bar and find the desired file
 - To save the changes, click OK in the window with the list of available icons. The folder icon will then change.
How to change all folder icons at once
To change the appearance of all folders, you need to resort to a more complex method - editing the registry in the system window. However, this method is not recommended for beginners: it is better to use the special programs described in the "Using special utilities" section of this article. If you are already a confident PC user, then you can perform manipulations in the system window:
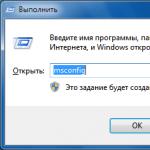
- To call the "Registry Editor" system window, simultaneously press the Win and R keys - a small "Run" panel will open with a single "Open" line. In it we type the regedit command. For the system to execute it, click on OK or press Enter.
 In the "Run" window, write the command regedit
 - In the next window, click "Yes". So we will give permission to the "Registry Editor" to make changes on the computer.
 Click "Yes" to allow the system utility to make changes to the device
 - First, let's make a backup in case the registry is edited incorrectly. On the top panel we find the item "File" and click on it with the left mouse button. In the menu that appears, click on "Export".
 Select "Export" from the "File" menu
 - In the new window that opens, select the folder in which the copy will be stored. Give an appropriate name to the file. Then click "Save".
 Name and save a copy in any folder
 - Now you can start editing. Double click on the third main branch - HKEY_LOCAL_MACHINE.
 Open the HKEY_LOCAL_MACHINE folder by double clicking
 - In turn, go to the following blocks in the same left part of the window: Microsoft - Windows - CurrentVersion - Explorer - Shell Icons.
 The Shell Icons folder should be in the Explorer section
 - If you did not find the last Shell Icons folder, create this section yourself: right-click on the Explorer section, select "Create" in the context menu, and then click on the "Section" item. We name it accordingly.
 If you do not have a Shell Icons folder, create it using the context menu of the Explorer section
 - Click on Shell Icons. On the right panel, right-click on an empty area to open the menu. In it, select "Create", and then - "String parameter". Specify the number 3 as the name for the new registry entry.
 Click on "Create" and then on "String Parameter"
 - Right click on it and select "Edit". You can also simply double-click on it with the left mouse button.
 Click on "Edit" in the context menu of the newly created parameter
 - In a small window, in the line for the value of the entry, insert the path to the file, where its name and ico extension must be indicated. We click on OK.
 In the line "Value" we write the path to the ico file, which should be set as an icon
 - If you have a 64-bit system, the path to the final Shell Icons folder in the left pane will be slightly different: Wow6432Node - Microsoft - Windows - CurrentVersion - Explorer. Next, repeat the same steps as for a 32-bit system.
- Close all windows and reboot your device. After starting the OS, you will see that the icons of all folders have changed.
Change app shortcut icon
If you are tired of the old shortcut icons of your programs, try replacing them. For example, let's take the icon of the popular Google Chrome browser:
- We are looking for the desired icon on the "Desktop" (in our case, this is the "Google Chrome" icon). We click on it with the right mouse button to call the context menu with a list of options. We select the same item as in the case of changing the folder icon - "Properties".
 Click on "Properties" in the context menu of the Google Chrome shortcut
 - You will immediately be taken to the desired tab - "Shortcut". Click on the middle button "Change Icon".
 In the "Shortcut" section, click on the "Change Icon" button
 - A window similar to the one shown in the instructions for changing the folder icon will appear on the display. Here, however, there will not be such a large selection of icons. As a source, we specify not the system library, but the executable file chrome.exe. We make a choice, for example, in favor of the original yellow icon. We click on OK.
 Select an icon from the available ones or upload your own ico file
 - In the window with the properties of the shortcut, first click "Apply". The system will ask permission to make changes. Click on the "Continue" button.
 Click on the "Continue" button to save all changes
 - After that, click on OK - the window will close, and the icon icon will change.
- If you want to change the shortcut icon to your own, use the Browse button to upload your own third-party image file.
How to create your own icon
If you want to set your image (drawn or downloaded from any site) with a png or jpg extension as an icon, you need to reduce its size if necessary using the standard Windows Paint utility, and then convert it to an ico file using special services - converters.
An easier way is to use the services of online and software icon generators that are already configured to create files with a certain format and other parameters, such as image sizes. For example, let's take the IcoFX program, which combines an icon generator and a tool for drawing and editing pictures. It is paid, but its developer, IcoFX Software, provides 30 days of free use. How to use it, we will tell in the instructions:
 On the start page of the program, click on the Windows Icon From Image if you want to upload an image
 A page with a set of image editing tools will open.
 Click on the Magic Wand on the left vertical panel
 On the right panel, select the checkerboard tile to make the background transparent
 Click Save to save the edited image
 Find the folder where you want to save the future icon and click on "Save"
 Choose the size and color quality of the future drawing
If you are no longer attracted by the look of the old icons on the "Desktop", change them either to other classic Windows icons, or to your own - any small ico images found on the Internet or drawn by yourself. To change icons, you can use both the built-in Windows tools and third-party applications.
Computer tuning is carried out not only to improve its performance, but also to improve the appearance of the system in accordance with user requirements. So, for example, you can change the appearance of folders, focusing on your taste and preferences.
Why you need to change folder icons in Windows 10
Changing the appearance of folders in the operating system is a useful feature that is often underestimated. After all, it allows:
- increase the speed of work - visual perception reacts much faster to individual drawings, and not to text. Therefore, choosing the right folder is much easier when it looks special;
- provide a nice look for folders - you can choose the icons you like. This gives a huge scope for creativity in creating a cozy working environment;
- create visual cues for other users - drawings can be not only individual, but also useful. Usually, the picture is selected to match the contents of the folder. So, for example, you can hang a wrench on a folder with technical documentation. This will allow people who first sat down at your computer to quickly find what they need.
Typically, folder icons are stored in the Windows/Icons path. But to find all the folder icons on the computer, it is enough to enter the query .ico into the search system.
In the case of programs, folder and file icons are usually encrypted inside dll files and their recovery is extremely difficult.
Folder icon changes in Windows 10
Changing the icon to another one is not difficult at all. Consider this process for system folders:
- Press the Win + I keyboard shortcut to open Windows 10 settings. Select the "Personalization" section.
Open the "Personalization" section in Windows Settings
- Or right-click on the desktop and select the appropriate item from the context menu.
Right-click on the desktop and select "Personalize"
- On the Themes tab, click Desktop Icon Options.
Select "Desktop Icon Options" under "Personalization"
- Click on the icon you want to change. The choice will be presented to the folders "Trash", "This PC" and other system partitions to access certain features of your computer. Once selected, click on the "Change Icon" button.
The "Change icon" button will allow you to select any icon for folders in the options window
- Or choose another icon from any folder. It must match the .ico format.
Specify the icon you want to install instead of the default
- After selecting the icon, press the "OK" key. Changes will be accepted.
If we are talking about ordinary, and not system folders, this is also not difficult at all. To do this, follow a series of the following steps:

In addition to replacing one icon with another, you can also change the size of the icon so that it is convenient to find the desired program or file and click on it with the mouse. To do this, do the following:

You can also resize all Windows elements at once. To do this, follow these steps:

Thus, the size of not only folders on the desktop, but also other elements will change. But you can also configure the scale settings in the browser separately, which will allow you to set a value that is convenient for working with a computer.
Video: how to change desktop icons using Windows 10
How to remove arrows from labels
If you actively use shortcuts for folders and programs, then the arrows on them can be annoying. They interfere with admiring neat icons and spoil the aesthetics of the desktop. Fortunately, removing them is not difficult at all, but this will require making changes to the registry.
You should not edit the system registry if you are not sure that you can clearly follow the instructions and do not confuse anything. Incorrect registry changes can damage your computer.
Do the following:

Video: how to remove arrows from shortcuts in Windows 10
How to remove the shield icon from shortcuts
The shield icon can also ruin the look of the icons. It appears on those applications that require administrator rights for full operation. This icon can be disabled:

It should be borne in mind that in this way an additional request will be disabled when starting programs. This will not harm your computer if you use programs from trusted sources, but it will still slightly reduce the security of the system. Unfortunately, there is no other way to remove the shield icon from icons.
Video: how to remove the shield icon from shortcuts in Windows 10
Show icons for hidden files and folders
The Windows operating system has long had the ability to hide files and folders. At the same time, their icon and name will not be displayed in the place where they are located. However, there is an easy way to enable the display of hidden icons in File Explorer:
- Open any folder such as This PC to access File Explorer on your system.
- Switch to the "View" tab.
- In the top panel, select the "Settings" section and open it.
In the "View" tab, select the "Options" item to configure hidden files
- Uncheck the box "Hide protected system files" and set the marker about hiding files to "Show hidden files ...".
Uncheck "Hide protected operating system files" and check "Show hidden files..."
- Confirm changes. All hidden files and folders will be displayed on your computer.
Many system files and folders are hidden by default. This is protection against careless users who are not very computer savvy.
Video: How to open hidden files and folders in Windows 10
Pinning an icon to the home screen
Pinning to the Start screen in Windows 10 refers to adding an icon to the Start menu. Such icons may well become an alternative to the desktop, as they are presented in the form of convenient tiles. To add icons to this menu, follow these steps:
- Right-click on the shortcut or executable file.
- Select "Pin to Start Screen" from the context menu.
Right-click on the icon and select "Pin to Start"
- On the home screen itself, you can also use the right mouse button to resize the icon or move it to a convenient location.
You can individually adjust the size of each icon on the home screen
Icon sorting options
To make it easier to find the desired file or folder, you can sort the icons by a variety of options:
- by name - the icons will be arranged in alphabetical order in ascending or descending order (depending on the settings);
Sorting by name helps arrange files in alphabetical order
- by date - sorting by the date the file was last modified or created, as well as from recent to older files and vice versa;
Sort by date modified will sort the files by the time they were last modified
- by type - separation of files depending on the format. Folders will be next to folders, and pictures next to pictures. This sorting is useful if there are many elements of different types in one place;
Sorting by type will separate different file formats from each other
- by size - sorting items by size is useful in cases where you need to clear the hard disk of unnecessary files. It will immediately highlight the heaviest and lightest documents among others;
Sorting by size will reveal the heaviest and lightest files by weight
- by tags - tags are optional, but if you use them, you can sort by them too.
Tag sorting is used to organize files associated with a tag
Programs for replacing icons in Windows 10
There are many programs that allow you to change the icons of folders and files. Many of them do this automatically. Some programs replace the icons of all documents at once, while others help, for example, change the image format to create the icons themselves. Let's consider some of them:
- icon changer. This small utility is easy to use and runs without installation on the system. It is enough to download it in order to change all the icons at the touch of a button. By default, instead of Windows 10 icons, it puts Windows 7 icons, but you can also download your own icon packs if necessary;
Icon Changer is a small utility that does not require installation.
- ICO Factory. Program for changing the image format. It allows you to create an icon of any size from the pictures you choose. The interface of this program is extremely simple: just drag and drop images into the ICO Factory workspace and select the required size. After that, all pictures will be converted;
ICO Factory allows you to change the format of pictures to the format of icons
- Dr. Folder. A convenient program for working with a large number of documents at the same time. Allows you to download icons from the network in large quantities and assign them to folders directly in the program window. A flexible tool that has many settings and even supports converting an image to the .ico format needed for icons.
Dr. Folder allows you to change the appearance of a large number of folders at once
- IconTo. This program allows you to change the icons of not only folders, but also hard drives. With its help, you can change the picture of both connected drives and internal ones. Among other things, the program supports about three hundred icons, from which you can choose something to your liking.
IconTo allows you to change the appearance of hard drive and external media icons
Video: How to Change Windows 10 Icons with Se7en Theme Source Patcher
Icon packs across sites
To quickly personalize your computer, you can download icon packs from various websites. Here are some of them:
- http://www.winscreen.ru/icon/ - a stylish site where you can find a lot of icons for Windows 10. It features a large selection of icons that are unusual in shape and style. For example, you can set icons in the style of the Iron Man computer from the Marvel movie comics;
Icons8 is famous for its huge number of free icons for Windows 10 and the ability to search by tags
- http://oformi.net/icons-png/ - This site also provides a lot of icons. In general, this site specializes in desktop and system customization, so you can choose an unusual mouse cursor or a cute Windows 10 theme for icons.
The Oformi website specializes in desktop customization, so the user can pay attention not only to icons, but also to mouse cursors and unusual themes for Windows 10
Problems when replacing icons
There are not many problems that you may encounter when replacing icons. However, there are a number of general tips that can help if your files, for example, stop moving after changing icons:
- check the system with a high-quality antivirus. The problem may lie in the viruses that you managed to catch while looking for the icons you need. In this case, check your computer with a high-quality anti-virus utility, such as Dr.Web CureIt!;
- restart the system. A simple restart of the computer may solve the problem and the icons will move again;
- turn off utilities that replace icons. If you have an icon replacement utility active, try disabling it and see if the problem is fixed;
- install the latest system updates. Older versions of Windows 10 may contain bugs and vulnerabilities. In this case, updating to a new version of the operating system will help.
In most cases, the problem with the inability to move icons is not related to the replacement of icons directly.
The ability to replace folder or file icons is extremely useful. This can be done both manually using the system tools, and by downloading special programs that work in an automated mode.
Very few users change the size of the icons of system directories and desktop shortcuts just because they do not know about the existence of such a function. And she appeared in the "seven".
Resizing icons
Customizing the appearance of shortcuts on the desktop is to change their size, which developers offer three types: large, regular icons and small. To call a drop-down menu with these options, right-click on an area of the desktop that is free from shortcuts and directories. Next, move the cursor to the first item "View" and select the size of the icons.
Also Windows 10 can:
- hide all icons from the desktop - in previous releases of the OS from Microsoft, it was possible to make the Windows workspace clear of icons by editing the registry or using third-party software;
- automatically arrange desktop icons;
- align the location of the icons by placing them in the cells of the virtual grid.
All these actions are carried out by checking or unchecking the boxes next to the corresponding options.
Setting the size of icons on the desktop by the second method allows you to more accurately select the desired dimensions, because there are about 20 size options available with a small step. The size is changed by holding down the "Ctrl" key and rotating the mouse wheel on the desktop. When the wheel is rotated forward (up), the dimensions of the icons will increase, and down (towards you), they will decrease.

Alas, for a laptop with Windows 10, on which there is no mouse, the proposed option will not work.
Adding and removing icons
Windows 10 offers another interesting feature - hiding system directories from the desktop. If you want to always have at hand (or vice versa, not flash before your eyes) the icon for launching the "Control Panel", "Recycle Bin", "Network", each of them can be changed.
The setting is carried out along the following path: "Personalization" → "Themes" → "Icon settings ...".

Here you can:
- add to the Desktop or hide the five icons of the system catalogs, which are displayed in the screenshot above;
- replace the icon of any element by selecting it from the Windows 10 system library or any third-party graphic or executable (exe, dll) file;
- reset the view of system folders to standard;
- prevent/allow themes to embed their own icons for system directories.
Individual icon personalization
In addition to everything named in Windows 10, you can quickly replace the icon of any shortcut, and not only located on the desktop.
Every day we use various computer programs to perform a wide variety of tasks. Some of them have a large number of settings and features, and in order to use all of them, you need to perform a lot of manipulations. For example, you regularly use several modes of the application, enter the username and password of the user, apply special modes. In addition to office workers, gamers often need such opportunities. All these manipulations can take a significant amount of effort and time, and simply annoying.
Reflection of application start conditions in a shortcut simplifies work with programs.
It is worth noting that such a need, which was mentioned above, occurs extremely rarely, and for the most part is solved effortlessly by the application or game settings themselves.
Based on this, the whole issue should be considered only as an additional opportunity for extended software launch, because the expediency of such actions is doubtful, and they definitely will not save time for the user.
The Windows operating system provides each user with the opportunity to prescribe launch options in the program shortcut. Within the framework of the question under consideration, instead of switching between menu items, you can create several shortcuts with the desired parameters once, place them on the desktop or taskbar, and in Windows 8 and 10 on the start screen, and launch the program with the desired parameters with one click buttons.
All these parameters are written in shortcuts, which are special files with a link to the executable file. You do not need to go to the folder where the software is installed every time and look for the startup file. In this article, we'll take a look at how to greatly expand your options when working with software and learn how to set launch options on the command line of a shortcut on the desktop. We will divide the whole procedure into two stages.
Stage 1. Selecting the executable file and transferring the shortcut to the desktop
Despite the fact that in the vast majority of cases, when installing software, the launch icon is placed on the desktop, in some cases this does not happen. Then you need to find the executable yourself. How?
- When installing the application, carefully follow which folder the installer suggests choosing. This is usually C:\Program Files or C:\Program Files (x86). Most developers provide the ability to choose the default folder yourself, but if you do not change the proposed option, the program will be installed exactly in the specified folder.
- Through Windows Explorer, go to the directory where the software is installed and find the startup file. It has an .exe extension. Often its name coincides with the name of the software itself. If you cannot decide, try to find out this information on the official website of the developer in the help section or in the technical support service.
- Right-click on the file name and select "Create Shortcut".
- Confirm the system prompt "Windows cannot create a shortcut in this folder. Put it on the desktop?".

If you do not remember in which folder the software is installed, you can do the following:
- Go to the Start menu, find the software you need in the list (you can even use the search function to speed up the process).
- Right-click on the name and select Send - Desktop (create shortcut).
If you are using Windows 10, the procedure will be slightly different:
- Go to the start screen by pressing the Start button.
- Find the program launch icon in the list of all applications or on the home screen.
- Right click, select Advanced - Go to file location.
- After the Windows Explorer window opens, copy the icon to the desktop through the context menu or simply by dragging it to the desired location.
Step 2: Specify launch options
After we have successfully transferred the icon to the desktop, let's specify the necessary parameters in its properties. For this you need:
- Right-click on the icon and select "Properties".
- In the menu that opens, go to the "Shortcut" tab and find the line "Object". You will see that the input field in it is active. It is here that we will prescribe the necessary commands.
- After entering the required data at the bottom of the window, click Apply - OK in sequence.

What commands to write
Having figured out how to write startup commands, let's try to figure out what exactly to write. Unfortunately, there are no universal commands that work for absolutely all programs. Therefore, if you want to create shortcuts for quick launch with the specified parameters, you will have to study the program's help or contact the developers' technical support service.
Very often, such information is indicated on the official forums of the application or game. More experienced users or representatives of developers or copyright holders publish detailed information there.
Returning to what was said at the beginning of this article. The indication of parameters received its greatest relevance during the period of mass interest in the game called "Counter-Strike". Why this interest has received such a spread specifically on “CS” is an ambiguous question, someone used it solely for entertainment, someone (like some professional players, for example) in order to maximize the individualization of the gameplay.
For example, here is a list of options for the game "Counter-Strike: Global Offensive" that some users use at startup:
| Parameter | Meaning |
| -novid | Turning off the intro movie |
| -w 640 -h 480 | Installing an extension |
| -console | Console activation |
| -freq 120 | Setting a screen refresh rate limit |
| -high | Run with higher priority |
| -condebug | Saving logs |
| -low | Run with reduced priority |
| -noaafonts | Disable anti-aliasing |
| -nosync | Deactivate vertical sync |
| -fullscreen | Run in full screen mode |
| -language English | Language setting |
Conclusion
How much of the above procedure is appropriate and relevant for the middle of 2019 is up to everyone to decide for themselves, and in the comments we invite you to discuss this topic, and also talk about which programs you run with the launch parameters. This information may be useful to someone.
Operating systems of the Windows family are very popular today due to their simplicity. Installing any version of Windows is not the most difficult task; setting up for convenient work is sometimes automatic (especially if you use licensed software), but more often it is not too complicated. Customizing the appearance of the desktop is also very transparent and obvious.
But there are nuances that many users do not immediately notice. For example, how can one or another icon on the desktop be changed? How can I change the icons and their sizes? How can I customize the order of the icons? The answers to some of these questions are quite obvious, but some need to be thought about.
Existing settings
It doesn't make sense to focus on standard things like arranging desktop icons.
All this is done elementarily with the right mouse button, but sometimes a situation arises when the user hits the shortcut on the desktop and starts to think, why is the result different? You need to right-click on an empty space on the desktop. Then the desired context menu will appear.
But there are still a number of settings that are not so obvious. For example, scaling the size of a single icon, and not all at once. Such a trick became available only in Windows 10 and can only be performed with a mouse (alas, imitation using a laptop touchpad does not count). What other tricks like this exist?
- general resizing of the icon;
- hide or add system icons to the Windows 10 desktop;
- changing individual icons.
Each of these points will be discussed in more detail. Because banal tasks like aligning labels on a grid or arranging them in a certain way are too obvious. These settings can be made using the right-click context menu. But the rest of the tricks are not so obvious and require effort, and sometimes ingenuity.
Icon scaling
This trick, as mentioned above, is found only in Windows 10. Old versions do not allow it to be done, the icon size is fixed there (one of the proposed options, no more). But the “ten”, in turn, allows you to choose one of 20 options: from very small images to icons on? screen.
It is very easy to do this scaling. It is enough to hold down the ctrl button and start rotating the mouse roller. Moving the roller down decreases the size of the icons, up increases the size. Each click of the roller corresponds to one of the scale values.
This method also has a disadvantage. If there are a lot of shortcuts on the desktop at a certain scale value, the desktop turns into a mess. Although, if you want to reduce the icons, then this method is great. Perhaps Microsoft will add the ability to increase individual shortcuts in upcoming updates, but for now, the entire desktop is scaling.
There is also a second way. It's a little more complicated, but familiar from previous versions of Windows. If on the context menu of the desktop (right-click on an empty space on the desktop) select the item "screen settings", then one of the first menus will be the ability to select the scaling of icons, text and desktop elements. 2 modes are supported: 100% and 125%, but this way is more familiar.
If you follow the path "Personalization" - "Themes" - "Icon Options", you can find a menu that allows you to add or hide system icons: recycle bin, this computer, user files and network. Previously, for such an action it was necessary to edit the registry. Windows 10 made this a standard feature of the system.

Change icons
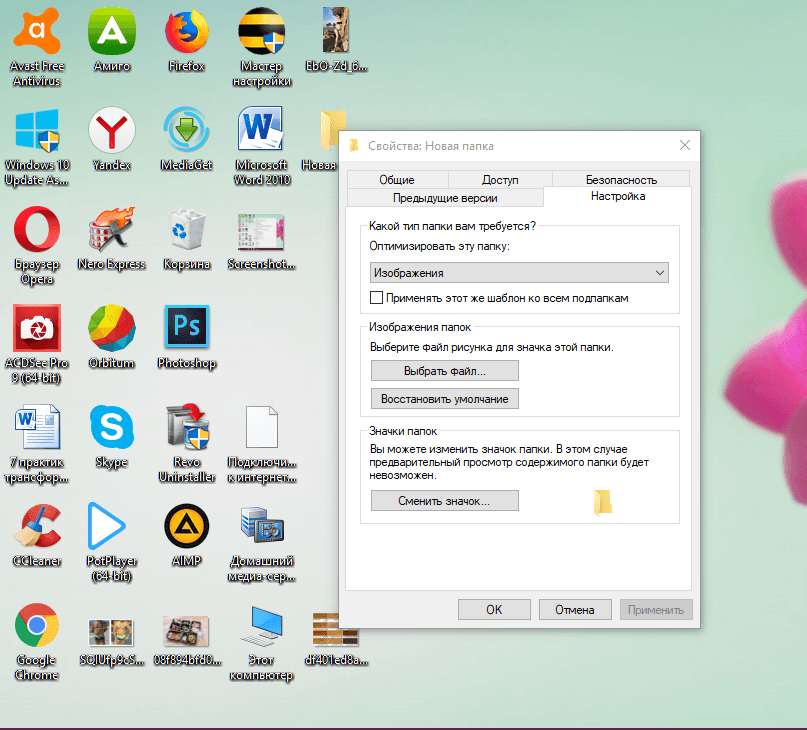
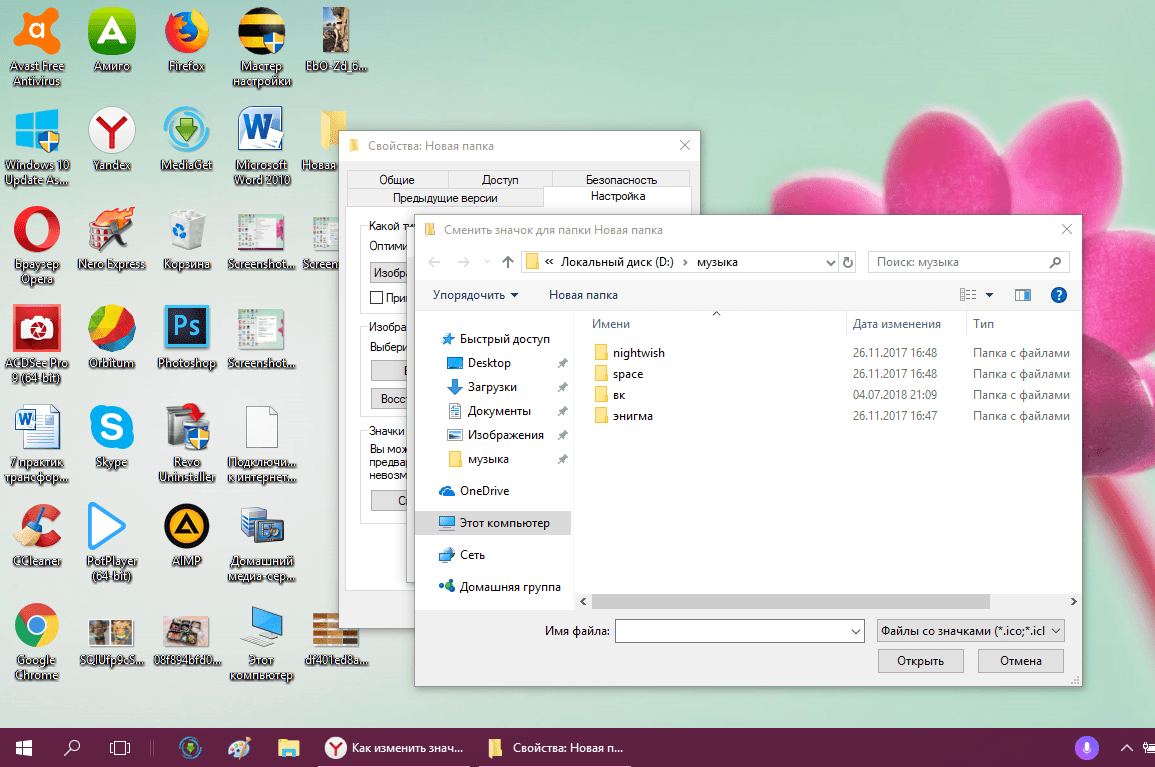
Perhaps one of the most popular tricks. Sometimes you want to add personality to familiar applications. The easiest way is to change the desktop shortcut. Standard folder images can also be annoying, which often end up in huge numbers on the desktop. The folder can be hidden on any system drive and create a shortcut on the desktop. But then, the funniest and most interesting begins. If you select this icon and right-click on it, you will notice the item "change icon".
As it turned out, Windows 10 is very friendly in terms of interface customization and it is by no means difficult to make it as personal as possible. You can replace any label, and there are even separate collections to give your system individuality.