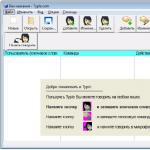
Today we will talk about such a team as " BCDEDIT”It will not be fully considered, since it will take a lot of time, which I simply do not have !!! I will tell you about an interesting thing, how to change the Windows boot timeout through cmd.exe.
As usual, there is nothing complicated, and in general, it is absolutely not necessary to know about this, since it is hardly useful in everyday life.
But! For general development and to gain a little more knowledge, this post will still be useful!!!
Windows boot timeout changes via cmd
For starters, as usual, you need to open the Windows command line, but through it we will change the system boot time.
Now let's look at the command " MSCONFIG How many seconds is worth. The default is 30!
After you have memorized the Timeout number, you can close the "System Configuration" window
For those who are not in the know. The timeout time can also be changed in this window (System Config) using the GUI shell.
But, our task is to change the Windows boot timeout through cmd.exe, and therefore the time has come for the command “ BCDEDIT»
The team " BCDEDIT There are other commands as well. For example (Commands for controlling data output, Commands for managing EMS services… and more.)
We are interested in one command /timeout"It will allow you to change the Windows boot time.
To do this, write the following in cmd:
After executing the command, the Windows boot timeout will change from 30 seconds to 10 seconds!
The same team will help to make sure of this, “ MSCONFIG which will open the system configuration.
In custody.
You can write a simple program, say in Delphi, with just one button :)
And in the event handler of this button, there is only one line of code.
ShellExecute(handle, nil,'BCDEDIT','/timeout 10',", sw_hide);
You can fasten the input field so that the user enters his timeout time, and also add a dozen more command functions " BCDEDIT»
In general, if you try, you will not get a great utility for working with the Windows boot configuration.
But that's another story!!!
26.11.2009 22:52
System Setup- this is diagnostic a tool designed to adjust the startup settings of Windows 7 in order to identify the causes of problems with the computer and operating system. Using the System Configuration program, you can identify drivers, programs and components, due to the incorrect operation of which errors occur during the startup and operation of Windows 7.
Launching System Setup
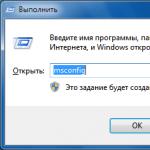
To launch the System Setup program, open the Start menu, type in the search bar and press Enter.
You can also use the keyboard shortcut Windows + R, type and press OK.

General tab

On the tab You can choose one of three options for starting the operating system:
Normal startup
In this mode, Windows 7 starts normally. "Normal startup" is used when there are no problems booting the OS or after troubleshooting.
Diagnostic run
In diagnostic startup mode, only the essential services and drivers that are necessary for the operation of the operating system and the computer start with Windows. If the problem does not disappear when the diagnostic startup is enabled, then the main files and Windows drivers are most likely damaged. If there are no problems with the diagnostic startup enabled, then you need to use the mode Selective launch.
Selective launch
In this mode, Windows 7 starts using basic services and drivers, as well as other services and automatically loaded programs selected by the user. There are three additional options available:
- Load system services– if this parameter is enabled, then the operating system is loaded with a standard set of services required for its operation.
- – if this option is enabled, the programs marked with flags on the tab are launched together with the operating system.
- - This option is enabled and grayed out by default. This option restores the original Windows 7 startup settings if changes are made on the tab.
Selective startup should be used if diagnostic run passed without errors. Turn on additional services and programs one by one, and monitor the operation of the system until you identify the cause of the errors.
Download tab

Operating system by default
If you have more than one operating system installed on your computer, you can set any of them to be bootable by default. To do this, highlight the desired operating system and click the button Use by default.
You can also set an arbitrary multiboot menu delay time by setting the time in seconds in the field Time-out.
To remove an operating system from the list, select it and click Delete.
Safe mode
Safe mode- This is a mode of operation of the operating system with a limited set of services, devices and drivers necessary for the functioning of the computer.
Windows services that start in safe mode:
- Windows event log
- Plug and Play plug and play support
- Remote Procedure Call (RPC)
- Cryptography Services
- Windows Defender
- Windows Management Instrumentation (WMI)
Devices and drivers that start in safe mode:
- Internal hard drives (ATA, SATA, SCSI)
- External hard drives (USB)
- Floppy drives (internal and USB)
- Internal CD and DVD drives (ATA, SCSI)
- External USB drives for CDs and DVDs
- Keyboards and mice (USB, PS/2, serial port)
- Video cards VGA (PCI, AGP)
Check box Safe mode and select one of the download options:
Minimum- Starting Windows 7 Explorer in safe mode using only basic Windows devices, drivers and services, no network support.
Another shell- loading the command line, basic devices, drivers and services of Windows 7. Explorer and network components are disabled.
Restoring Active Directory- Starting Windows 7 Explorer in safe mode using only basic services, devices and drivers, and the Active Directory directory service.
Net– Starting Windows 7 Explorer in safe mode using only the main components of the operating system, as well as the following network components:
- Network adapters (wired Ethernet and wireless 802.11x)
- DHCP Dynamic Host Configuration Protocol
- Network connections
- NetBIOS over TCP/IP support module
- Windows Firewall
Download log- all information about the boot process of Windows 7 is saved to a file %SystemRoot%/Ntbtlog.txt.
Base video– standard VGA drivers are loaded instead of the drivers corresponding to the video card.
OS Information- During Windows 7 boot, the names of the drivers to be loaded are displayed.
Make these boot options permanent– if this option is enabled, then the system settings you have changed can only be canceled manually. You will not be able to undo the changes by selecting the "Normal startup" mode on the "General" tab. Also, you will not be able to undo changes using the function Use original boot configuration tab .

To configure advanced boot options for Windows 7, on the tab, click Extra options.
Number of processors
With this setting, you can limit the number of both real and virtual processors used in the system. Check the box and use the drop-down list to specify the number of processors to be used from the next system startup.
Maximum Memory
With this setting, you can limit the amount of physical RAM used by the operating system. Select the checkbox and in the text field set the maximum amount of RAM (in megabytes) that will be used by the system from the next start.
PCI lock
If this setting is enabled, the operating system does not allocate I/O and interrupt resources on the PCI bus. At the same time, the I/O and memory resources specified in the BIOS are preserved.
Debugging
If this setting is enabled, you can set global kernel-mode debugging options for device driver developers.
Services tab

tab Services contains a list of services that start automatically when Windows 7 boots. All these services are conventionally divided into two categories:
- Microsoft services on which the operation of the operating system depends;
- third party services necessary for the operation of drivers and some programs.
When identifying the causes of problems that occur during the startup or operation of Windows 7, you need to perform the following steps:
1. Tab
- Turn on Selective launch.
- Check box Load system services.
- Uncheck Download startup items.
2. Tab Services:
- Check box .
- Disable all third party services from starting.
3. Restart your computer.
If problems do not occur after a reboot, then the Windows 7 system components are working, and the cause of the errors is most likely the incorrect operation of one or more third-party services. To determine which service is causing the failure, enable one service at a time, restart the computer, and monitor the system status.
If, after disabling third-party services, the system still works with errors, then the underlying components of the operating system are probably damaged. To identify the cause of the errors, follow these steps:
1. Uncheck Do not display Microsoft services.
2. Disable all Microsoft services, then enable them one at a time, restart the computer and monitor the changes until you identify all the services that are causing the failure.
Startup tab

- In column Startup element the name of the program is displayed.
- In column Manufacturer- Program developer.
- In column Team the executable file that starts with the OS is specified, as well as the location of this file.
- In column Location displays the registry key responsible for automatically starting the program along with Windows 7.
- In column Shutdown date indicates the date of disabling startup items that do not start automatically with the operating system.
If you experience problems with Windows 7, you can try to determine the cause of the problem by disabling automatic startup programs one by one. To find out which program is causing the crash, turn off the startup of all programs, and then turn on one program at a time, restart the computer and monitor the system status.
To prevent the program from starting with Windows 7, you need to uncheck the box next to its name and click the button Apply.
Service tab

tab allows you to quickly launch Windows configuration, administration, and diagnostic tools. Highlight the desired tool and click the button launch.
About the program- display information about the version of Windows 7 installed on the computer.
Changing User Account Control Settings- configuring UAC - a Windows 7 security component that asks for confirmation of actions that require administrator rights.
Support Center- the main place to view alerts and take actions that help the normal operation of Windows 7. The Action Center lists important messages about computer security and maintenance settings that require the user's attention.
is a set of tools for automatically fixing some common Internet-related network, hardware and device problems, and program compatibility issues.
Computer management- a set of tools for managing hardware, software and network components of Windows 7.
System Information is a Windows 7 feature that displays detailed information about the hardware configuration, components, and software of your computer, including drivers.
Event Viewer– a tool for viewing detailed information about important events that occur in the system (for example, improper launch of programs or updates that are downloaded automatically). This information can be useful for troubleshooting and bugs in Windows 7 and installed programs.
Programs- the Windows 7 Programs and Features tool, designed to enable and disable Windows 7 features, as well as to remove programs or change their configuration.
Properties of the system- basic information about the hardware and operating system. Windows 7 version and activation status, performance index, computer name, domain name, and workgroup settings.
Internet Options- Internet Explorer browser settings.
IP protocol configuration– viewing and setting the network address of the computer (on the command line).
is a powerful diagnostic and performance monitoring tool built into Windows 7.
Resource Monitor- a tool for viewing information about the use of the processor, hard disk, network and memory in real time.
Task Manager- displays applications, processes and services that are currently running on the computer. With it, you can monitor the performance of your computer or shut down applications that are not responding. Monitoring the state of the network and viewing the parameters of its operation.
Command line is a Windows 7 feature that provides the ability to enter MS-DOS commands and other commands without a graphical user interface.
Registry Editor- a tool designed to view and change settings in the system registry, which contains information about the operation of the computer.
The article talks about what the utility is. msconfig, what are its main usefulness and how to use it correctly to solve emerging problems with Windows and set the stage for error testing.
Among other repair utilities included with Windows, msconfig.exe(aka utility System Configurations) certainly stands apart. It is most often used for:
- system startup type configuration (special mode selection)
- changing the boot procedure
- selection of services and programs at the time of system startup
- running special repair or statistical utilities
The configuration utility is a window of several tabs, and in the latest version of Windows, one of them () migrated to the Task Manager. msconfig.exe It is launched in several ways, the simplest of them:
WIN+R->msconfig
Let's check each of the tabs:
Msconfig: select services and drivers for Windows
The first tab will be General. Here we will meet several points that characterize the option to start services and drivers.

- Normal startup- an option that occurs by default and has been preserved since the installation of Windows. At this time, the system will load drivers for all installed (and installed after) devices and those services that, according to Windows, are needed to work, if the system does not register any errors in operation. You don't need to change anything for this option to work...as long as the user hasn't changed anything in the list of services, in the startup folder, or other settings. As soon as you make changes to the startup method, block programs from starting, change the task schedule, or add your own, the startup option automatically changes to Selective startup
- Diagnostic run- This option is somewhat reminiscent of Windows Safe Boot Mode. After a reboot, only the drivers and services of the system itself will work in it: no other programs and third-party drivers will start working, and the pre-installed and updated drivers will be replaced with those that “arrived” along with the installation of Windows (so to speak, international). However, anti-virus software often falls into this privileged list. The meaning is clear - this launch option is used in an attempt to isolate the problematic part of the software when the OS is unstable
- Selective the launch will allow you to boot the system, bypassing the programs that have registered over time, loading (or not loading) the main services. By setting or deleting the autoload setting, you can determine whether its contents interfere with normal operation, or the reason is not here. A modified item with the original boot configuration means that you have made changes to the boot record. This often happens when using a multiboot system with 2 or more operating systems, when editing local disks (letters, size or deleting / recreating volumes), etc.
The next tab displays a list of Windows systems as their bootloader sees them. So, if you have a second Linux installed, the bootloader rightly has no idea about it. The same applies to Windows OS of various generations: when it was in vogue Windows XP, its bootloader is Windows 7 or 10 and did not hear. So what about Windows 10 in the bootloader Windows XP there is nothing. But here are 10 about previous versions of the Microsoft OS, they already know everything, so they are great. But for security reasons, the correction of the list of systems in this part of the window is excluded: you cannot rename, delete from here, or rearrange them, since the utility has not been granted such rights. This option is presented purely for informational purposes.
However, the lower part of the tab window already contains customizable options, among which you can find useful ones. The simplest, but required - Time-out-Change the display time of the menu for selecting operating systems (if there are several). By default, Windows leaves us 30 seconds for this. If the system is alone, the bootloader is wise to omit the menu. But if there are 2 or more copies of Windows, you can not wait half a minute, but set the desired time.

On the left are special boot options. Among them is the notorious Safe Mode, which completely excludes the launch of programs and drivers, except for those installed by the system. Moreover, in addition to the option itself, you can set additional parameters for Safe Mode, including:
– Safe mode with full user interface but disabled network driversThe functionality of the utility continues with the next column of settings that will allow the user to change some boot options in both Safe Mode and Normal Mode. Like that:
- Without GUI- during boot you will not see the usual welcome screen, only a black screen without any information
- Download log- after loading, all information about running services and drivers is recorded in a special log file, which can be found at C:\Windows\Ntbtlog.txt
- Base video- a very useful parameter that allows you to load an image from a video card using ONLY drivers preinstalled by the system (and not those that you installed from the video disk, downloaded from the Internet, etc.). An important option when something went wrong after the next update of the video driver
- OS Information– option must be used with set Without GUI. Booting the system will be accompanied by a black screen displaying full information on the loaded drivers. If the system crashes while it is still booting, this mode can help in identifying the driver that is causing the system to crash.
Button : options not for everyone
The only available button in this quadrant of the window is Additional download options, where you can force this copy of Windows to start, either by ignoring the data from or vice versa strictly following them (this part of the tab was left by the developers at the beta stage: they pushed some settings for testing, and so they “forgot” them there).

For example, you can ask Windows to start with a LIMITED set of processors and physical memory. However, contrary to some misconceptions, in an attempt to speed up the startup of Windows, indicating the maximum number of processors and the entire amount of RAM at the time of inclusion will not affect the download speed in any way.

But your system may be set up so that redistributing I/O and IRQ resources over the PCI bus (which is what this checkbox does) will cause a system crash on boot, and you will inevitably encounter a startup error: it will either be a black screen or BSOD. If you encounter this problem, try booting into Safe Mode and remove the check from the item, or you will have to clear the CMOS memory with a battery or jumper. No big deal - we'll fix it. In general, when experimenting with this part of msconfig, remember:
By default, Windows throws all its energy and resources into launch, and it does this based on the results of the POST check carried out by . At the same time, the system selects the startup and operation parameters for itself EVERY TIME upon boot, and it is better not to interfere in this process.
Next option debugging- even more unknown to a mere mortal, a test function tool for developers of drivers for new devices. Work with potential drivers is performed at the level, and for work it is necessary to use a special control channel. It is highlighted immediately after this option is activated. debugger/debugger (like windbg), connected to the specified port, will allow you to work out the device under study. However, if Windows does not detect it on the default port COM1 (with incorrect settings for the debugger itself), the system may very well freeze. Simple users who do not use debugging when solving problems or solving problems related to software development under Windows have nothing to do here.
Msconfig: Services tab
Everything is simple here. The list contains services that are starting at boot and are running right now. The Hide Microsoft services option is often useful here, if we are interested in third-party programs that are loaded with Windows. By checking or unchecking the checkbox, you can check the effect of a particular program on the launch if you are going to catch the culprit of the unstable operation.

The settings applied here mate with the settings in the tab. General. Once you add or remove a service from this list, the launch option in the first tab will change to Selective.
In Windows 10, the contents of the tab moved to the Task Manager, but the owners of previous versions could somehow control the ever-expanding list of programs that started with Windows right from here, slowing down the boot process. Plus, hanging in the background in the number of running processes, slowing down the work in the current session:

the list of automatically loaded programs is now here

but autoload in windows 7 was possible
However, to get the most complete understanding of autoload management, it is better to pay attention to the article
Msconfig: Tools tab
The tab, unlike the previous ones, allows you to start the selected process right now using the button launch. Moreover, this is done on behalf of the administrator, indicating the full path to the executable file in the system directory. All the utilities listed here are not just that, but those that belong to the number of repair or statistical ones. Knowing what tools are available from here can be a great time saver without knowing.
 In addition, it is possible, by adding the programs we need, like those already available.
A familiar situation: you read some information from the smartphone screen, and the display at this moment fades. And if it takes not a few seconds to read, but much more? It is clear that the constant pressing of the power button, to put it mildly, is annoying.
How to make the Android screen not turn off? It turns out that the situation is not as critical as it might seem. There are several ways to solve it, which we will talk about now.
To adjust the screen off of your phone using the pre-installed tools, you need to go to " Settings", open the section" Screen", select the item" Sleep mode” and set there a time that is comfortable for you to “wake” the smartphone, after which the screen will go blank, or even remove the sleep mode by marking the corresponding line:

How to disable screen timeout using third-party software
I think it’s not worth going into too much detail about what the “Sleep Mode” function is for, or turning off the screen after a certain period of time (timeout from the English timeout - waiting time). It is clear that if the smartphone is constantly in active mode, then the battery charge will start to go to zero too quickly.
In this case, the problem is easily solved using special utilities.
Hold Screen On Demo
This program will not let the screen turn off while you are looking at it. With the help of the front camera, Hold Screen ON catches your eye and does not let your smartphone fall asleep. When you stop looking at the screen, it fades out and, accordingly, the consumption of resources stops.
It is possible to bind the utility to a specific application, and then the phone screen will not turn off, detecting your eyes in this application, however, if your camera works in another application, the program will have to wait until it is released.
Owners of Samsung Galaxy S3 use this feature without installing the utility, since it is present in this model by default, and if you have a simpler device, then you just need to download Hold Screen ON:

KeepScreen (now free)
Another good app that does a great job of disabling the timeout. Unlike the previous one, Keep Screen controls the position of the device using the built-in gyroscope. Therefore, when you hold your gadget in your hands, the utility, given its angle of inclination relative to the horizontal axis, will not let the screen turn off.
In addition, there is also the ability to block the screen off on the Android device for selected applications. To do this, after specifying the desired program, press " start/stop service“, and on the phone, in the screen blanking sensor (see the first screenshot), set the interval to 30 seconds.
Keep Screen takes care of the resources of the smartphone and works in the background, to do this, click " On", and after that " Save and restart app».
Important! If you turn off (lock) the device using the power button while the program is running, then after thirty seconds the screen will turn on and will not go out. Therefore, before blocking the gadget with the power button, you need to close the application or simply return to the main desktop.

On today's topic, we have nothing more to add, and, of course, you can judge how useful the information presented was. Good luck!