Since Windows is a multitasking system, you can open several windows at once in it, switching from one window to another if necessary. Among all open windows, one is active is the window that is currently being worked on, and the others are inactive or passive .
Signs of an active window:
The title of the active window is brighter than the titles of other windows.
The button of the active window in the Taskbar appears to be pressed, while the buttons of other windows appear to be depressed.
The active window is positioned on top of other windows.
For the operating system, all open windows are considered tasks, regardless of whether an application window or a folder is open. To switch to another task means to make the corresponding window active.
Ways to switch between windows:
click on the window button in the taskbar;
click on any visible area of the inactive window;
use the Alt + Tab key combination - press the Alt key and, without releasing it, press the Tab key. This will bring up a panel with icons for all open windows. When the desired icon is highlighted, release both keys.
Alt+Esc - toggles between non-minimized windows.
b) Creating folders and files in windows environment In order to create a new file or folder in any other folder on your computer's disk, you need to do the following steps: navigate to the folder where you want to create a new folder or file. It can also be the root partition of your drive; right-click on any point free of icons in the folder you open in the main working window of Explorer; in the menu that appears, select the New item and in it specify the type of file object you want to create. By default, Windows offers to create the following types of file objects: Folder - new folder; Shortcut - new shortcut; Briefcase - portfolio; Picture (Bitmap Image) - graphic file; Text document (Text Document) - a text document in Pain Text format; Sound WAV (Wave Sound) - sound file; Compressed ZIP folder - a folder compressed using the WinZIP archiver built into Windows XP. If additional applications and software packages are installed on your system, such as Microsoft Office or any graphic editors, this menu may also contain other items, such as a vector drawing, a Word document, or a Microsoft Excel sheet. After the new object is created, you will need to enter its name from the keyboard. The name can be specified in both Latin and Cyrillic characters.
in) File name extension(eng. filename extension, often just a file extension or extension) - a sequence of characters added to the file name and designed to identify the type (format) of the file. This is one of the common ways that a user or computer software can determine the type of data stored in a file. The extension is usually separated from the main part of the filename by a dot. In CP/M and MS-DOS operating systems, the length of the extension was limited to three characters, in modern operating systems this restriction is not. Sometimes multiple extensions can be used in succession, such as ".tar.gz". In the FAT16 file system, the filename and extension were separate entities, and the dot separating them was not really part of the full filename and served only to visually separate the filename from the extension. In the FAT32 and NTFS file systems, the dot has become a common legal character in a filename, so restrictions on the number of dots in a filename on these systems and their locations have been lifted (with some exceptions, such as all trailing dots in filenames are simply discarded). Therefore, the standard search pattern *.* no longer has any practical meaning, it is enough to specify *, since the dot character now falls under the concept of any character.
22. a) Clipboard(English clipboard) - an intermediate data storage provided by the software and designed to be transferred or copied between applications or parts of one application. An application can use its own clipboard, available only within it, or a shared one provided by the operating system or other environment through a specific interface. The clipboard of some environments allows you to paste copied data in different formats depending on the receiving application, interface element, and other circumstances. For example, text copied from a word processor can be pasted with markup into applications that support it, and as plain text into others. You can paste an object from the clipboard as many times as you like. As a rule, when information is copied to the buffer, its previous contents are lost. But, for example, Microsoft Office contains several buffers, so it can store several pieces of information at the same time. Some desktop environments include a program to log the latest buffer values and retrieve those that have already been overwritten. !!!Hot keys for using the clipboard
A list of some so-called hotkeys that will make working with your computer a little more convenient and faster. The list, of course, is incomplete, but includes the main keys and keyboard shortcuts that a novice user needs to know. In addition, it is very useful to get used to controlling the computer using the keyboard (in case if the mouse fails, For example).
Del(or Delete) is used to delete files.
Win(window button Windows on the bottom row of keys on your keyboard) - brings up the Start menu.
Ctrl+Esc also brings up the start menu.
Left Alt + Shift- this keyboard shortcut is usually in Windows switches the input language.
F1- challenge Windows Help.
F10– activates the menu bar of the open program.
Enter is the equivalent of clicking on the highlighted button.
Esc- the equivalent of a button click Cancel.
Pause- if you press this button on the keyboard while the computer is booting, you can view information about it: the frequency of its processor, the size of the hard disk, the capacity of the RAM, etc. After viewing this information, to further boot the computer, press the key Esc.
Prt Scr(Print Screen) - By pressing this key, you can take a snapshot of the screen of your computer monitor. Then just open some graphical editor, for example, Paint, and paste the image from the clipboard there (to paste, use the keyboard shortcut ctrl+v, or simply click Edit > Paste from the program menu. Then save the drawing as a JPEG or JIF. For Windows Vista: If instead Prt Scr press the key combination Alt + PrintScreen, then Windows Vista will not copy the entire screen to the clipboard, but only the current window that is displayed on the screen.
Shift– If this key is kept pressed, inserting a CD cancels the autorun procedure (AutoRun or CD player).
PageUp- Scrolls up the page of an open document or browser.
PageDown- scrolls down the page of an open document or browser. Keyboard Shortcuts:
Ctrl+Esc- opens the menu START.
Alt+Tab- switching between open programs.
Alt+Tab+Shift- switching between open programs in the opposite direction.
Alt+F4- closes the current window.
Shift+Del- deleting an object without moving it to BASKET.
Ctrl+O- calls the "Open document" window in any program.
ctrl+w- closes the document in any program.
Ctrl+A- By clicking, you can select the entire document in any program.
ctrl+s- saves the document in any program.
ctrl+c- click to copy the selected part of the document or file to Clipboard.
ctrl+v- click to insert part of a document or file from Clipboard.
Win+Pause/Break- open control panel window system-properties.
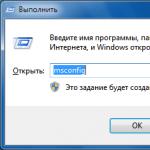
Win+R- opening the "Start Program" window (the same as START → EXECUTE).
Win+D- Minimizes all currently open windows.
Win+F- opens a window SEARCH.
Win+Tab- toggles between buttons on Task Panels.
Standard shortcuts for working with clipboard used in graphical user interfaces on PC-compatible PCs (for PC101 keyboard with QWERTY layout): Copy selected objects to clipboard: Ctrl + C or Ctrl + Ins . Cut selected objects to clipboard (to move): Ctrl + X or ⇧ Shift + Del . Paste from clipboard: Ctrl + V or ⇧ Shift + Ins . Although these combinations are the most common, some applications may use other key combinations. For example, in the X Window System, in addition to the clipboard described above, a "selection" buffer is available, to copy into which you just need to select the desired part of the text, and to paste, just press the middle mouse button or simultaneously left and right buttons (imitation of the middle button).
b). Context menu(English context menu) in the graphical user interface - a menu that opens, as a rule, when you press the second button of the pointing input device. This menu displays commands provided by the object (context) that was under the pointer at the time it was called, and general commands. Whether an object has a context menu and what it contains depends on the operating environment and the specific program.
e). Windows system main menu ( The Start Menu is a Microsoft Windows menu launched by clicking the Start button on the taskbar or by pressing the Windows logo key on the keyboard. It is the central starting point for launching programs as well as opening recent documents and accessing system properties. First appeared in Windows 95. Starting with Windows XP, there are two options: "Classic" - similar to the one in Windows Me / 2000/98/95, and "Standard" - the default in Windows XP, Windows Vista, in which you can run frequently used programs. In Windows 7, there is only a standard variant of the design of the Start menu, but there is no classic one. Windows XP Start Menu: Displaying the user's name and avatar Accessing the browser and E-mail client Accessing frequently used programs Opening special folders Turning off the computer
23.
TEXT EDITOR
WORD General view Text editor Word is designed to compile any documents: business and personal. Word is launched either through Start - Programs - Microsoft Word, or by double-clicking on the program's shortcut (if there is one on the desktop). On startup, a new document named Document1 (DOC1.DOC) is automatically opened. This name remains until you change it when saving to disk. Title bar Program menu bar Title bar Toolbar Document toolbar Standard formatting Ruler Scroll bar Status bar Figure 1 Microsoft Word program window There is a vertical cursor on the screen in the working area. Recall that the TEXT CURSOR is a vertical stroke that indicates where the text will be entered next. You can move the text cursor INSIDE THE TEXT using the mouse (to do this, click the mouse button in the place where you want to place the cursor) or using the cursor keys and the following keyboard shortcuts:
MICROSOFT WORD is a word processing application. It can be used to create letters, reports, invoices, brochures, novels, and other text documents. A text document is any information displayed on a computer keyboard. Documents created in WORD can contain both text and graphics, and other objects such as sound and video clips. WORD makes it easy to format characters and paragraphs. Built-in spelling and grammar checking programs check the document not only after it is completed, but also during creation. Existing object manipulation tools allow you to create attractive documents for printing, displaying on the screen and posting on the INTERNET. Finally, the HTML format support provides a good tool for beginner web page designers. Download WOPD. Standard: Start Programs Microsoft WORD Via the Microsoft OFFICE panel Via the program shortcut. By opening a WORD document. Screen view. The WORD program window contains standard window controls: Title; Menu bar; Toolbars - Standard and Formatting; Scroll bars; Status bar. The menu bar of the WORD program consists of the following sections: File - work with document files. Edit - editing the document. View - setting the program window and document type. Insert - Insert pictures, diagrams, mathematical formulas, non-standard symbols and other objects into the document. Format - document formatting (setting font, paragraph, style, etc.). Service - service functions (spell check, WORD settings). Table - work with tables. Window - work with document windows. ? - reference information about WORD. Usually on the screen we see two toolbars Standard and Formatting. They contain buttons for quick access to menu commands. If you move the mouse pointer over any button, a tooltip appears, and a brief description of that command appears in the status bar. Let's consider some commands of the first three menu items, studying the corresponding buttons in parallel. File menu. Create. When this menu item is selected, a dialog box opens in which we can select a template for the created document: General, Letters and faxes, Notes, Other documents, WEB pages. The New button on the toolbar quickly creates a regular document. Open. When this menu item is selected, a dialog box opens in which we can find the desired document in order to read, correct or print it. This menu item corresponds to the Open button on the toolbar. Close. This command closes an open document. It corresponds to the y button in the upper right corner of the document window. Save. This command is for saving the currently opened document. When this command is selected for the first time or when the save button is clicked, a dialog box appears in which we can specify the name of the file in which the document will be saved and, if necessary, the folder. Selecting this command again will save the document in the same file. Save As... If you need to make a copy of the document or save it elsewhere (for example, on a floppy disk), then use this command. In the dialog box, you need to specify a different name or path. Page settings. This command sets the page parameters for placing the document on it. The dialog box consists of 4 tabs: Margins, Paper Size, Paper Source, and Layout. Let's consider the first two. On the Margins tab, indents are set from the edges of the paper to the beginning of the text. The distance is indicated in cm. On the Paper Size tab, we can select a standard size or specify it in cm (if the printer allows it) and the orientation of the text on the sheet - Portrait or Landscape. Preview. This command shows how the document will look when printed. Her
Hotkeys in Word: 1. Text selection by words - Shift+Ctrl+cursor. Selects text not by characters, but by words, which speeds up the selection of the phrase as a whole. 2. Selection of the line to the end - Shift + End. Selects text from the position where the cursor is to the end of the line. 3. Selecting a line to the beginning - Shift + Home. Selects text from the position where the cursor is to the beginning of the line. 4. Select all text to the end - Shift + Ctrl + End. Selects text from the position where the cursor is to the end of the entire text. 5. Select all text to the beginning - Shift + Ctrl + Home. Selects text from the position where the cursor is to the end of the entire text. 6. Make the selected text bold - Ctrl+B. 7. Select text in italics - Ctrl + I. 8. Underline text - Ctrl + U. 9. Cut - Ctrl + Del. 10. Copy - Ctrl + C. 11. Paste - Ctrl + V. 12. Transfer to the next line without a paragraph - Shift + Enter. 13. Transfer to the next line from a new page - Ctrl + Enter. 14. Change the case of the selected text (lowercase, uppercase, first capital) - Shift+F3.
Windows 8 is more touch oriented, but Microsoft has tried to make it easier to navigate the OS with a mouse as well. In particular, the company has tried to make it easier to switch between applications with the mouse.
For this, the company has developed a special mechanism. And it turned out to be very simple. To switch to a recent application, the user only needs to hover over the upper left corner. By moving the cursor down, the user can view the full list of running applications.
The whole process, after getting used to it, seems very simple. But at times there is a desire to disable unwanted switching between applications so as not to be distracted from important work.
How to do it? Today we will tell you about it.
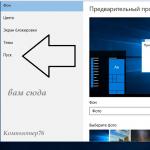
To get started, launch the Home Screen Control Panel. To do this, call the Charms panel and select the "Settings" option and then "Change PC settings".

Now select "General" from the left menu bar. As a result, on the right you will see the option to allow switching between recent applications, next to which there will be a slider. By default, this slider is in the on position.

All you have to do is move this slider to the left. And then you disable switching between applications in Windows 8.
It's that simple, good luck!
In Windows 7, thanks to Aero Desktop, it is possible to switch between application windows in 3D. It looks impressive and works well. To switch between windows, you need to press Windows + Tab and move to the desired window while continuing to press Tab. I must say that this key combination is not the most successful and convenient. Switching between windows can be implemented differently, much easier and more convenient.
Create a label
Beautiful switching between windows in Aero Desktop can be organized by creating a shortcut. To get started, go to the desktop, open the context menu and select "New - Shortcut" there, and in the window that opens, write the path to the shortcut:
C:\Windows\System32\rundll32.exe DwmApi #105


After you click Next, the system will ask you how to name the shortcut. Here you can write anything, for example Switch Between Windows. Then you need to call the shortcut properties. Right click and Properties. In the resulting menu, click Change Icon.

Now write the path to the icons:
C:\Windows\System32\imageres.dll

Among the many icons, it would be most logical to choose the one in the upper left corner.

It remains to click "Ok" and the shortcut is ready!
Using a label
To make the shortcut easy to use, place it on the taskbar.

Click on the shortcut and switch between windows with the direction keys. You can stop your selection on a specific window by pressing Enter. This is much faster and more convenient than switching with the Windows + Tab combination.
Long gone are the days in which the average user felt insecure at the computer. Almost everyone has become proficient in this business so much that we can compare it with a novice programmer. As a result, having understood the system, people try to use their time as rationally as possible, not to waste it on all sorts of trifles.
Such trifles include switching tabs in the browser. This problem is quite relevant, because now everyone has access to the Internet, and it is there that most of the time is spent. In this article, we will talk about how to switch between tabs using the keyboard, thereby speeding up the web.
Sequential switching
So, let's figure out how to switch between tabs using the keyboard. The key assignment for this is quite simple. CTRL + TAB is responsible for this. As soon as you press this combination, the tab will switch to the right of the active one.

By continuing to press TAB, you will go further and further, and so on in a circle. It is noteworthy that all the hotkeys given in this article are universal. That is, you can use them in all browsers without exception.
Switch to a specific tab
The above was not the only way to switch between tabs using the keyboard. It allows you to switch them sequentially, but this is rather inconvenient, especially if there are several tabs, and you need to get to a specific one. Now let's talk about how to switch between tabs using the keyboard so as to switch to a specific one.

For this, another is used - CTRL + 1 ... 9. By pressing a number from 1 to 9, you will switch to the corresponding tab. That is, the indicated figure is a serial number.
Switch to the next tab
If you want to go to the next tab in order, then the keyboard shortcut CTRL + PageDown or the aforementioned CTRL + TAB will help you with this. We figured out how to switch between tabs using the keyboard to the next one, but many may ask why such a variety. Everything is very simple: it is convenient to use different combinations on different keyboards.

Switch to the previous tab
If you decide to switch to the previous tab, then feel free to press the key combination CTRL + PageUp. In the event that it is inconvenient for you to press these buttons, you can use another combination - CTRL + SHIFT. The essence of such a layout of hot keys is quite simple. It consists (as in the previous case) in the fact that on some keyboards it is inconvenient to reach, for example, to PageUp, and on others, on the contrary, to SHIFT. This allows the user to decide for himself how it will be more convenient for him.

Add-ons
We have listed all the ways to switch between tabs using the keyboard. Using hotkeys may not always be convenient. That is why various browser add-ons have been developed. They are quite different from each other. Some allow you to assign hotkeys yourself, others bring specific changes. It's up to you which one to use.