How to Clear the List of Frequently Launched Programs and Apps in Windows 10
Windows 10 offers the user quite a few configuration settings that can optimize the appearance of the system menu. Among them is the display of the most popular files and documents used by the user. If the constant expansion of this list suits the user - often, indeed, there are several applications that are most used by us - then the system developers guessed right.
And if among them there is something that should not catch the eye of the rest of the household? Launched frequently, World of Tanks will betray you in front of your family with your head.
How to clear the list of programs in the start menu?
Clear the list of programs, most frequently used documents and applications from the Windows 10 Start menu. And in order not to go twice, at the same time we will add to the list with our applications and documents, which really belong there.
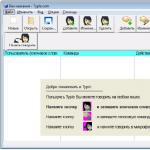
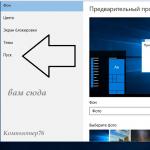
The first of the tasks (as, indeed, the rest) is solved elementarily. We need a menu Start–Options, click on Personalization and then Start:

In the list of settings find Show most used apps and simply disable this service by moving the slider. Now exit to the Start menu and you will see that the list of applications is empty:

Now let's add to the menu those programs and documents that are really needed there. Yes, it's also easy to do with a couple of mouse clicks. You can add files, folders and system directories here.
Click the Optimize list link or What folders will be displayed in the start menu to open the corresponding settings panel (follow the instructions in the figure above). This will allow you to customize the list of places that will be displayed in the menu. Here you can place folders with settings, Documents and Downloads directories. Select the one you want, turning on the slider and you will see how the corresponding item appears in the menu.
How to hide certain programs from the list of frequently used ones?
This is the easiest - just select the appropriate program and use the right mouse button to select the item Don't show in this list:

In the same manner, you can get rid of recently added programs in the Windows 10 Start menu. Open Windows 10 settings - Personalization - Start. In the list menu, you will see the item Show recently added programs. Move the slider to the Off position. We go to the Start menu and see that the corresponding positions are empty. Use the third figure of the article.
Good luck to all of us.
Windows 10 users may notice that ads for recommended apps appear on the Start menu from time to time, both on the left side of it and on the right side with tiles. Apps like Candy Crush Soda Saga, Bubble Witch 3 Saga, Autodesk Sketchbook, and others can also be automatically installed all the time. And after removing them, the installation occurs again. This “option” appeared after one of the first major updates of Windows 10 and works as part of the Microsoft Consumer Experience feature.
This guide details how to disable recommended apps in the Start menu, as well as prevent Candy Crush Soda Saga, Bubble Witch 3 Saga and other junk from being installed again after being uninstalled in Windows 10.

Disabling the automatic installation of unnecessary applications even after uninstalling them is somewhat more complicated, but still possible. This will require disabling Microsoft Consumer Experience in Windows 10.
Disable Microsoft Consumer Experience in Windows 10
You can disable the Microsoft Consumer Experience features that serve you promotional offers in the Windows 10 interface using the Windows 10 Registry Editor.

Important note: after a reboot, unnecessary applications in the Start menu may be installed again (if their addition there was initialized by the system even before you made a change in settings). Wait for them to be "Downloaded" and delete them (there is an item in the right-click menu for this) - after that they will not reappear.
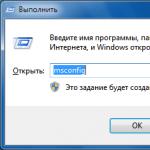
Everything that is described above can be done by creating and executing a simple bat file with the contents (see):
Reg add "HKEY_LOCAL_MACHINE\SOFTWARE\Policies\Microsoft\Windows\CloudContent" /v "DisableWindowsConsumerFeatures" /t reg_dword /d 1 /f reg add "HKEY_LOCAL_MACHINE\SOFTWARE\Policies\Microsoft\Windows\CloudContent" /v "DisableSoftLanding" /t reg_dword /d 1 /f reg add "HKEY_CURRENT_USER\Software\Microsoft\Windows\CurrentVersion\ContentDeliveryManager" /v "SilentInstalledAppsEnabled" /t reg_dword /d 0 /f
Also, if you have Windows 10 Professional or later, you can use the Local Group Policy Editor to disable consumer options.

After that, also restart your computer or File Explorer. Going forward (unless Microsoft introduces something new), the recommended apps in the Windows 10 start menu should not bother you.
Update 2017: the same can be done not manually, but with the help of third-party programs, for example, in (the option is located in the Behavior section).
How to clean the start menu from unnecessary shortcuts in Windows 8
In fact, it is very simple, but for general development, we do it according to the instructions.

A checkmark icon will appear on the tile, indicating that it is selected. If desired, you can select several tiles. To do this, simply right-click on a few more shortcuts or widgets you don't need.

4) After pressing the button, the tile will disappear, which is exactly what we needed:

How to remove unwanted shortcuts from the All Programs menu in Windows 8 and Windows 8.1
A little introduction. In order to get to the "All Programs" menu in Windows 8, you need to right-click in an empty area of \u200b\u200bthe start screen and there click the button on the right "All Programs". In Windows 8.1, the input was slightly changed, and to view programs, you just need to move the cursor to the bottom of the screen and press the down arrow that appears:

As it turned out, the location of the shortcuts has not changed much since the past operating systems, and for cleaning it is enough to go through two folders. We go in, delete unnecessary shortcuts or even directories.
The first one is in the following path:
C:\Users\*username*\AppData\Roaming\Microsoft\Windows\Start Menu\Programs
It is the user's personal folder. That is, it contains those shortcuts that relate to programs installed only for your user. Remind me to see the folder Appdata you must enable the display of hidden folders and files (see ).

The second folder is located in the following location:
C:\ProgramData\Microsoft\Windows\Start Menu\Programs
It is shared by all users on a given computer, i.e. if you delete the shortcut in this folder from under your user, it will automatically be deleted from the Start menu and from another user. Folder ProgramData is also hidden (see).

That's all. I hope this article was useful to you, click one of the buttons below to tell your friends about it. Also subscribe to site updates by entering your e-mail in the field on the right.
Thank you for your attention:)
Do you want to remove shortcuts for installed programs from the Windows 10 Start Menu, but you don't want to remove entire games and programs?
There is a way to remove or rename programs and folders from the start menu. How to do it?
When you install a program or game, an icon is created in the start to launch the application.
Sometimes new appearances are not limited to one shortcut, and separate links to program settings are also added.
Programs create whole folders in the menu, in which you will find not only shortcuts to launch the application, but also help files, registration links or text files with documentation.
In short, after a while, "Start" is terribly overflowing with rubbish. The obvious way to put things in order is to remove the excess.
To do this, we right-click on the selected shortcut and we already want to select the “Delete” option, and suddenly it turns out that such a function simply does not exist.
We can only remove the program we no longer want or only remove the icon.
Remove Programs from the Start Menu in Windows 10
All the contents of the list of applications in the "Start" in Windows 10 are stored in a special folder containing all the icons.
You just need to get access there, then change the names of shortcuts and folders or delete them completely. Any changes you make will be immediately reflected in the menu. It's very easy to do.
All you have to do is open Start and then look for the icon for the program or game you want to uninstall from the list of applications.
You should then right-click on the abbreviation and then select "Advanced" -> "Open file location" from the drop-down menu.

A window will open showing the path containing the shortcuts and folders displayed in Start. Windows 10 has several of these folders. It can be one of the following ways:
- C:/ProgramData/Microsoft/Windows/Start menu/Programs/
- C:/Users/Your username/AppData/Roaming/Microsoft/Windows/Start menu/Programs/
Some shortcuts are stored in one section, and some are stored in another. The system will automatically select the right location for you after selecting the option "Advanced" -> "Open File Location".

The open folder has shortcuts for programs and games that appear in the menu on Windows 10.
The only exceptions are apps downloaded from the Windows 10 store - they don't show up here and the only way to remove them is to completely uninstall them.
If you want to change the name of a shortcut or folder, just right-click on it and choose Rename.
Then enter a new name for the element and confirm it by pressing the Enter key. The changes will be applied and the icon/folder in Start will also change its name to the same one.
In turn, if you want to remove something from the menu, just remove the selected shortcut or folder from the open directory.
Removing the icon or folder will not remove the app - the only thing we will remove are the links in Start.
After deleting shortcuts and folders, the changes will be updated and the deleted items will also disappear from the menu in Windows 10. Good luck.