In a previous article I wrote about setting up a local network on Windows 7. But, since the number Windows users 10 is growing every day, I decided to prepare instructions for setting up a local network in Windows 10. Using these instructions, you can combine all the computers that you have connected to one into a home local network Wi-Fi router u. I will show the example of setting up a network between a computer on Windows 10 and Windows 7. But, computers on Windows 8, or several computers on Windows 10 can also participate in this network. The instructions are universal, and if you have several regular desktop computers and laptops connected to the same router, you can easily combine them into a local network. And at the same time, it doesn’t matter at all what version of Windows they run on (except Windows XP).
After creating a local network, you will be able to:
- Share files between computers on your home network.
- Share the printer. For example: you connected a printer to one computer on the local network, and you can print documents from other computers.
- Play games over a local network.
And all this can be done by air. If your computers and laptops are connected to the router via a Wi-Fi network. This is how it works for you. You can connect some computers via cable, and laptops, for example, via Wi-Fi. Everything will work.
I have set up a local network between two computers (desktop PC and laptop). One works on Windows 10, and the second on Windows 7. I set it up through a home group. I think this is the most correct and safe way. You can also configure it by disabling public access with password protection, as I did in the instructions for .
How it works local network, through setup using homegroup? Very important point, since the settings there are a little confusing, the main thing is to understand how everything works, and it will be easier to configure. This means we create a home group on one of the computers and receive a password (I created on Windows 7, it doesn't matter). And all other computers that we want to connect to the network, we simply join the home group using the received password. That's it. It is precisely this scheme that we will now consider in more detail.
I made a small diagram for clarity (you may have more or fewer computers, and a printer does not need to be connected):
Before proceeding with the setup, you must check time and date. Check that the time and date on all computers that will participate in the network are the same.
Create a homegroup in Windows 7
If, for example, all your computers are on Windows 10, then we create a home group on one of the computers with “ten”, everything is exactly the same there. Or in Windows 8, for example.
Click on the Internet connection icon in the notification panel. Then, select .

There will be our connection to the router (via cable or Wi-Fi). It is important that it has the Home Network status. If you have a Public Network like me in the screenshot, then click on this link and select Home network.

Close the window for selecting network location. Now, our connection has the status "Home Network". Go to section Home group.

Click on the button Create a home group.
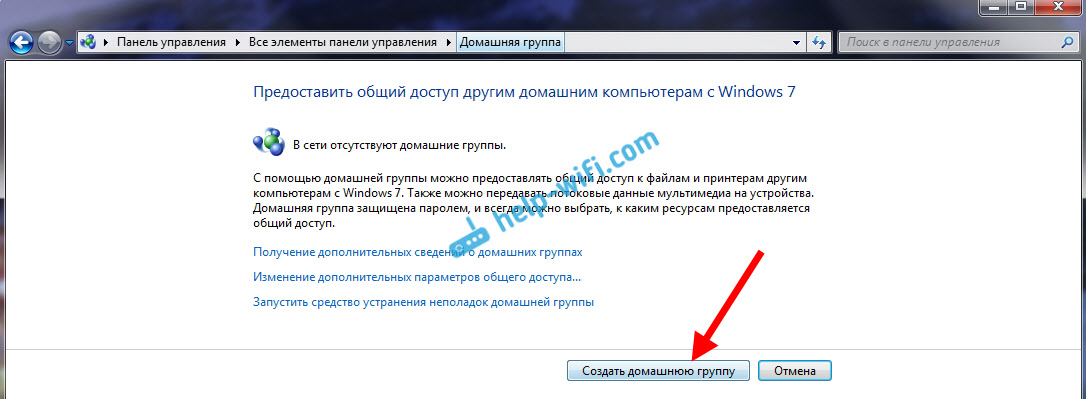
Select the checkboxes for the required items that will be shared (shared folders) and click Next.

Write down or take a photo of the password you receive. Using this password, we will connect other computers to our network.

At this point, the creation of a home group is completed. If you go back to Network and Sharing Center - Home group, then you can remember your password, change it, leave the group, change sharing settings, etc.

That's it, the group has been created. We have the password. Now we connect the necessary computers on our network to the homegroup.
Setting up a local network in Windows 10: connecting to a homegroup
Let's move on to another computer. Now I will show, using the example of a computer with Windows 10, how to connect to a home group to create a home local network. Using this scheme, you can connect not only computers with installed Windows 10, but also with Windows 7 and Windows 8.
Already by standard scheme right-click on the internet icon and select Network and Sharing Center. Let's go to Home group.

If you have a message "HomeGroup is not available because you are not connected to your home network.", then click on , and click on the button Yes.

We wait a little and see a message that we can join the home group. Click on the button Will join.

You will be prompted for a password. We indicate the password that we received when creating a homegroup on another computer. Click Ok.

A message appears that you have joined the homegroup. Click Ready.

If you open the Network and Sharing Center - Home Group, you can set up sharing, leave the group, view the password, etc.

That's it, the local network between computers is already working. Open Explorer (This Computer), go to the network tab on the left, and see the computers on the local network. We can open them and view the folders that are shared. A computer with Windows 10 can easily see a computer with Windows 7 installed on the network.

In the same way, a computer running Windows 7 sees and logs into a computer running Windows 10. In this way, you can connect other computers. One condition is that they are connected to your router.
What to do next? How to use the local network?
It all depends on the purpose for which you connected computers into one network.
- If you want to play online, then everything should already work. Sometimes antivirus programs block such connections. Therefore, if problems arise when the computers do not see each other, then just try it for a while disable antivirus.
- To share files, you can use shared folders. Just copy the files, for example, to the "My Images" folder (assuming we shared this folder during setup), and they will be accessible from all computers on the network. If you want to share your folder on local disk, then follow . See after the heading "Setting up sharing of files and folders."
- I will prepare a separate article on setting up shared access to the printer.
These are the tips. I hope you found the article useful.
In commercial, educational and other small organizations it is very important to establish convenient, fast and secure file exchange. In such cases, instead of using the Internet to transfer data, computers are connected to a local network. Networks can be both large and small, have different topologies, that is, connection method and type. There are two main types - client-server, when one computer on the local network plays the role of a server, and the others are workstations, and a peer-to-peer network, in which all computers are equal.
The second type of network is also called workgroup and is used where there is no need for centralized management. There are also home groups - so to speak, a special subtype of workgroups in which a password is requested when connecting a new device. Such groups are usually used for sharing files in small organizations and houses/apartments with several PCs, hence their name, by the way. A Windows 10 homegroup can include up to two dozen machines, and we’ll discuss how to organize and configure it below.
Creating and setting up a homegroup in Windows 10
So, how to create a homegroup in Windows 10? First, let's make sure that all computers meet three main requirements, namely: they must be connected to the same network (via a router or Ethernet) and have the same name working group (System Properties – Edit – WORKGROUP) and run a system no lower than Windows 7.
Now let's proceed directly to the procedure itself. Let's open it with a team control /name Microsoft.HomeGroup On your computer, use the HomeGroup applet and the first step is to make your network private. To do this, click on the “Change network location” link in the current window, and then click the “Yes” button on the panel that appears on the right.


The contents of the window will immediately change, and the “Create Homegroup” button will become active. Okay, now let's configure some parameters. Click the “Change advanced sharing settings” link in the window and enable network discovery(must already be enabled) and file and printer sharing.


Returning to the “Home Group” applet window, click the “Create Home Group” – “Next” button and select the directories whose contents we want to make common to all users of the group.


At the last stage, you will be asked to write down a password that will be used to connect other computers to the created group. Save the password and click “Finish”. This completes the creation of a homegroup in Windows 10.

How to join a homegroup
The homegroup is ready, but so far it only has one computer. Let's connect other hosts on the local network to it. To do this, open the “HomeGroup” applet on another computer and when, after the automatic scan is completed, the message “The user has created a homegroup on the network” appears in the snap-in window, click the “Join” button.

Then click “Next”, select the necessary resources and enter the same password that was issued by the system when creating a homegroup on the first computer. The connection is complete. If desired or necessary, you can add arbitrary directories to the list of shared resources. There are at least two ways to do this.
The first way is to add the desired folder to any of the standard Windows libraries by right-clicking on it and selecting the appropriate option in the menu. The second method is just as simple. Click on the shared catalog RMB, select the option “ Grant access - Homegroup (view and edit)».

After this, the folder will immediately appear in the resources of the Windows Home Group. In addition, you can change the group access password ( New Password must be shared with all group members) and temporarily disable access to any of the shared libraries. All of these actions are performed directly from the HomeGroup snap-in window.

Common problems with using HomeGroup
As you can see, creating and setting up a homegroup in Windows 10 is not difficult. It is much more difficult to cope with the problems that sometimes arise, especially when it is not possible to establish their cause. And there can be many reasons for this. Let's briefly consider the most common of them.
What to do if you can't connect to your homegroup:
- Make sure that all PCs connected to the HomeGroup are set to the same time. Open on all machines with the command control /name Microsoft.DateAndTime“Date and Time” applet, switch to the “Internet Time” tab and, if necessary, synchronize the time on the Microsoft server.

- A connection problem may occur if a user creates a HomeGroup on multiple computers on the same network. This mistake is often made by novice users. And although all PCs in a homegroup are equal, it is created on only one machine, and all the others only connect to it.
- You will not be able to connect if for some reason Windows services Your Network Member Grouping and Home Group Provider services will be disabled. Also enable the PNRP Protocol and PNRP Computer Name Publishing Service services.

- Problems will arise if, after creating a HomeGroup, you change the network type from Home to Public or Enterprise Network. Also note that there should only be one network in the Network and Sharing Center.
- For correct operation Homegroup requires IPv6 to be enabled. Go to the “Network and Sharing Center”, click the “Change adapter settings” link, open the properties of the adapter used to connect to the Internet, find the item IP version 6 (TCP/IPv6) and make sure that the checkbox next to it is checked.

Homegroup no longer available after Windows 10 update

Opening with the command services.msc service management snap-in, find the specified service in the list, double click open its properties, set the startup type to “Automatic”, save the settings and restart the computer. In the following Microsoft versions, will probably simplify the task, but for now let’s connect like this.
Other problems
There may be other problems that prevent you from connecting to a Windows 10 HomeGroup. If you receive the error “Windows can’t set up a HomeGroup to this computer"You can try resetting the function responsible for saving certificate storage data. Open a Command Prompt or PowerShell console as an administrator and disable the Network Member Identity Manager service by running the following command:
net stop p2pimsvc /y

Now go to File Explorer to the location C:/Windows/ServiceProfiles/LocalService/AppData/Roaming/PeerNetworking, delete the file from there idstore.sst, and then restart your computer.

Previously disabled services will start on their own.
And one more thing. If problems with HomeGroup occur after upgrading to Windows 10 from earlier versions of the system, open the command optional features applet “Enable and disable Windows components"And just in case, activate the SMB 1.0 protocol, which is disabled in the Top Ten; it is also associated with network discovery.

Hello friends! We continue to understand the Internet setup and solution different problems in Windows 10. I have already prepared several useful articles on this topic, I will provide links below. Well, in this article we will set up the Internet in Windows 10. Let's talk about setting up a regular network connection, high-speed connection (PPPoE), Wi-Fi networks, and 3G/4G modems. I think the article will be useful to many. After all, after upgrading to Windows 10, not everyone can immediately figure out where and what to configure and how to do it. And there are times when, after upgrading to Windows 10, the Internet simply does not work. Most likely, you just need to reconfigure the connection.
We know there is different ways connect our computer to the Internet. In this article I will try to talk about setting up basic connections:
- Setting up a regular Ethernet connection. Connecting the cable directly from the provider to the computer, through a router, or ADSL modem.
- Internet connection via Wi-Fi.
- Internet setup via USB 3G/4G modem.
Now we will take a detailed look at setting up an Internet connection through the connections listed above. You should find out what kind of internet you have, and you can immediately go to the desired subheading in this article. Let's probably start with Ethernet - a very popular way to connect to the Internet.
Ethernet: connecting to the Internet in Windows 10 via a network cable (router, modem)
Let's look at the simplest connection first. If your Internet provider just laid a network cable into the house, and the provider did not provide a login and password to connect to the Internet, then you have normal connection using Ethernet technology.
The Internet connection in Windows 10 is configured in the same way via a router or ADSL modem.
To set up such a connection, just connect a network cable from your provider (router, or ADSL modem) to your computer (laptop), into the network card connector:
If everything is fine with the Ethernet settings on the computer (nobody changed them), then the Internet should work immediately (you will understand this by the connection status in the notification panel). If the Internet via a network cable does not work, the computer simply does not respond to connecting the cable, then see. I myself encountered such a problem.
If the connection appears, but status Limited, or unidentified network, and the Internet does not work, then you need to check the parameters of the Ethernet adapter.
In Windows 10 this is done like this:
Right-click on the Internet connection status in the notification panel and select . Next, click on the item in the new window Changing adapter settings.

Right-click on the adapter Ethernet and choose Properties. Select an item from the list IP version 4 (TCP/IPv4). If the checkbox next to this item is not checked, be sure to check it, otherwise the Internet will not work. So, select “IP version 4 (TCP/IPv4)” and press the button Properties.
In a new window we check that they have been set automatic settings obtain IP and DNS addresses, and click Ok.

The Internet should already be working. If not, then restart your computer. If you still can’t establish a connection, then check the cable connections, whether there are any problems on the provider’s side, whether the router or ADSL modem through which you are connecting is working properly (if you do not have a direct connection to your ISP).
If you are trying to set up an Ethernet connection directly from your provider, and the Internet does not want to work for you, then ask your provider if they bind by MAC address. If it does, then you need to tell the provider the MAC address of the computer. He will register it in his settings, and the Internet will work. Few providers use such a binding, but it does happen. Read how to find out the MAC address in Windows 10.
That's it, we've sorted out this type of connection, now we have a high-speed connection.
If your Internet provider laid a cable into your house and provided you with a login, password, and possibly some other data for connecting to the Internet that you need to set in the settings of your computer or Wi-Fi router, then you need to configure High-Speed on Windows 10 connection (PPPoE). What are we going to do now? Essentially, this is the same as Ethernet, but here the Internet will not work until we create connections.
If your Internet connection is through a router and a connection is configured on it (PPPoE, L2TP, PPTP), then you do not need to configure anything on your computer. Just connect the network cable from the router to the computer. I talked about setting up such a connection above.
If you connect the cable directly to the computer, and you have a username and password to connect to the Internet, then you need to create a connection.
Opening Network and Sharing Center:

Click on the item. Then, select the item Internet connection, and press the button Next.

In the next window, select the item: High speed (with PPPoE).

Next, set the username and password that your Internet provider must provide to you. You can also set a name for the connection, for example: " High speed connection Beeline". And you can also check the boxes next to the items saving the password, displaying the password and allowing other users to use this connection. I recommend checking the box next to the item Remember this password.

Click on the button Connect, and if everything is connected correctly and the parameters are set correctly, a connection will be created and a connection to the Internet will be established.
You can see and manage this connection by clicking on the Internet icon in the notification panel.

Clicking on the connection will open a menu Dialing a number, where you can connect, delete, or edit connection settings.
Internet connection via Wi-Fi
If you have a Wi-Fi router installed at home, or you want to connect your laptop to the Internet with friends, in a cafe, etc., then you can use Wi-Fi for this. If you already have the driver installed on Wi-Fi adapter, and Windows 10 almost always installs it automatically, all that remains is to open the list of networks available for connection, select the one you need, and specify the password (if the network is secure), and you are already connected to the Internet.

On this topic, I have already written a detailed article: . I think there should be no problems connecting to a wireless network.
Setting up the Internet via a 3G/4G modem in Windows 10
All that remains is to consider setting up a connection via a USB 3G or 4G modem. On a computer with Windows 10, setting up such a connection will be practically no different from.
First of all, we need to connect the modem to the computer and install the driver for our modem. The driver can be downloaded from the modem manufacturer's website, from the Internet provider's website, or simply found on the Internet. Search by modem name and model. Also, the driver can be on the disk included with the modem, or on the modem itself. If there is no driver for your modem under operating system Windows 10, then try searching for Windows 8, or even Windows 7. It might work.
After you have installed the driver, connect the modem to your computer, and you can start setting up a 3G connection on Windows 10. By the way, everything is almost the same as when setting up a high-speed connection.
Opening Network and Sharing Center.
Click on Create and configure a new connection or network and choose Internet connection.

And we set the parameters that the provider provides: number, username and password. I showed the example of the Intertelecom provider. I recommend checking the box next to Remember this password. Specify a custom connection name. Once you have filled in all the fields, click on the button Create.

If everything is ok, a connection will be created and a connection to the Internet will be established.
If the connection fails, check all parameters and USB connection modem It may also be that you have very poor coverage from your provider. In such cases, the Internet may not connect at all, or work very slowly. I wrote how to see what your signal level is and how to increase it. In some cases, if the network is very bad, you need.
You can start, stop, delete, or edit the created connection by clicking on the Internet connection icon and selecting the created connection.
 The Internet connection status is always displayed in the notification panel. By clicking on it, you can disconnect from the Internet, or start the desired connection.
And a few more words
No matter how you set up the Internet, you may encounter a popular error "Limited". When the Internet does not work and the connection status is yellow exclamation mark. We dealt with this problem in .
The article turned out to be long, but it didn’t seem confusing. I would like to fully answer the question posed in the title. I hope you found useful information in this article and connected your Windows 10 computer to the Internet.
You can ask questions in the comments. Before describing your problem, read this article carefully. Perhaps the solution has already been written. Also, look at the links to other articles, there are many useful information on the topic.
This article describes how to set up sharing of files and folders without a password on Windows 10.
This instruction will look at the simplest case of setting up shared access to Windows 10 folders. When you need to provide access to Windows 10 shared resources without a password. This is the most common situation in home networks and small office networks. This setting assumes that network access will be without a password, without restrictions.
Note. If you have Windows 10 2017 or 2018 and are experiencing the " Windows 10 does not see other computers on the local network", then read another article -. It describes a solution to the problem of connecting Windows 10 to older versions of Windows. This article may also be relevant for Windows connections 10 to older versions of Linux.
But at the beginning of a silent theory.
Local and global networks
Today there is only one global computer network, the Internet. Local computer networks differ from global ones in the following factors:
- The number of computers connected in this network.
- The quantity and quality of resources shared (available) in this network.
IN global network The Internet is connected by hundreds of millions (possibly more than a billion) computers. These computers provide a large number of different types of resources. The most common of which are text and graphic information. In addition to the information itself on the Internet, it is also possible to process this information - there are services for working with images and documents. Also available on the Internet are services unrelated to computer topics, for example, the sale of goods and services (for example, the sale of tickets for various transport).
To local computer network Most often, two to several computers are combined. Much less often, the number of computers on a local network can be several tens or hundreds (in large commercial or government organizations). As a rule, only a few resources are distributed on local networks - files, printers, scanners and Internet access.
Computers are physically connected to a network either using a cable or via a radio signal (WiFi). But in any case, setting up a local network is done the same way.
So, what, and in what order, needs to be done in order to configure the Windows 10 network?
Windows 10 sharing without password
This instruction will describe how to set up a Windows 10 network so that shared access to folders (files) and printers is provided without requiring a password. This is a trusted network option. This type of organization of a local computer network is most convenient to use (no need to remember passwords for each computer). Moreover, such a network is easier to create and maintain.
It is best to start setting up a local network by checking the necessary conditions.
Checking local network connection
First, you need to check whether your computer has a local network connection. To do this, you need to open the applet of available network adapters and network connections. The easiest way to open this applet is through the " Execute Windows + R ncpa.cpl and click " OK":
Note: there are more long way- open "" and click on the link there" Changing adapter settings".
This is what the network connections applet looks like:

This example shows that there is a physical network adapter on the computer and there is also a network connection to the local network. This example uses a cable connection to a local network (Ethernet). If connected via WiFi, the adapter will be called "802-11 Wireless Connection".
Possible errors, which can be found in the Network Connections applet:
- This applet may not contain adapters at all - in this case, you need to check the list of equipment (Device Manager). The network adapter may be disabled or the drivers may not be installed.
- The adapter may be crossed out with a red cross. This means that there is no physical connection to the local network. You need to check the cables. In the case of WiFi, this means that the computer is not connected to a WiFi access point (router).
- The adapter may have the inscription " Unidentified network". This means that there is a physical connection to the local network, but the computer was unable to receive the settings of this network. Most often this happens if there is no router on the local network and you need to manually specify the local network parameters.
By Windows default configured to automatically receive network settings from the network router. If there is a router on the local network, then you just need to plug in a network cable or connect to a point WiFi access. If there is no router on the local network, and this sometimes happens when using small cable networks, then you will need to manually specify the network settings in the properties network adapter. Read more about manual setting Local network settings are written in the article "Setting up a network between Linux and Windows". The setup is described there for Windows XP, but for Windows 10 it will be exactly the same.
The next step is to check the computer name and workgroup. To do this, you need to open the applet " System Properties"The easiest way to open this applet is through the dialog box" Execute". It is accessible through the Start menu or by pressing the keys Windows + R on the keyboard. In this window write sysdm.cpl and click " OK":

This is what the applet looks like" System Properties" (you need to open the tab " Computer name"):

Here you need to check:
- Full name - it should not be written in Cyrillic and should not have spaces.
- Working group- it should not be written in Cyrillic and should not have spaces. In addition, the workgroup name must match the same name on other computers on the local network. That is, the workgroup name must be the same on all computers on the local network.
If you need to change the computer or workgroup name, click the Change button. After such a change, you will need to restart Windows.
Now you can proceed to setting up the Windows 10 network.
Setting up a Windows 10 network
Open "Windows Explorer" and in it find and open the item " Net". By default, sharing is disabled on Windows 10 and when you open Network, there will be a warning message at the top:

You need to click on this inscription and then select " Enable network discovery and file sharing":

Note: Another way to enable network discovery and file sharing via " Network and Sharing Center"and then click on the link" More sharing options" and then open the desired profile.
After that "Windows Explorer" will prompt you to select a network type, where you need to select the first option:

Note: if you later need to change the network type - instructions in the article "Change network type Windows 10".
After that "Windows Explorer" will show a list of computers on the local network:

You can now access the shared folders on these computers.
Login via local network to a computer named "Home":

The next step is to configure Windows 10 folder sharing.
How to set up folder sharing in Windows 10
IN "Windows Explorer" Locate the folder you want to share. Click on that folder right button mouse and select " Properties" (in this illustration the folder is called lan):

Note: The folder name must be in Latin and without spaces.
In the folder properties window, you need to open the "tab" Access"and then press the button" Sharing":

In the next window, you need to open the list of local users (accounts on this computer) and select “All” from this list:

After that, click the "Add" button:

After this, you need to specify read and write access rights for the “Everyone” group:


After this, you need to click the “Finish” button:

After this, the window will open again" Folder properties". In it you can check the tab " Safety"there should be full access for the group" All" (Windows automatically changes the permissions file system NTFS):

That's it, setting up access to a specific folder is complete. If you want to share another folder, these steps must be repeated for each one.
Note: There is no need to share individual files. All files that are in the shared folder will be accessible over the network. All will also be available online nested folders.
One last step left...
Need to open" Network and Sharing Center" and on the left side click on " Change advanced sharing options":

In the next window you need to open your profile " All networks":

And there disable the parameter " shared access with password protection" and of course click the "Save changes" button:

This completes setting up network access without a password for Windows 10. Now you can log into this computer via the local network and Windows will not require you to enter a password.
To check, let's go to a Windows 10 computer from a Windows XP computer:

The shared folder "lan" opens and you can edit and create files in it via the local network.
But if, nevertheless, Windows requires a network password
Despite the fact that the settings described above have been made, when logging into this computer, another computer may request network password. This is possible in two cases.
Local users with the same name (login)
Both computers have local users with the same name but different passwords.
Example. There are Comp1 and Comp2. Each of them has a user named User. But on Comp1 the user's password is 123, and on Comp2 his password is 456. When trying to log in to the network, the system will ask for a password.
Solution. Or remove matching user logins. Or for users with the same login, specify the same password. An empty password is also considered the same.
There are no local users on Windows 10
On Windows 10, you can log in and work with a Microsoft account if you have Internet access. In this case, a situation is possible when Windows installation 10, no local user was created at all (the login was through the account Microsoft entry). In this case, Windows will also require a password when logging in via the local network.
Solution. Create a local user on your Windows 10 computer.
If there are old computers on your local network
If there are computers on your local network running older versions of Windows or Linux, then you may encounter a problem where Windows 10 does not “see” such computers.
The reason may be that in latest versions Windows 10 has disabled support for the SMB protocol version 1. How to enable support for SMB version 1 is written in the article Local network between Windows 10 and Windows XP.
Unshare a Windows 10 folder
On Windows 10, canceling sharing is not at all obvious (unlike Windows XP). On the "tab" Access"(folder properties) there is no option, as there was in Windows XP. It is useless to click the "Sharing" button; you cannot cancel sharing there.
Now, to cancel sharing, you need to go to the " Access"press button" Advanced setup":

And disable access there (uncheck the “Share this folder” option):

As they say, “guess three times.”
Share a Windows 10 folder through the command line
Everything can be done much faster if you use the command line (console, cmd.exe). There are only two teams:
net share lan=c:\lan
net share lan /delete
The first command shares the folder c:\lan and asks for her network name lan.
The second command deletes the network (public) folder lan. Real folder c:\lan Of course it stays in place.
Share Windows 10 files using the Shared Folders snap-in
Included in the tool kit Windows management 10 yes special program(snap-in) for managing shared resources on a computer. It's called "Shared Folders" and you can run it with the command fsmgmt.msc(in the console or via Win + R):

Alternatively, this snap-in can be opened through the Start menu: "Control Panel - Administrative Tools - Computer Management - Shared Folders."
Windows 10 Printer Sharing
Printer sharing is configured in the same way as for a folder. You need to open the "Devices and Printers" applet and find there desired printer, open its properties and on the “Access” tab define network access parameters.
Setting up a local network for other operating systems
If you live in Krasnodar and you need to set up a local network in Windows
Ivan Sukhov, 2017, 2019 .
If you found this article useful or simply liked it, then do not hesitate to financially support the author. This is easy to do by throwing money at Yandex Wallet No. 410011416229354. Or on the phone +7 918-16-26-331 .
Even a small amount can help write new articles :)
Just fifteen years ago, there was only one computer in the family and the question of creating a home local network simply did not arise. Nowadays a PC, a couple of laptops, tablets, and smartphones can easily coexist in one apartment. Routers have become available and cost no more than a carton of cigarettes. Sooner or later the question arises: how to combine all this machinery into one network? After all, you want to share a printer, a disk drive and play games. network games. On Windows 10, setting up such a grid is not that difficult.
How to create a local network in Windows 10 - magic, a router and some wires
As funny as it sounds, when computers were slower and more expensive, building a local network was cheaper and easier. To connect several computers, there were enough network adapters and cheap coaxial cable(much like a cable for connecting television antennas). The connection topology was a “ring”, so a router was simply not needed. But such networks were slow, the maximum speed achieved could not exceed 10 MB, and as new clients connected, the speed dropped exponentially.
The “ring” was replaced by the “star” topology, according to which all modern networks. Here, the router is in the center, and the clients are at the ends of the rays of an imaginary star. The beam can be either a wired connection or a WiFi connection. Almost all home networks are built as a star. The network that we will set up is no exception.
The router is a key player in the home (and any other network). The incoming Internet channel, client machines, and peripheral devices (printers and disk storage) are connected to it. 99% of home routers are equipped with a WiFi module, so they can connect clients over the air. If you don’t have a router, you’ll have to buy one, and it’s advisable not to skimp on the purchase, because the speed and comfort of your home network depends on the performance and stability of the router. The router must be equipped with at least two antennas and USB ports for connecting peripherals.
Avoid using routers that are “gifted” by your ISP when you connect or installed “for free.” As a rule, these are the simplest and cheapest devices, the performance of which is enough to connect 2-3 smartphones to the Internet together. A home local network is an enormous burden for such a unit: it will often freeze, overheat and ultimately fail.
If you live in a multi-apartment high-rise building, it would be useful to buy a 2-band router that works in frequency ranges 2.4GHz - 5GHz. The 5GHz band has many more channels and fewer routers, so your network will be less affected by nearby routers. The illustration shows how routers configured to operate in adjacent channels interfere with each other. The result is a decrease in speed and response.
Program WiFi Analyzer will help you select a free channel in the operating range
It would also be a good idea to limit the transmitter power to a value that ensures stable reception throughout the entire house, and other networks will not be visible. This configuration can be done both from the router side through the web interface, and from the client computer through the device manager.
DD-WRT firmware provides the user with flexible configuration of the WiFi module power
Setting up the router is quite simple and in most cases you will need to configure an incoming Internet connection (the login and password will be provided by the provider) and wireless network: come up with a name for it, choose an encryption algorithm (WEP, WPA or WPA2) and the most hack-resistant password. If necessary, enable the DHCP server to distribute addresses. After this, you can begin connecting home network clients (hereinafter referred to as DS).
When creating wireless connections Do not use encryption below WPA2. The network password must contain lowercase, capital letters and numbers look chaotic. Date of birth, dog's name or girlfriend's name as a password is a bad idea. You can find a lot of programs online for WiFi hacking, not requiring any special knowledge.
Connecting a DS client using a cable
If the laying of cables around the apartment is carried out by specially trained cable elves, the task is greatly simplified. If not, then you can do it yourself, although you will have to work with your hands.
- Choose a place to install the router and connect the Internet provider cable to it - usually it is already inserted into the apartment/house and crimped with an RJ-45 plug. The port for connecting the provider cable is highlighted in color and labeled: WAN or Internet.
The ISP cable plugs into a special port on the back of the router
- Lay the cable to the computer connection points, securing it to the baseboards. If your baseboards have cable channels, you can hide the cables in them.
- Using crimping pliers, crimp the RJ-45 connectors at the ends of the cable according to the diagram below.
- Connect with cable network interface computer with the corresponding router port. If the number of computers that need to be connected to the network with a cable is more than four, you will need to connect an additional splitter-switch to one of the ports and connect the remaining clients to it.
Home network clients connect to the yellow (LAN) connectors on the back of the router
Connecting a DS client using WiFi
Despite obvious advantages cable ( highest speed, no interference and harmful radiation), not everyone is ready to put up with the fact that a computer or laptop is connected by a wire. In addition, a number of devices (tablets, smartphones, convertible netbooks) have a network connection when WiFi assistance- the only possible option.
First of all, you need to enable the WiFi interface in the router, create a network name (SSID), select the encryption type and come up with a password:
On your computer, select from the available WiFi reception networks, enter your password and connect to it.
Setting up LAN in Windows 10
You connect to the router with a cable or over the air - make sure that the network card (adapter) has received TCP/IP and DNS server addresses from the router:
- Open "Network Connections" and find there network card, through which the computer is connected to the router.
- Expand the properties of the adapter, and in them - the TPC / IP protocol.
- Make sure that all values are obtained automatically.
Next, you need to make sure that all Windows devices connected to the network have the same workgroup selected:

Working with Homegroups
For an unprepared user, the simplest solution in which all users will have shared access to each other’s resources is to create a Homegroup. In the early Windows versions the home group worked unstable and with limitations. In Windows 10, setup has become simple and straightforward, and the Homegroup mechanism works like a clock.
Creating a Homegroup in Windows 10 is a process that is as simplified as possible. Follow the instructions and prompts of the system, first checking the necessary settings. In this case, access will only be granted to shared folders OS. If necessary, you can change the composition of the Homegroup, enable or disable the types of resources that will be available, or leave the Homegroup.
Before creating a Homegroup, you should make the folders that will be accessible in this group public. By default, the homegroup includes the so-called user files: “video”, “music”, “documents”, and “printers and devices”. If you don't want to bother with extras. settings, you can simply place documents for sharing in these folders. And if you need to ensure the availability of folders in other places hard drive, you will have to tinker a little.
Creating a home network

Setting options

Thanks to the efforts of Microsoft, the process of creating a network has become as simple and straightforward as possible. If you follow the instructions, no problems will arise.
- In the Home Group window, go to Change advanced sharing settings, and then click the Private tab.
- Enable “Turn on network discovery” and “Turn on file and printer sharing” options.
- Then open the “All Networks” tab and turn on the “Enable sharing. Users on your home network will then be able to read and write files in the homegroup shares.
- To prevent users from having to enter passwords, enable the “Turn off password protected sharing” option.
- Save your settings changes.
In the “Home Group” window, select “Create a Home Group”, and in it specify the folders to which access will be shared. The list of available folders will already contain standard user folders Windows folders 10, as well as folders to which you have configured access separately.
Once you complete the Home Network Setup Wizard, your computer will generate a password that other network users will need to enter to access shared folders. If password access is disabled, users can simply open folders as if they were located on their local drive.
Disabling password access to folders makes your home network vulnerable to external Internet attacks. If your network router is connected to the Internet, be sure to configure your firewall to exclude external requests to home network resources.
Connecting to a homegroup
Open the “Control Panel”, in it turn on the “Categories” display mode, in the “Network and Internet” group open the “Home Group” item, and in it - the “Join” item.
Delete a homegroup
- Before deleting a homegroup, disconnect from it.
Leaving the home group is carried out only after disconnecting from it
- Open a command prompt from which you launch the service manager.
Launch Service Manager from command line Windows
- The HomeGroup Provider and HomeGroup Listener services need to be stopped.
Select HomeGroup Provider and HomeGroup Listener services to stop
- The service must not only be stopped, but also the status must be set “manually” when the OS starts.
In configuring service settings in Windows 10, you must click “Stop”
Disable network discovery and sharing to folders and printers. These options can be found in Advanced Sharing Options. Don't forget to save your changes.
Turn off sharing to leave a homegroup
Now the home group will not appear in the control panel settings and will not work.
Video: how to create a local network on Windows 10
Adding a device to the local network
Let's look at how to add a device (not a computer/laptop) to a local network using the example of an ordinary printer. Several algorithms are possible sharing printer on the network. Depending on the interfaces of the printing device, it can be connected directly to the router or to one of the client computers with shared access configured.
A modern workgroup printer carries all the interfaces for integration into a local network
Sharing an Ethernet Printer
Typically, a wired network interface is present in color and monochrome laser printers for small workgroups and offices. These are rather large, high-performance devices, so they are rare guests at home. But if by chance such a printer came to you, setting up shared access to it is not difficult at all:

After installing the drivers, the printer is available for sharing.
On each computer in your home network, steps 3–7 of the instructions must be repeated. It does not matter how the clients are connected; the TCP/IP protocol is supported in both cable and wireless connections.
Sharing a Wi-Fi Printer
Wireless interfaces can now be found even in inexpensive inkjet printers and MFP. Manufacturers have tried to make the installation process as simple and straightforward as possible.

Print on wireless printer will be available only to those network clients who are connected to it via the WiFi protocol. Wired clients will not be able to print directly to such a printer. If you share this printer on a computer with WiFi, everyone can print.
Sharing a printer connected to a network client
This type of connection is the simplest. The printer connection interface does not matter. All you need to do is configure shared access to it:

Do not forget that the seal on such network device will be possible only when the client computer to which the printer is connected is turned on.
How to remove LAN in Windows 10
This question is very relevant for laptop owners who often connect to public networks. Each time you connect to a new location, the OS creates a new local network called “Local Network N”, where N=1,2,3... There is no simple mechanism for deleting through network settings, so here it is step by step guide by removal.
- Using the Win+Pause key combination, open the system properties window and select “Advanced system settings” in it.
In the window that opens, select additional system parameters
- Open the Environment Variables dialog.
- Create a new variable DEVMGR_SHOW_NONPRESENT_DEVICES and give it the value "1".
After creating a new variable, you need to set it to 1
- In Device Manager, enable showing hidden devices.
- In the “network adapters” section you will see a whole bunch of old network connection items with numbers “1,2,3”... and ad infinitum. By deleting these items, you also delete the local networks associated with them.
How to disable network discovery
Network discovery is a mechanism that allows computers on a network to see other machines, their network drives and printers. If you don't want your machine to be visible on your home network, it's best to turn off network discovery.

Home network does not work: causes and diagnostics
The network is both a technically and programmatically complex organism, equipment that ensures round-the-clock uninterrupted operation and costs a lot of money. In the home segment, the class of equipment is lower and it is prone to failures and malfunctions. All this leads to loss of network functionality. Let's take a quick look at the main mesh problems and how to fix them.
Router malfunction
Most home routers are made in compact plastic cases. Electronic components work in a very difficult thermal regime, almost “to the limit”. The hot season adds 10–15 degrees to the temperature of the device and the router freezes. Together with him, everything loses working capacity home network. Symptoms include the inability to log into the router’s web interface and lack of access to the Internet and network resources. To restore the network, you need to turn off the router and let it cool down, but this is a palliative measure. A radical solution to the problem would be to improve the heat transfer of the router by creating additional ventilation holes and installing a fan for airflow.
Installing additional fans will help your router overheat significantly less and work longer
Operating a router in severe thermal conditions not only makes the network unstable and glitchy, but also shortens the life of the router itself by 3–4 times.
Damage to the network cable
Pets, curious children, or just a wife with a mop can instantly render a network segment inoperable by damaging the wire that connects the computer to the router. If only one client has lost access to the network, the problem is most likely in the cable. Disconnect the connectors, carefully inspect them and the wire itself. If the RJ-45 plugs are damaged, you can cut them off and crimp new ones. If the wire itself is mechanically damaged, you need to replace it entirely. Twisted or soldered connections will lead to network errors and a drop in speed to a snail's pace.
Inexpensive twisted pair UTP is designed for installation in protected cable boxes. If the cable is laid along the baseboard and is poorly secured, it can be easily damaged
Damage to WiFi antennas
External antennas of a router or network adapter connected to a computer can be easily damaged by children or careless users. In inexpensive home devices, antenna connectors are held in place only by soldering, without additional fastening. Mechanical impact on the antennas leads to the formation of cracks and loss of contact. It is easy to diagnose such damage - if at a distance of a meter and a half there is a connection between the router and the computer, but at 5–6 meters there is no longer any connection - the antenna is damaged. The fix requires opening the device and soldering it. If you do not have the skills for such repairs, contact a service center.
The SMA antenna connector is the weak point of the router. Impact or lateral force leads to connector breakage
Operating a router for a long time with a damaged antenna can result in device failure. Try to fix the problem as quickly as possible.
So, the home local network has been created: the router’s LEDs are blinking merrily, network clients go online and exchange files, the printer rustles with sheets of paper. The network works, but not everything has been done yet: you will need to install anti-virus software, configure a firewall in the router, protect the connection from external virus attacks, create a blacklist of sites so that children do not find “movies for adults” on the network. Test the network for errors in data transmission and measure the speed of operation. However, this is the topic of the next material. Stay tuned!