Home media server(UPnP) - universal program, which provides access to content hard drive your computer electronic devices such as TVs, players, game consoles. Data is transmitted via the UPnP (DLNA) protocol. This program works with TVs, game consoles, stereo systems, mobile phones and smartphones.
Today, human life in modern realities is very difficult to imagine without high technology. Each of us is surrounded by laptops, computers, televisions, and stereo systems. It often happens when you really want to watch your favorite movie on a big TV or play computer game via the console. The multifunctional home media server software package for Windows is designed to solve such problems. With its help, you can organize full access to all media contents of your computer’s hard drive.


Download Home Media Server for free
Home media server program ( Home Media Server) is small in size. You can install a home media server in just a few minutes. Its main capabilities include transcoding video and audio into a form that is supported by a TV or tape recorder. You can also customize subtitles, select the desired picture size for any screen, and select audio tracks yourself. The user has the opportunity to send Internet radio or television directly to the TV or player.
If you don't see your life without digital television, you can also download a home media server. It supports all modern digital formats(C, S, T), works perfectly with the VLC Media Player program and can transmit using the Digital Media Renderer function digital signal to other electronic devices.
The home media server in Russian has wide functionality. It is possible to save transcoding profiles. Their use greatly simplifies setup when connecting new devices. Downloading a free home media server (DLNA) is recommended for owners of Philips, Sony, Panasonic, JVC, Toshiba, Samsung TVs and players. Each of them has all the necessary connectors for interaction via the UPnP protocol with personal computer. Thus, with the help of this program you can significantly expand the capabilities of these TVs.
All novice users are recommended to take a look at the official website of this application. There is a wonderful forum where the solutions of the most common problems. You can also learn how to effectively connect a particular device.
You can download the home media server without registration and SMS on the SoftAttaka website. We always provide the latest and most relevant updates.
In this article, I want to once again talk about how to create on a computer (laptop, netbook) DLNA server. This will allow you to watch movies and photos on your TV, as well as listen to music that is on your computer.
You just need to connect the TV to your computer via a network cable, or simply to one network, start a DLNA server on your computer and start watching a movie or photo.
But, as it turned out in the end, with Smart app Share raises many problems. Either it does not start, then it produces various errors, or it closes on its own. You can read about this in the comments that visitors left on the article, the link to which is above.
There is a very good and absolutely free program “Home media server (UPnP, DLNA, HTTP)”, which is an excellent analogue of Smart Share from LG, or for example AllShare from Samsung.
“Home Media Server (UPnP, DLNA, HTTP)” is a universal program with which you can launch a DLNA server and connect to it from almost any TV that supports DLNA technology (and if your TV has Wi-Fi or a network connector, then it most likely supports this technology). In principle, a DLNA client can be not only a TV, but for example a game console.
This manual is suitable for TVs different manufacturers: LG, Samsung, Toshiba, Sony, etc. Compared to proprietary applications such as Smart Share, “Home Media Server (UPnP, DLNA, HTTP)” has a large number settings.
We will not delve into all the nuances, but will only consider how to open shared access to the necessary folders or drives. How to create a server and how to start watching a movie using DLNA technology on your TV.
Connecting a TV to use DLNA technology
Before we start setting up the program, we need to connect the TV to a computer or laptop. If you already have everything connected, for example through a router, then you can move on to the next step.
We need to connect the laptop and TV to the network. If you have a router installed at home, then just connect your computer to this router, via cable or via Wi-Fi, it doesn’t matter. And you need to connect the TV to the same router. You can connect your TV the same way, or via Wi-Fi (see connection instructions ) .
Our task is to ensure that the TV and computer (in my case laptop), were connected to the same router. I have a TV connected to my router via Wi-Fi LG 32LN575U and laptop Asus K56CM. This instruction will be based on their example.
What to do if you don't have a router?
In this case, you can connect the computer to the TV via a network cable directly. Just take the required length network cable (it can be crimped at almost any computer store), and connect the TV to the computer.
It looks something like this:
Connecting this way should work fine. But my TV refused to see the server created on the laptop. But, in the “Home Media Server (UPnP, DLNA, HTTP)” program, the TV was displayed and I could start viewing photos from the laptop itself, and the photo appeared on the TV.
She also has an idea on how to connect them without a cable and without a router. But I’m not sure what will work and this method is only suitable for TVs that have the ability to connect to Wi-Fi.
You can try to create a computer-to-computer connection on a laptop, which I wrote about in the article ““. Then, connect the TV to the created access point and try to access files on the computer.
I think we have sorted out the connection. Let's move on to setting up the server.
Setting up the “Home Media Server (UPnP, DLNA, HTTP)” program
First, we need to download and install the program itself. I recommend downloading from the official website: https://www.homemediaserver.ru/index.htm. There's always new version and it's safer that way.
Save the archive to your computer. To install, simply run the setup.exe file, which is located in the archive. I will not describe the entire installation process, it is simple. Follow the instructions.
After installation, launch the program with a shortcut on the desktop.
Let's go straight to the program settings. We won't do anything special there. We'll just point out local disks, flash drives, external hard drive and, or folders, the contents of which we want to see on the TV. For example, you can open only a few folders with movies, photos and music.
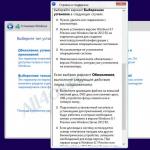
A settings window will open. In the first category, Media resources, we need to indicate which drives or folders we want to see on the TV. By default, there are open standard folders with photos, videos and music.
The program is trying to sort everything. And in order not to get confused in all these folders on the TV, I advise you to open shared access to local drives. By default, if I'm not mistaken, access to them is already open. Check if the checkbox next to Local disks.
If installed, this means that you can open any file on your TV that is stored on these local drives (drives C, D, E, etc.).
You can also specify individual folders, or for example external hard disk. To do this, click on the button on the right Add, and select in Explorer the desired folder, flash drive, or hard drive.
We can see which folders and drives we have opened access to. We can delete selected folders. These are the basic settings, if you look, there are a lot of settings there, I won’t go through them all. To save, click on the button Ok, and agree to scan media resources.
We wait while the program scans the folders and disk. Next, you can start the DLNA server itself. To do this, simply click on the “ Launch“.
We see a message stating that the server is running.
Now, just turn on the TV. If everything is connected correctly, it should appear in the “Home Media Server (UPnP, DLNA, HTTP)” program. To do this, go to the tab Playback devices (DMR), and on the right, click the button Update.
If our TV appears, then everything is fine. You can try to start viewing photos directly from the program.
If the TV does not appear in the program, and the server we created is also not visible on the TV, then first of all, check the connection. Is the TV connected to the network and is the laptop connected.
Then, completely disable antiviruses and firewalls. They can block access to the server.
To do this, in the main program window (above), select one of the tabs: movies, music, or photos.
In the left window, media content will appear that is located in those folders and drives to which we have opened access. Click right click mouse, for example on a photo, and select “Play on“, then select our TV.
The photo should immediately appear on the TV screen.
In the same way, you can start playing video and music. This means that we can start playback on the TV screen from the “Home Media Server (UPnP, DLNA, HTTP)” program.
But this is not always convenient. It's much better to go through the TV and open necessary files. To do this, leave the server running. You can hide the “Home Media Server (UPnP, DLNA, HTTP)” program. Click on the red cross (close the program), and it will hide in the notification panel.
At the same time, the server will work and you will be able to access your computer from the TV.
We start viewing files via DLNA from the TV
This means the server is running on the computer, files are open for viewing.
Now, on the TV, we need to go into the program that is responsible for working with DLNA technology. For example, in LG, this is Smart Share. On other TVs, this application may be called differently.
For example, to launch Smart Share in LG, go to Smart TV (blue button on the remote control) and select Smart Share. If your TV does not have Smart TV, but does have DLNA, the process may be different.
Open the folder My computer, and we see our local drives there, and other folders to which we have opened access.
Afterword
“Home Media Server (UPnP, DLNA, HTTP)” is actually a very cool program, with a lot of settings. We only considered the opening public access to files, and starting the server. When I started watching the movie through Smart program Share, the laptop went into sleep mode and playback was interrupted. “Home Media Server (UPnP, DLNA, HTTP)” has a lock that prevents the computer from going to sleep when it is being used as a server.
I hope everything worked out for you and you are now watching your favorite movies on the big screen TV using DLNA technology.
If something doesn’t work out, write in the comments, we’ll try to figure it out.
Owners of modern digital gadgets - smartphones, tablets, as well as high-tech TVs with Smart TV support - can create a real media server at home with which they can access various types multimedia content with different devices. How to use this opportunity in practice?
How a home media server works
What is a home media server? This is a system in which various devices networked - computers, televisions (if they support the corresponding functions), mobile gadgets and other modern devices, can interact and share multimedia content. Another notable technology that can be used through a home media server is IPTV. That is, having built the appropriate one, the user will be able to organize something like a mini-TV studio at home.
Sharing access to media content in HMS
Among the main advantages of the HMS program, as we noted above, is versatility. With its help, virtually any device can be combined into an infrastructure, the central part of which is a home media server. For Philips, Samsung, LG and other brands, it does not matter what type of software is installed on the main network module.
To solve a problem related to the organization sharing to media files - videos, photos, music - launch the program, then select from the list of devices displayed in the main window the one with which you are supposed to launch files on the media server. For example, it could be a TV-enabled TV.

After this, you should specify the media resources that are to be distributed among the devices connected to the network. You need to go to the HMS settings, select the “Directory List” item, then “Media Resources”, and then, by clicking the “Add” button, you should specify the address of the corresponding files. As soon as these actions are completed, you need to click the “Scan” button, and then activate its automatic implementation so that the corresponding content is promptly displayed on the TV.
How to use a media server using TV? Very simple. You need to load an interface using the TV remote control, which is supposed to indicate the source of the TV picture - this could be the antenna itself, an Internet channel, a flash drive, or, as in our case, a media server created using the DLNA standard. The corresponding item should appear in the TV menu, and those files that we have marked in HSM as being shared will be available for launch. Modern TVs, as a rule, recognize the home media server without problems. For LG, Samsung, Philips and other brands, providing support for standards like DLNA is the norm.
Using IPTV on your home network
Another common problem solved by home network owners is organizing TV broadcasts using IPTV technology. The most important condition here is that the user has a subscription to the corresponding service of the provider (it is usually paid). When using HMS interfaces, setting up the media server in terms of using IPTV is also very simple.

You will need to download and install the VLC Media Player program on your PC - it will be used to work with the corresponding content. You need to link it to the HMS interfaces by going to “Settings”, then selecting “Media Resources”, then “Internet Resources” and specifying the folder in which the VLC program is installed.
After this, you need to upload a playlist of TV channels in m3u format to HMS - many providers allow you to download these files from their websites. After that, go to “Settings” again and check the “Internet television” option in the “Transcoding profile” item. After this, you need to restart the media server. Then you can start watching channels in IPTV format using your TV.
Home media server - rich in settings, free application to provide public access and sharing files on PC Windows 7, 8 and 10 to other UPnP, DLNA, HTTP devices on the network.


It will turn out to be a convenient option for watching streaming television, radio broadcasting and local video on gadgets without additional steps of downloading and converting content, connecting flash drives and HDMI cables.
Home Media Server Features
Processes requests from client devices for movies, images and audio data, without playing or generating anything on its own. The program supports Smart TV, game consoles, media players, as well as mobile gadgets - almost any device can be a full participant in the multimedia network. Endowed with a number of capabilities:
- converting content into the required format;
- adjusting video frame parameters;
- switching audio streams and supporting subtitles;
- redirection of online streaming;
- support for digital television;
- simultaneous launch on a group of devices;
- working with podcasts;
- remote control via WEB interface.
The home media server also provides an option for backing up the database and settings. May be useful in correcting errors in using the program and possible errors work.
Advantages of Home Media Server
The main advantages in comparison with similar products include:
- Absolutely free. None advertising banners and intrusive third-party software.
- Multifunctionality. A universal “harvester”, the potential of which knows no bounds.
- Trans coding support. Automatically detects and recodes unreadable source file in real time.
- Russian-language localization. Given the extensive functionality of the utility, it will be easier to understand the options in a clear language.
You can download Home Media Server for free for operating systems Windows 10, 8 and 7 at the link https://site/domashnij-media-server/ below, and a large number of settings and parameters will help users customize the application as accurately as possible.
In general, the Home Media Server program is conceived by the developers as a home media server. But most often HMS is used in as DLNA server. It is ideal for this purpose and has many useful settings, often functioning even better than such official programs like LG SmartShare PC SW and the standard way to set up DLNA via Windows Media Player. The idea is to allow the TV to play movies, music, pictures and other content directly from your laptop or computer. At the same time, they must be connected to the same home network, for the organization of which a router or router is usually used. After that, all that remains is to configure the program, and it’s done. You can download it on the official website http://www.homemediaserver.ru by clicking on the “Download” button.
Installing Media Server is as easy as shelling pears: unpack the archive and run “setup.exe”, where we agree to all the conditions and click the “Next” button everywhere. After successful installation and launch of HMS, the main program window will appear. When you launch it for the first time, select your TV from the list of devices (for example, LG TV). You can add media resources to which your TV will have access in the next window or in the settings later. In the program data backup and recovery window, click “Run” and “Close”.
HMS as DLNA server
We immediately go to the program settings. Here we have to configure our home media server like DLNA. To do this, in the “Media Resources” category in the very first tab “Directory List”, using the “Add” button, indicate the paths to the folders on our computer where the media files that you would like to see on an LG TV or other are located. After adding all the folders, click “Scan”. Although we will set up auto-scanning of new media resources, new elements still sometimes do not appear automatically, and you need to scan using this button manually.
On the “Scanning” tab, it is important to enable automatic scanning of directories when they change and start the program, so that new media files are immediately displayed on the TV.
In order for Home Media Server to start when the computer boots, in the “Advanced” category you need to check the boxes “Start the program when you start a Windows session” and “Installation Windows services Home media server..." Setting up HMS for the DLNA server is complete, click OK.
Next, select the “PC Connection” tab and click the “Next” button 3 times. Please note that in step 3 you select your home network(wired or wireless, depending on how you connect your TV), otherwise select it.
In step 4 you should see your PC. If it is not there, restart the server, this usually helps. Next, select the device and go to the “Connected devices” item.
View Media
After the first connection, our device will be displayed in the last item of LG SmartShare - “Connected devices”. If it is not there, restart the server on your PC. For example, to watch movies you need to select the “Movies” folder, then “Media resource directories”.
Here you will see a list of folders added in HMS settings. Go to any folder and launch the movie. Sometimes the TV may write that “The file type is not supported.” Don’t despair, this is a glitch, try to run it again and everything will work out 2-3 times.
Features of HMS
The advantages of a home media server from Serviio are as follows:
- on the TV you can see a clear PC folder structure;
- the ability to start playing media files on TV from the program itself on a PC. To do this, you need to select a file from the list and click on the green Play button, which is present if the TV is turned on;
- relative stability of operation (after PC SW DLNA from LG it’s just a fairy tale);
- a large number of settings.

Flaws:
- some confusion for beginners;
- Sometimes automatic scanning of new files does not work;
- Periodically you have to restart the server for the device to appear on TV.
Despite these shortcomings, HMS is ideal as a home media server, including DLNA. Details on setting up the Home DLNA server are in the following video.
Other options
The capabilities of the Home Media server reviewed do not end with DLNA. HMS can provide access to computer media resources using UPnP (Universal Plug and Play) technology and the HTTP protocol. This is more relevant for smartphones and tablets.
But also for DLNA given server maybe a lot more. For example, you can give access not only to computer resources, but also to streams of Internet radio and IPTV television. It is also possible to broadcast so-called podcasts from various online cinemas, such as hdserials.ru, hdkinoklub.ru and hundreds of others. There are also possibilities for transcoding media files of a format that is not supported on TV. How do you like this? All this will be discussed in the following articles, subscribe to our newsletter, as well as VKontakte and Twitter.
Please note.