Updated: 05/02/2017 Published: 2016 or earlier
Description
Windows does not boot or takes a very long time to boot and says “Could not configure Windows updates Cancel changes. Don't turn off your computer."

Cause
During the installation of updates, an error occurred critical error, which the system must correct. Since Windows doesn't know exactly which update caused the problem, it uninstalls any patches that were last installed. If there are a lot of them, the system will take a long time to load, which will create the feeling of a stuck boot.
Main reasons incorrect installation updates - unexpected power outage or internal error code for the fix itself.
Solution
Step 1 - go to Windows:
We are waiting for the system to boot. This will happen sooner or later (sometimes you will have to wait up to 12 hours).
If you can't wait:
- We boot the system in safe mode - this does not always help, since Windows can also start rolling back updates in it.
- We start Windows recovery from the installation disk - you will have to work in command line.
Step 2.1 - if you managed to wait for the system to boot or start it in safe mode:
Click right click mouse by Computer - Properties - Windows Update - Setting options.
In the window that opens, in the section Important updates choose Look for updates, but the decision to download and install is made by me:
and press OK.
Now open Windows services and disable Windows Update:

Go to the folder C:\Windows\SoftwareDistribution\Download and delete everything that is in it.
* more often, system disk- C, but this is not always the case. Please take this note into account and replace the letter if necessary.
Step 2.2 - if you started Windows recovery from disk:
Select Command Prompt as your recovery tool.
Run the following commands:
> ren C:\Windows\SoftwareDistribution\Download C:\Windows\SoftwareDistribution\Download.old
* this command will rename the Download folder to Download.old, thereby making downloaded updates for the system unavailable.
> sc config wuauserv start= disabled
* disable Windows automatic update service.
Step 3 - start Windows in normal mode:
After making the settings in step 2, restart the computer. It may happen that the system will start rolling back updates again. In this case, you will have to wait until the procedure is completed and restart the computer again.
Now turn on the update service and manually install Windows fixes. But let's not install all the packages at once, since this is what leads to problems. We select several updates, wait for them to install and restart the computer. Continue this way until all the fixes have been installed.
Did you know that when iPhone connection and iPad to the Internet via Wi-Fi, software updates (iOS) are downloaded to the device’s memory automatically and there is no way to prevent this?
If you agree to voluntarily give up some of the free memory in your iPhone or iPad, pass by. “Under the cut” is information on how to prevent automatic downloading of software updates to iOS devices, how to delete a downloaded update and how to prevent it from being downloaded “automatically” in the future.
With the release of iOS 5.0 in 2011, iPhone owners iPod Touch and iPad were able to update the firmware of their devices “over the air”, the so-called (OverTheAir). In this case, the software update is downloaded by wireless network Wi-Fi and the update process itself takes place on the device itself.

This is certainly a big step forward, but at the same time, we, iPhone, iPod Touch and iPad users, have acquired a new headache: the software update is downloaded to the device’s memory in background automatically and without our consent.

Why disable automatic downloads of software updates on iPhone and iPad
If your device has plenty of memory (not RAM) (32, 64 or 128 GB) and most of it is empty all the time, you don’t have to think about blocking downloading updates. But if free space an iPhone or iPad is “worth its weight in gold” and every time you need something in it (video, photos, install an application), the space saved on software updates will be very useful.
Size of software updates, such as iOS 8, for various types devices (iPhone, iPod Touch or iPad) and models (iPhone 5c, 5s, 6, 6 Plus, etc.) can reach from 0.9 to 1.1 GB. And if the memory in your device is only 8 GB, updating the firmware alone will take about 15%.

When software updates are downloaded to iPhone and iPad automatically
Remember, firmware updates (aka iOS) are downloaded automatically to iPhone and iPad only when the device is connected to the Internet via Wi-Fi, and even when the device is not connected to a power source, but is running on battery power. By cellular network(mobile Internet), software updates are not downloaded.
How to prevent iOS updates from automatically downloading on iPhone and iPad
Let's assume that your device is running firmware 7.1.2 and . A software update for your device is available for download and you will be notified immediately via .

Until you independently go to the device Settings in the “General -> Software Update” menu and a request to search for updates is sent to the Apple server, downloading the new version of iOS will not begin.
The iPhone and iPad receives the command to download updates simultaneously with the request to search for updates in “Settings -> General -> Software Update”, and in order to prevent this, on a connected Internet connection. WiFi iPhone or iPad, do not go to the Software Update menu.

Once you do this and the request to search for updates is sent to the Apple server, you can no longer cancel the download, you can only stop it.
How to stop downloading software updates on iPhone and iPad over Wi-Fi
As I already said, it is impossible to completely cancel the download of software updates that has begun. The only way to stop it is to disconnect your iPhone or iPad from the Internet via Wi-Fi. In this case, the download is not canceled, but only paused, and as soon as you connect the device to Wi-Fi networks With Internet access, downloading will continue.

How to remove software updates downloaded to iPhone and iPad
The memory of iOS devices can be freed from downloaded updates, but this is not always advisable. The only way to remove from iPhone updates BY - .

Why is it inappropriate, you ask? Yes, because in addition to firmware updates, priceless data (unique photos, family videos, etc.) can be stored in the device’s memory, which will be completely deleted as a result of erasing.
Of course, all the content can be transferred to the computer, and this will solve the problem, but there is always a chance that something will go wrong.
Those who own a jailbroken iPhone or iPad are luckier. On devices with software updates, you do not need to erase the content to remove them.

How to Remove iOS Update from Jailbroken iPhone and iPad
If you can boast of having Cydia installed on your device, you can remove the downloaded software update in several ways:
- Manually
- on iPhone and iPad in the iFile file manager;
- on the computer in file managers iFunbox and iTools.
- Automatically , using Cydia tweaks Software Update Killer and iLex R.A.T.
The first method involves uninstalling software updates yourself in the file managers iFile (on the device itself) and iFunbox and iTools (on the computer).
How to remove software update from iPhone and iPad directly from the device

Let me remind you, this method Only works on jailbroken devices with .

How to remove iPhone and iPad software updates on your computer

How to Remove Software Updates from iPhone and iPad Using Cydia
IN alternative store Cydia applications from the famous Saurik have several tweaks that allow you to clear the memory of iOS devices from updates downloaded over Wi-Fi; for firmware from 4.x.x to 6.x.x there are at least 2: Software Update Killer and iLex R.A.T.


The first one does not have its own shell (you won’t find an icon on the desktop) and is installed as an add-on in Cydia and is intended only to remove updates (they are removed immediately after installation). The second has more functionality and allows you not only to remove the content, but also to remove all applications and tweaks from Cydia, and all this without losing the jailbreak and the need to re-jailbreak.
The descriptions of the tweaks indicate that all devices running under iOS control up to 6.x.x. I can’t personally check their performance; I have iOS 7.1.2 installed on my iPhone 5s, and I don’t want to risk losing the jailbreak if something goes wrong, especially since it’s not difficult to remove updates manually.

Interesting fact, even after clearing the updates, if you reconnect the device to the Internet via Wi-Fi and request to check for updates in the “Software Update” menu, and if available new version firmware, it will be loaded into the device’s memory automatically again.
On jailbroken iPhones and iPads, you can completely prevent downloading of updates and do it very simply.
How to prevent automatic downloading of software updates on a jailbroken iPhone and iPad

If you have any problems, errors in iTunes, or have questions about the topic, write to us in the comments. If our article was useful to you and you want to express gratitude for the help, share a link to this material on your page in social networks, our resource will benefit, and we will thank you.
Hello admin! Yesterday evening I worked on my laptop and did Shutdown, but the laptop did not turn off, began to install some updates, wrote to me that the computer would turn off automatically and imagine, it didn’t turn off even after an hour, I came up, and on the laptop screen there was already another message - Failed to configure Windows updates. Cancel changes, well, I think ok, let it roll back, but even in three hours nothing could be rolled back; already at one o’clock in the morning I forcibly turned off the laptop.
This morning I turn it on and again this error appears: Windows updates could not be configured. Cancel changes all day long. I wanted to enter safe mode using the F8 key at boot, but it was no use, I also used the Shift+F8 key combination, also to no avail.
I went online, but there seemed to be no solution to this problem; even on the official Microsoft website they said that the issue would only be resolved by reinstalling the system. What kind of “this” is this? latest Windows 8, huh?


Failed to configure Windows updates. Cancel changes
Hi all! At my work, for a month now, every other day I encounter a similar problem, apparently Microsoft released some kind of incorrect update.
1) A simple way to defeat the error - Failed to configure Windows updates. Cancel changes. We will boot from the recovery flash drive and run System Restore. Works in most cases.
2) The hard way. Emptying a folder and stopping Windows services Update. This folder contains Windows 8 update files, which contain the error. You will need a simple LiveCD or rescue disk, or better yet, a professional Microsoft Diagnostic and Recovery Toolset 8.1. if you have Win 8.1 and Microsoft Diagnostic and Recovery Toolset 8.0 if you have Win 8.
This problem can be solved without Windows reinstallation 8 using environment Windows recovery 8, but you must have either an eight recovery disk, or a recovery flash drive will also work. Whatever you have, you need to do everything the same.
We connect the Windows 8 recovery flash drive to the laptop and turn on the laptop. To boot the laptop from the flash drive, first of all, you need to enter the boot menu of the laptop, on my laptop the F12 key is responsible for this.
- Note: If you don’t know, follow the link and read our special article.
We boot the problematic laptop from the recovery flash drive. In the boot menu of the laptop, use the arrows on the keyboard to select our recovery flash drive and press Enter.
Well, we booted from the recovery flash drive. It is useless to choose a language, everything will still be in English.

Note: If you boot from installation disk or a Windows 8 recovery disk, then everything will be in Russian, so I will show you the necessary menu items in Russian.
Need to choose Troubleshoot(Diagnose or fix the problem)

Advanced options(Additional options)

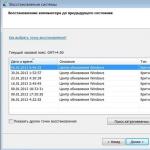
System Restore(System Restore).

Choose Windows 8.1


Select the last restore point
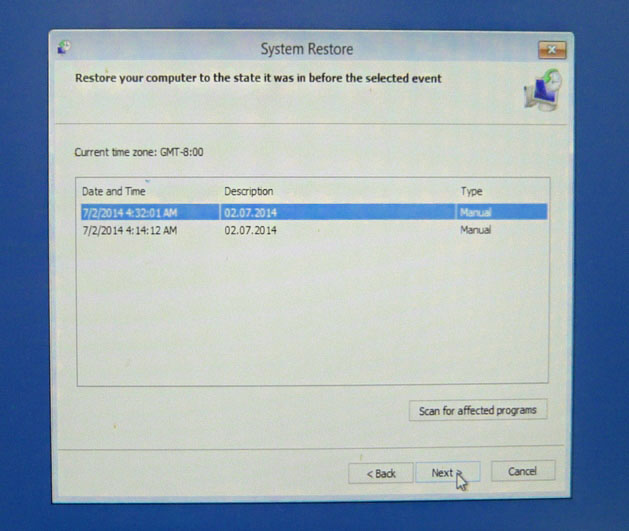
Finish

Yes(restore cannot be undone)

The system recovery process begins, which in most cases will be completed successfully.


In rare cases, this will not help, then you need to boot the laptop from any LiveCD, go to the C: drive in the folder
C:\Windows\SoftwareDistribution\Download and clean it.
Bootable Live CD AOMEI PE Builder
Microsoft Diagnostic and Recovery Toolset 8.0
Instead of LiveCD, I use Microsoft Diagnostic and Recovery Toolset 8.0 for Windows 8 or Microsoft Diagnostic and Recovery Toolset 8.1 rescue disk. for Win 8.1, .
It is not necessary to connect to the Internet. No.

Russian.

Diagnostics.

Microsoft Diagnostic and Recovery Toolset. Windows 8.

Explorer (conductor).

Please note that drive C: is not the Windows 8 drive.

And the hidden partition is Reserved by the system (containing files Windows boot 8).

File section operating system under the letter D:, find the folder D:\Windows\SoftwareDistribution\Download and delete everything from it.


This folder contains Windows 8 update files, which contain the error. Next we reboot.
Once, system restore did not help me and clearing the C:\Windows\SoftwareDistribution\Download folder did not help, then I booted again from the Microsoft Diagnostic and Recovery Toolset disk. Windows 8 and chose Computer management,

Then Services, click double click right mouse on on service Windows Update

And stop it, then Apply and OK. after that Windows 8 booted.
This problem is not something supernatural and insoluble. Any problem can be solved. First of all, you need to understand the cause of the system problems. In order to solve the consequences of a “breakdown”. There are two main reasons.
The first of the main reasons for almost all users is simple forgetfulness.
Users often forget about automatic system updates and simply turn off the computer when downloading the update. Which leads to a system error. Also in case of unauthorized power outage.
The second reason, the most common, is the use of pirated content.
When downloading updates to Microsoft services, the code is identified. Let's just say checking the Windows system license. Which leads to this problem.
Practical actions to solve the problem!
method one.
If, when you start Windows_7 or Windows_XP, the operating principle in the systems is almost the same, when you try to install updates, the system writes that “it was not possible to configure windows updates” and “the changes are being canceled.” In this case, a reboot occurs and the system starts updating windows again. This can happen ad infinitum. The following actions must be taken:
You need to restart the computer, or, as in our case, wait for a reboot. Or press the “RESET” button. On a laptop, hold down the power button.
While loading the bios, you must press the “F-8” key. The system boot menu opens.
From the list select " Safe Mode"and wait for the system to load.
In Safe Mode, most system services are disabled. Therefore, this method allows you to disable the update download system. On the desktop, go to the start menu.
Click “Computer”.
Select " local disk(WITH)". If the drive letter on which the system is installed is different, then select your local drive.
Then we follow the following path:
From:/windows/SoftwareDistribution/Download/
The "Download" folder contains Microsoft update files for windows.
The downloaded update files must be deleted from the package. Select files by date and time that were downloaded the last time they were updated. If this is difficult for you. Select all files and folders with the mouse and delete. After deleting, reboot the system and try to enable system updates.
If you have pirated Windows content installed, it is recommended to disable system updates in the system settings. In order to protect yourself from such problems.
Method two.
If the first case did not work for some reason. You can restore your system using a restore point backup copy systems. We do almost the same thing.
When loading the system, press “F-8”. Select "Safe Mode with Command Line Support". Press “enter”. In the command line, enter the following command “msconfig”, press “enter”. You will be taken to the “system configuration” window
Select “service” at the top of the window. In the window that opens, select “restore the computer system to one of its previous states”
The "System Restore" window opens. Click “next”.
Confirm the restore point. Click “Finish”.
After which you need to confirm the restoration notification. Click “Yes”. After the system restore is complete. Try updating the system again or disabling the update in the settings.
method three.
If the previous two methods did not help you. And they didn’t bring you any closer to solving the problem. You need to do the following: As you probably already remember.
Reboot the computer. During loading, press “F-8”. In the download lists, select “Directory Services Restore Mode”.
Important: Turn off the Internet.
After the procedure, the system should turn on.After the procedure, the system should turn on. Go to the start menu. In the "control panel".
In the "control panel". If your control panel looks different, change it to the format you need in the “view” category in the upper right corner.
Go to Windows Update. In the window that opens, on the left side select “Parameters settings”.
In the settings, uncheck all the boxes.
We also change “Install automatically (recommended)” to “Do not check for updates (not recommended).” Then try to restart your computer.
If this article helped you solve your problem. So you didn't waste your time.
As a rule, most instructions are written based on experience, sometimes sad. So I recently encountered a problem - one of my household members clicked on “Download and install” updates, or responded positively to the request to update their computer. Thus, a constantly pop-up request appeared on the tablet for iOS update. For reference, I flashed it on iOS 9.3.3, but the system requires an update to 9.3.4, which I don’t want to install yet.
The problem is that this request cannot be canceled in any way. If the updates are downloaded to the tablet, the system will update sooner or later, whether you want it or not. An update request can only be postponed, not cancelled. A search on the Internet gave me one “recipe” - resetting the tablet to factory settings, which I hastened to use. After the reset, going to the “Software Update” section in the settings, I saw how the update was downloading quickly again. The problem, to my great regret, has not disappeared.
The network has released a lot more possible options, but some did not work, while others required the presence of a jail, which, on at the moment, I have no. I won’t bore you, friends, but I found a solution and it doesn’t require jailbreaking or other drastic actions with the iPad.
How to prevent updates?
If for some reason you don't want to update to the next version of iOS, there are a few steps you can take to prevent your tablet from randomly updating.
1. Don't run the update. The very first rule you must remember is that the system will never update itself without your permission. Thus, do not click on update either on the tablet itself or in iTunes, since the update process is almost irreversible.
2. Set a password on your tablet. This simple step will prevent accidental installation of the update, since before installing the update, you will be required to enter a password.
3. Turn off automatic updates on iPad. Follow the path: Settings -> iTunes Store And App Store. On the page that opens, opposite the “Updates” item, move the slider to the far left position. However, I want to warn you that in iOS there is no separate disabling of updates for the system and programs, and disabling this item will also affect automatic program updates. However, programs can be updated manually.
4. Disable automatic updates on iTunes. When connecting the tablet to computer iTunes checks the Apple server for iOS updates. If updates are detected, tuna immediately offers to apply (update) them. To disable update checking, follow the path: iTunes –> Edit (on the menu bar) –> Preferences. In the pop-up window, click the “Add-ons” tab. Uncheck the box next to the line (at the very bottom of the tab) “Check for software updates automatically.”

By following these simple rules, you will be able to control the update process and stay on track. the required version iOS.
How to delete an update request?
If you do download updates to your iPad, the system will require you to update. As I wrote above, you cannot cancel this in the usual way. In other words, this process does not have a “Cancel” button.
But, despite the fatality of the situation, there are even two options for solving this problem.
Option #1. To cancel an update, you need to delete the update file. As it turns out, you don’t need to get into the weeds for this. file system, especially since this requires jailbreak. Everything is much simpler. :)
We follow the path: Settings -> General. On the page that opens, tap on the item “Use storage and iCloud”.


On the page that opens, in the list of programs, find “iOS 9.3.4” (or another similar file, depending on the relevance of the system) and tap it.

In the window that opens, tap “Uninstall update.” When asked to confirm the action, we confirm the deletion.

After this, the update file will disappear from the program list, and in the “Software Update” section you will again see the “Download and install” update request. The tablet will no longer bother you with an annoying message about the need to update.

Option #2. The most radical solution to tablet software problems will help you with this problem. It's about about flashing. But, here we need to make one caveat - this option will suit you if the previous (old) iOS version Apple is still signing. You can find out this information here (http://api.ineal.me/tss/status) or on thematic sites.
You need to reflash using the firmware file, which is previously downloaded for your device. The link to the firmware can be found on our website: All firmware for iPad, iPhone or iPod Touch.
Naturally, before flashing, you need to do backup iPad data in iTunes and iCloud.
Friends, this instruction is universal and can be useful to you, say, when switching to iOS 10, or rather, not wanting to switch to it. So, enjoy it to your health!
P.S. Based on the results of our joint experience with the readers, I would like to make some clarifications to the article.
- The above methods really work, but are temporary. In other words, sooner or later, the firmware will be downloaded to your device via Wi-Fi. However, you can delete it again and get rid of the update prompt. Fortunately, this action takes 10 - 15 seconds.
- A deleted update will not be downloaded again on devices running iOS8 or lower.
- Since Apple has stopped signing older firmware (9.3.3, 9.3.4), you will not be able to upgrade to them. Thus, the advice on flashing is relevant (as of September 2016), only for iOS 9.3.5 (and from September 13 for iOS 10). If you want to stay for more old version system, you can’t reflash it! Please take this into account!
- To ensure that iOS never downloads an update again, you need to block the addresses on your router: appldnld.apple.com, mesu.apple.com But, I want to warn you, if you do not understand setting up a router, then it is better to entrust this process to a specialist. Naturally, the ban on updating will only apply in the zone of your “configured” router.
P.P.S. It would be interesting to hear from users who have Wi-Fi turned off and use mobile internet(3G, LTE). After all, in theory, the update should not be downloaded to the tablet in this case unless the appropriate permission is given from the user. If so, then this can be used as another tip)