Now wireless networks Wi-Fi supported a huge amount various devices, from wristwatch to TVs. Typically for such devices they use Wi-Fi router. But, if you don’t have such a router, then you can get by with a regular laptop or a computer with a Wi-Fi adapter. In this article you will learn how to create a point Wi-Fi access on a computer or laptop with an operating system Windows system 7 or Windows 10.
Creating a Wi-Fi hotspot on Windows 7
First, let's look at a more complex way to create a Wi-Fi access point. This method is based on the command line, so it works fine on both Windows 7 and Windows 10. Although in Windows case 10 it is better to use the second method, which is described at the end of the article.
So, in order to create a Wi-Fi access point on a computer with Windows 7, you need to open command line with administrator rights. To do this, open the “Start” menu, enter the phrase “Command Prompt” into the search, right-click on the found program and select “Run as administrator.” This is the simplest option though.
Once the command line is launched, you can begin creating a Wi-Fi access point. To do this you need to run the following command:
Netsh wlan set hostednetwork mode=allow ssid="wifi_name" key="wifi_password" keyUsage=persistent
Please note that this command contains the parameters “wifi_name” and “wifi_password”. This is the name of the Wi-Fi access point to be created and the password for connecting to it. In order to create a secure access point, it is better to change these parameters.
After running the above command, a message should appear at the command prompt to enable hosted network mode and to change the SSID and passphrase.

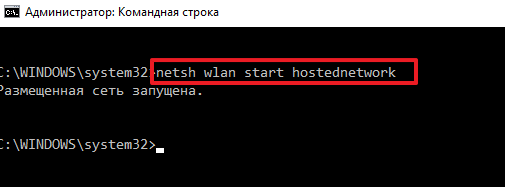
Now you need to run a command that will launch only the previously created Wi-Fi access point:
Netsh wlan start hostednetwork
After running this command, you should receive the message “The hosted network is running.” If you receive the message “The hosted network could not start,” then you have problems with your Wi-Fi adapter. It may be disabled or not working due to driver issues. Solve the problem with the Wi-Fi adapter and run the command “netsh wlan start hostednetwork” again.
At this stage, the Wi-Fi access point has already been created and is working. You can even connect to it, but there will be no Internet access. In order to enable Internet distribution, you need to open the “ Network connections" To do this, you can press Windows-R and run the command “ncpa.cpl”.

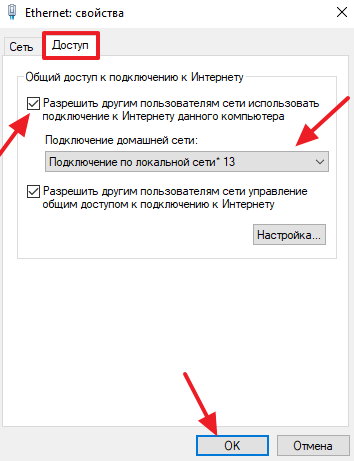
In the “Network Connections” window, you need to find the connection through which you connect to your Internet provider. Right-click on this connection and go to “Properties”.
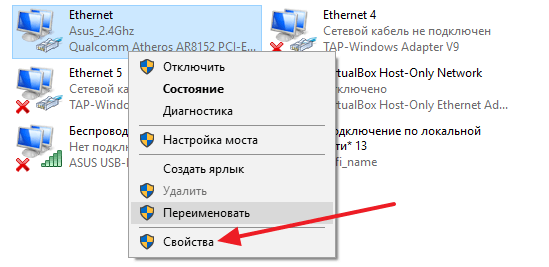
Next you need to go to the “Access” tab and enable the “Allow other network users to use the Internet connection” function there of this computer" Also here you need to open the drop-down list and select Wi-Fi connection, which was created earlier by executing commands. In the screenshot below this connection is called “Local Area Connection 13”, but in your case the name will be different.
This completes the creation of a Wi-Fi access point on Windows 7. Close the window using the “Ok” button and check how Wi-Fi works. To connect to the created access point, use the password you specified earlier.
It should be noted that the command “netsh wlan start hostednetwork” must be executed after each Windows startup 7. To stop the access point, use the “netsh wlan stop hostednetwork” command.
Creating a Wi-Fi hotspot on Windows 10
If you have Windows 10, then you are in luck, in this case operating system The process of creating a Wi-Fi hotspot is greatly simplified. Here you do not need to execute any commands, everything is done in a couple of mouse clicks.
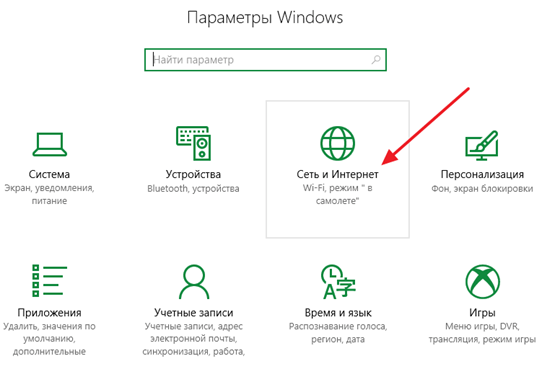
So, in order to create a Wi-Fi hotspot on a Windows 10 computer, you need to open the Settings window. To do this, you can open the Start menu and click on the gear icon. You can also right-click on the “Start” button and select “Options” from the menu that appears.

In the “Settings” window, go immediately to the “Network and Internet” section.
And then we open the “Mobile hotspot” subsection. Here at the very top of the window there will be available function"Mobile hot spot" Turn on this function and a Wi-Fi hotspot will be created automatically.

Just below you can select the connection that will be shared through the Wi-Fi access point, as well as view or change the access point name and password.
HOW TO REALLY MAKE EARNING ON THE INTERNET???
Please read this, just 2 minutes, reading has never harmed anyone.
I had 71 rubles, but it became 600,000 rubles!!! Wandering, as usual, through various forums, I find this article, which says that YOU CAN MAKE HUNDREDS OF THOUSANDS OF RUBLES IN A COUPLE OF WEEKS BY INVESTING ONLY 71 rubles (note from the author: of course you will not see that kind of money in TWO WEEKS; you will see, BUT much later). I thought that this should be another trick for suckers, but I still decided to read to the end and find out what they offer.
HERE ARE THE THREE STEPS TO SUCCESS:
1. Register in the Yandex. Money" (“Yandex. Money”), which is located at: http//money.yandex.ru, thoroughly familiarize yourself with this system, how it works, choose the best option for replenishing your wallet and deposit 71 rubles into your wallet. The problem of depositing money into your account will immediately arise; most likely, you will have to go to the nearest bank (believe me, it’s worth going once for the next real earnings), or payment terminal cellular communication(addresses can be found at http//money.yandex.ru), or you can use online banking. In general, everything on the site is written out and understandable.
2. Take the first wallet number from the list below, send 10 rubles 05 kopecks to it, entering this number in the “Account number” field. You do not need to enter anything in the “Recipient’s name” and “Recipient’s email” fields. In the “Payment Name” field, write “Please add me to the list of Yandex wallets.” All you did was create a service, and most importantly, it was absolutely legal. You are asking for a LEGITIMATE service that you are paying for. Then, starting from the second, send 10 rubles each by analogy. 05 kop. for the following 6 wallets (do not forget to enter in the “Payment name” field. Please add me to the list of Yandex wallets):
1.410011275850934
2.410011295167520
3.410011278889957
4.410011295192026
5.410011277321095
6.410011295734404
7. 410012084616978
I REPEAT, in order to receive income, you need to send 10 rubles to EACH of these 7 wallets. 05 kop. otherwise, by the network moderators of Yandex wallets, you simply will not be included in the system and will not be able to cash out your income. Now ATTENTION!!! After you have completed STEP 2, copy all this text from beginning to end to your computer (you can txt format or whatever is more convenient for you). In the copied article, remove the FIRST (TOP) wallet from the list of wallets and move the 2nd wallet to the place of the 1st, which you erased, the 3rd - to the place of the 2nd, the 4th - to the place of the 3rd, 5- y - in the place of the 4th, 6th - in the place of the 5th and 7th - in the place of the 6th! And in the 7th number, which turned out to be empty, ENTER YOUR WALLET NUMBER!!! In case of problems with Yandex wallet, I advise you to contact THIS page http//feedback.yandex.ru/?from = money.
Accordingly, you should get something like this:
1.410011295167520
2.410011278889957
3.410011295192026
4.410011277321095
5.410011295734404
6. 410012084616978
7. Your wallet number
3. Post this article (or an ad with a link to the page, which you can easily do on one of the free sites, for example, http//www.narod.ru) on AT LEAST 200-300 FORUMS and NEWS FEEDS (News Groups ). REMEMBER THE MORE YOU POST, THE HIGHER YOUR INCOME WILL BE. And this income will DIRECTLY DEPEND ON YOU. Posting this article on 200 forums, even the least visited ones, GUARANTEES you an income of 150,000 rubles. - THIS IS THE MINIMUM!!! GOOD LUCK!!!
What is this for?
This solution is ideal for those who plan to connect a mobile gadget or any other device (for example, a TV, game console etc.).
What do we need for this?:
1. Personal computer/laptop equipped with a Wifi module and connected to the Internet;
2. Windows operating system;
3. Straight arms!
So let's get started!
Open the command line file cmd.exe in any available way. For example, you can type cmd into search bar located in the Start menu:

Now let's create our access point. Copy the code into the command line: netsh wlan set hostednetwork mode=allow ssid=access point name key=access password (right-click in the cmd window field and select the “Paste” function).
Attention! You must replace the “access point name” and “access password” with your data.
For example, let's create an access point with the name sm and password 1231231. To do this, we will need to enter the command into the command line:
netsh wlan set hostednetwork mode=allow ssid= sm key=1231231
That's it, the Wifi access point has been created! All that remains is to launch it.

To do this, enter the command on the command line netsh wlan start hostednetwork . This procedure will need to be performed every time you restart the computer.
Let's automate a little this operation. To do this, let's create a regular text file and copy the text netsh wlan start hostednetwork into it. Save and close the file. Now we rename its resolution to *.bat (instead of *, enter any name). This file you can add it to the startup list and then the Wifi access point will start automatically (or you can independently launch the *.bat file every time you need to connect your gadget to the Internet).
Attention! In order to change the file permission, you must perform the following operation:
1. While in the folder where you created text document with the content netsh wlan start hostednetwork, click on the alt button. A menu list appears below the folder address bar.

2. Select “Tools -> Folder Options”.

3. In the window that opens, go to the “View” tab and uncheck the “Hide extensions for registered file types” checkbox.

And the last step! It is necessary to share the access of the main connection to our access point. To do this, go to “Control Panel -> Network and Sharing Center -> Change adapter settings.” Next, right-click on the main connection (in my case it’s Beeline) and select “Properties”.

In the window that opens, go to the “Access” tab, check the box next to “Allow other network users to use this computer’s Internet connection” and in the drop-down list select the access point we created (in my case it is Wireless network connection 2 with the name sm).
So, the access point has been created, but after connecting to it, you discovered that the Internet does not work? In this case, I have only one recommendation: disable all firewalls (like standard Windows, and antivirus). If after this the Internet works, then enter this connection to firewall exceptions.

In the case of NOD, everything is very simple! Go to “advanced settings” and set “Filtering mode” to training.
If, after all the steps taken, the client device cannot connect to the access point you created, then your Internet-distributing laptop/computer does not have a DHCP server that provides IP addresses. In this case, you will have to assign IP addresses yourself. There is nothing complicated about this, just follow these instructions exactly.

Go to “Network Neighborhoods” and right-click on “Wireless Network Connection” (not the one we created, but the one that was originally) -> Properties -> Internet Protocol Version 4 (TCP/IPv4) -> enter the following values :
IP address: 192.168.2.1
Subnet mask: 255.255.255.0
Default Gateway: 192.168.2.1

Now go to the properties of the virtual access point we created (“Wireless network connection”) -> Internet Protocol version 4 (TCP/IPv4) -> enter the following values:
IP address: 192.168.2.3
Subnet mask: 255.255.255.0
Default Gateway: 192.168.2.1
Preferred DNS Server: 192.168.2.1
And at the end of the article, a couple of useful commands:
netsh wlan show profiles- view the names of all previously created points;
netsh wlan delete profile name="ProfileName"- deleting a previously created wireless access point profile (instead of ProfileName, of course, you need to put the name of your access point);
netsh wlan show profile name="ProfileName" key=clear- shows the security key of the specified access point;
How to create a WiFi access point using Windows 7. Instructions, step by step with illustrations. Although people are mostly interested in the question of how to make a laptop a point wifi access, it doesn’t really matter whether it’s a laptop or a regular desktop computer.
Creating a wifi hotspot is the same in both cases. Imagine the situation: you came to visit and you need fast internet on a smartphone or tablet, and the owners only have a laptop connected to the Internet with a cable, but no router. No problem - you can organize wireless Internet distribution from this laptop in a couple of minutes.
What is WiFi
The abbreviation WiFi (Wi-Fi) stands for: Wireless Fidelity(wireless attachment). WiFi is the transmission of network data over a radio channel.
Most often, WiFi is used to “distribute” the Internet. For these purposes, WiFi is used in various public places - cafes, restaurants, train stations, shopping centers.
But in the last year or two, WiFi routers have begun to be actively installed in apartments. This is explained by the fact that today people have many mobile devices from which you can access the Internet - laptops, tablets, smartphones, netbooks.
And often WiFi is not only the most convenient way connecting such a device to the Internet, but also the only possible one. For example, tablets and smartphones do not have wired networks. Ethernet adapters, so that they cannot be connected to the network via cable.
Although WiFi is most often used to distribute the Internet, nothing prevents you from building a regular local network via WiFi.
And by the way, in some offices they do this, since installing one WiFi router (access point) is cheaper and easier than laying UTP network cables.
Home WiFi network allows you not only to receive the Internet via WiFi on all devices, but also to conveniently exchange various information- You can easily copy photos from your smartphone to your computer or laptop. Or music from your computer to your smartphone. No need to fiddle with different USB cables.
WiFi specifications are described by the international standard 802.11. There is a division into modes based on the access speed that 802.11 devices can provide:
802.11a
802.11b— speeds from 1 megabit per second to 11 megabit per second.
802.11g— speeds from 6 to 54 megabits per second.
802.11n- speed up to 150 megabits per second over one antenna, and if four antennas are used, then up to 600 megabits per second.
The most common devices now are those that support WiFi modes 802.11 b and g. In the specifications of such devices they say so - 802.11b/g.
In the last couple of years, the bulk of devices have been released with support for three WiFi modes- 802.11b/g/n. 802.11a mode is rarely used and is incompatible with b and g.
What is an access point
This is a regular network router that only transmits network packets via an 802.11 radio signal.
Performs the same functions as a simple network router - assign an IP address to the connected device, transfer it network settings and further ensure the transmission of network packets from this device to other network devices (routing).
Most often, a WiFi router looks exactly like an ADSL modem or Ethernet router. Only with antenna.
The incoming connection to this router is in RJ-11 (telephone jack) or RJ-45 (network cable jack) format.
In the first case The WiFi router receives the Internet through a telephone line using ADSL (xDSL) technology.
In the second case WiFi router receives Internet via network cable using PPPoE FTTx technology.
There are also cellular WiFi routers, a little similar in appearance to cell phones. Such a router receives the Internet via cellular network GSM.
Receivable Internet WiFi The router distributes via a WiFi adapter.
How to create a WiFi hotspot on Windows 7
We need to create a software wifi router based on Windows 7 that will receive the Internet in some way and be able to distribute this Internet via wifi.
What we need:
1) Windows 7 Basic or older. Windows 7 Starter (initial) will not work. More precisely, on Windows 7 Starter you will have to solve the routing issue using a third-party program (for Windows 7 Starter there is a separate note at the end of the article).
2) An old wifi adapter. For example, for this article I used USB wifi adapter TP-Link TL-WN722NC.
3) Internet connection. For this article, a GSM connection was used through the MTS operator (MTS USB modem). But it can be any connection - PPPoE, VPN, Dail-Up, Ethernet, WiFi.
The first step is to install the wifi adapter, if it is not already installed, and make sure that it is turned on and working.
After this, you need to check whether the “WLAN AutoConfig Service” service is running. Usually its launch mode is “Manual”, which means it can be stopped. If you plan to use the created access point constantly, then it is better to switch this service to the “Automatic” startup mode.
You also need to check that the Internet Connection Sharing (ICS) service also has a startup mode of “Automatic”.
You also need to check that the “Routing and remote access“There was also an “Automatic” launch mode. And for this service to work.
There may be situations when the startup type of this service is set to auto, but when Windows 7 starts, it stops and, accordingly, others in this case will not receive the Internet. Read more about this in another article - “Routing and remote Windows access 7 stops."
These checks are done through “Control Panel - Administration - Services”.
After this, you need to open the Windows console (cmd.exe) with administrator rights. This can be done through the menu “Start - Programs - Accessories - Command Prompt”, then right mouse button and “Run as administrator”.
In the console, type and execute the command:
netsh wlan set hostednetwork mode=allow ssid="winap" key="123456789" keyusage=persistent.
Instead of winap And 123456789 enter your access point name and password:

Note. Important! The password must be at least 8 characters long, this is a requirement for the WPA2 security type that is used in Windows when creating an access point. It is better not to use the Cyrillic alphabet in your password. The case of letters matters - a and A are different symbols!
Next, check that the connection for the access point has been created. Open “Start - Run - ncpa.cpl” and after opening the “Network Connections” window, in this window find the wireless connection for which the physical adapter is not specified:

Click right button mouse, then “Properties” and look there - it should be “ MicroSoft Virtual Miniport Adapter":

At the same time, you can remove unnecessary connections and protocols.
Immediately rename this connection in ncpa.cpl - for example, to “winAP”:

Enable ICS and specify the connection to which the Internet will be distributed - to wifi connection access points (“winAP”):

Now you need to connect to the Internet. Or reconnect if the connection was established previously.
After that, type and execute the command in the console:
netsh wlan start hostednetwork
That's it, the access point should already be working. Now you can connect the client to this access point (this illustration is from the client’s computer):

How to connect a wifi client to:
— Laptop (or computer) running Windows — WiFi setup in Windows 7.
— How to turn on WiFi on your tablet.
— A laptop (or computer) running Linux — A laptop (or computer) running Ubuntu.
Client connected:

On the computer where the access point is running, you can check its status. To do this, enter the command in the console:
netsh wlan show hostednetwork

It can be seen that one client is connected.
Stopping the access point with the command netsh wlan stop hostednetwork
Complete destruction of the access point with the command netsh wlan set hostednetwork mode=disallow
If you want the access point to turn on automatically when booting Windows, then the start command needs to be added to autorun.
We are talking about the command netsh wlan start hostednetwork. The command can be written in cmd script, you must specify “Run as Administrator” in the properties of this script. Then include the script in autorun.
It is necessary that the connection to the Internet is also established when Windows starts. Otherwise, you will have an access point, but there will be no Internet through it.
Of course this is a very simple access point. But everything is at hand. Don't need any third party programs. Just Windows 7. And everything can be configured in a couple of minutes.
Yes, there are programs like Connectify and Virtual Router. However, you need to understand that they are only doing the work that is done by two teams in Windows console. These are just add-ons to the functionality of Windows 7. It’s easier to write two commands in the console than to download and install some gadgets.
Some may say that this option does not have many of the capabilities that an access point should have. Well yes, that's true. Only this is an option when you need to make a wifi router very quickly and without problems. And just like this Windows feature 7 provides - with a minimum of body movements, what is called “on the knee”, create an access point.
But if your needs are broader and deeper, if you need an access point for every day, or in complex configurations, then you don’t need to use Windows, but buy a decent, or even good, WiFi router.
A decent WiFi router now costs less than a thousand rubles. And in such a situation, making a design based on a computer and Windows is somehow absurd.
It’s another matter if you need an access point once a month, for a day or for a couple of days. Or on a business trip. Or on vacation. This is where Windows helps us out. You can quickly distribute the Internet via WiFi laptop on a tablet, smartphone or other laptops.
But if there is a need to make a permanent access point on a computer, then it is better to do it under Linux. How this is actually implemented in WiFi routers. For example, like in this article - Access Point on Ubuntu.
Hotspot on Windows 7 does not work
There is no need to swear at Microsoft, at Windows - in general, look for the guilty on the side. The problem in such cases is always yours. own computer(or laptop).
It could be:
— Drivers for the WiFi adapter on which you are creating an access point.
— The WiFi adapter itself.
- You did something wrong.
— Any “left-handed” services or drivers/programs that use the WiFi adapter or USB port (if your adapter is connected via USB).
— You have Windows 7 Starter.
— One of the necessary services has stopped, for example, see the article “Windows 7 Routing and Remote Access service stops.”
For example, during the startup process Windows driver The WiFi adapter can put the adapter into standby mode. And when Windows starts the hostednetwork service, the adapter does not wake up.
Under normal conditions WiFi adapter and if you haven’t messed up your Windows with crooked programs and drivers, everything will work fine.
In general, always look for the source of the problem on your computer.
Access point on Windows 7 Starter (initial)
Microsoft did something weird with it. ICS is blocked on it, but you can create an access point as such. Paradox. Why do you need a hostednetwork mechanism if there is no routing?
Be that as it may, you can make a wifi access point on Windows 7 Starter. You just need to find a program with which to perform routing between the Internet and winAP interfaces.
There are many options here, for example you can use a proxy server, such as 3proxy.
Good day, blog visitors.
Today, many computer users cannot imagine their life without the Internet. Moreover, it is now available not only on computers, but also on smartphones, tablets, and TVs. Becoming increasingly popular wireless technologies, and this mainly concerns getting the opportunity to get into the “World Wide Web” anywhere in the room. Special devices cope with this task perfectly. But what to do if such equipment is not provided? Later in the article I will tell you how to organize a Windows 7 wifi access point on a laptop in various ways.
General information
Wi-Fi technology allows all users to combine multiple computers and additional peripheral devices into home groups. This allows you to increase the speed of information transfer, speed up communication, and improve the workflow.
Mostly similar system organized using special equipment - a router. But this device is not always at hand. But what if you urgently need to establish a connection with a new component or open access to the Internet? Fortunately everything modern laptops have built-in Wi-Fi adapter. It is this element that can be configured as a wireless communication module.
There are many programs for this. In addition, the operating system itself provides some tools that allow you to accomplish your plans.
Built-in capabilities
It’s worth saying right away that this method does not require users to install any additional software.
This method will help you get a wireless access point without a router - it will be configured on your laptop. In this case, the device both distributes and receives a signal.
And the first thing we need to check for this is the drivers for the module we need. They must be latest version. If this is not the case, the functionality we need may not be supported at the software level.
Internet distribution can be organized via the command line or using the “comp-comp” connection. In any case, the result will be the same.
The main thing is to do everything step by step so as not to miss anything.
Command line
To achieve the desired result, you need to perform a number of actions:

In some cases, users may need general access to information. To do this we do the following:

If you suddenly receive a limited connection, and you need to set up the Internet for all participants, you need to do a few steps:

Now the access point is designed not only for computers or laptops, but also for phones and tablets.
Comp-comp connection
The procedure itself is simple. To do this we do the following:

If after this the device does not distribute the Internet, rebooting the equipment may help. Otherwise, check your settings.
Programs
This method can be called one of the simplest. There are many applications for this that are downloaded for free. In general, work in similar programs comes down to four main steps:
- Entering a name.
- Security selection.
- Entering the key.
- Selecting a connection to access the “world wide web”.
It is worth noting that if you are planning to do this using a desktop computer, it must have the appropriate components. So, for example, the usual network card won't do. This can be accomplished via a USB modem connected to an external port.
I hope you can easily achieve your goal. Subscribe and you will always know what to do with your computer in any situation.


