Virtual router manager is designed to help if you do not have a real wi-fi router, but you need to distribute it. Its main task is to imitate a wi-fi router, so you can forget about any wires and inconveniences. The program is reliable and licensed, there are no viruses in it, and you can download virtual router manager for free. The program is compatible with the operating system Microsoft Windows XP, Seven and above.
What devices is the program compatible with?
The key condition for the correct operation of the program is the presence of wi-fi on the distributing and receiving devices. The receiving devices can be: iPhone, iPod Touch, netbooks, laptops, audio devices, wireless all-in-ones, smartphones, Android or Zune phones, and others. The distributing device (usually a computer) on which the program is installed must have a wi-fi adapter.Where to download Virtual Router?
You can download virtual router manager on the official website or on torrents. Please note that the file must only be with the extension ".exe" or ".msi". Anyone can set up the program without even reading the instructions. Using the program is even easier than installing it.How to get started with virtual router manager?
To distribute wifi on windows, you will need to perform the simplest manipulations:- correctly indicate the name of your network;
- enter a password;
- press the "Start" button.
Entering a password is necessary for the security of the transmitted data so that another person cannot unauthorizedly connect to your virtual distribution. All devices that you connect via virtual wifi will be displayed in the program window. If necessary, it is even possible to find out the ip and MAC addresses of each device by looking at them in the program window.
Working with the program
At its core, the Russian version of the virtual router manager is a shell, that is, it is able to perform all the settings for you. To get access via wifi, just run the program and minimize it to tray after it. With such actions, every time you turn on the computer, it will automatically start.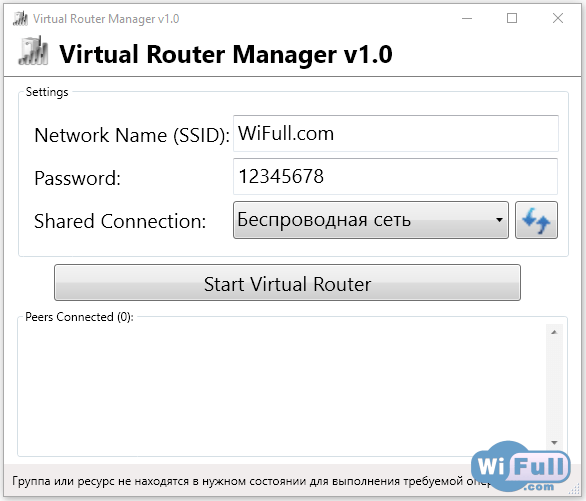
Program settings
The setting comes down to filling or selecting in 4 lines:- to create a wifi network, you need to come up with any name for it in the top field;
- in the next field, come up with a password consisting of at least 8 characters;
- in the drop-down menu "Shared Connection" select the connection through which the computer connects to the Internet;
- In the bottom drop-down menu, select the desired connection type.
How to choose the right type of connection?
In order to correctly create a wifi network, you need to select the desired type of connection - this is important! There are two modes: access point or ad hoc.- ad hoc. This mode provides a point-to-point connection. In simple terms, only one device can be connected to a virtual router.
- access point. This mode will allow you to connect to the "access point" (distributing wi-fi device) a large number of receiving devices. Possible problems and their elimination
Virtual WiFi Router is a simple and easy-to-use utility that, as the name suggests, can turn your computer or laptop into a WiFi hotspot and "share the Internet" over a short distance. The program is extremely easy to use and configure.
The program does not have many options. The developers allowed the user to assign a name to the access point, set a password and limit the number of possible connections. The main window of Virtual WiFi Router displays all connected devices with brief information about them. Immediately after setting up, the application can be minimized to the notification panel. It will continue to run in the background. It is also important that the program is completely free. Its only drawback can be considered, perhaps, the fact that it is only compatible with Windows 7 (including the 64-bit version).
Key features and functions
- allows you to turn your computer into an access point in a couple of minutes;
- allows you to assign a name and password;
- displays all active connections;
- can work in the background;
- easy to use and easy to set up.
Currently, wireless networks are becoming more widespread: they work at train stations, airports, and enterprises, and for many users even at home. Windows 7 introduced such an option as "virtual WiFi" (Virtual WiFi) - a software layer that creates several virtual adapters from a wireless network card installed in a computer. But first, a little theory.
Wireless networks can operate in two modes:
The devices are connected directly to each other. It turns out a simple network (ad-hoc mode). This mode is called "point-to-point". This mode is used quite rarely and mainly for data exchange when there is no possibility to use an access point.
Devices connect via an access point (Access Point-AP).
This mode is called infrastructure (Infrastructure Mode) and, as a rule, is used in conjunction with a wireless router connected to the Internet.
It should be noted that the simultaneous use of two modes of wireless network operation on one physical wireless adapter is not provided for by the WiFi concept itself, and this is where the virtualization technology used in Windows 7, which expands the capabilities of adapters, came to the rescue.
What is Virtual WiFi technology
Without going into technical details: in Windows 7, one physical wireless adapter can be turned into several virtual ones, and - attention! - Each of these virtual adapters can be configured to connect to different wireless networks.
What is it for
Hmm... The question is, of course, an interesting one.
Example one: the radio signal from an existing access point does not cover the required distance between it and wireless devices. In this case, a computer or laptop with Virtual WiFi can act as a repeater (repeater) that expands the coverage area of the wireless network.
Example two: creating a personal area network (Wireless Personal Area Network), to which you can very quickly connect a phone, camera, printer, laptop or any other device with a wireless adapter for easy information exchange.
Example three: an existing wireless network with static IP addresses of devices, but sometimes you need to quickly connect new devices, and without any settings-rebuilds (this can be done if the dynamic IP address allocation mode was enabled. But alas) .
How Virtual WiFi is Implemented in Windows 7
By the way: Virtual WiFi technology is included not only in Windows 7, but also in Windows 2008 R2.
Virtual WiFi is implemented in the operating system at the kernel level and allows a very simple implementation of a software access point (SoftAP), while wireless adapter manufacturers only need to implement SoftAP support in their drivers (many, by the way, have already done this).
So far - in the current implementation - Virtual WiFi has the following limitations: only one virtual adapter can be created, operating only in access point mode and only with WPA2-PSK / AES encryption.
By the way, Virtual WiFi technology allows you to connect up to 100 clients to an access point versus 8 clients in My WiFi technology promoted by Intel.
Installing, enabling and configuring Virtual WiFi
Testing of Virtual WiFi - installation, enabling and configuring a wireless network - was carried out on an ASUS eeePC 1000H netbook with a built-in Ralink WiFi adapter.
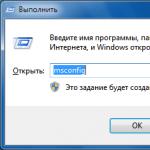
So, first you have to "cheat" a little - call the command line with administrator rights and enter the following command:
netsh wlan set hostednetwork mode=allow ssid="MS Virtual WiFi" key="softodrom" keyUsage=persistent
"MS Virtual WiFi" here is the name (SSID) of the virtual network being created, and "softodrom" is the password for accessing the network. Of course, both of these parameters can be changed at your own discretion.
The last parameter - keyUsage=persistent - specifies that the password will be saved and will not need to be specified each time the virtual network needs to be started.
After executing this command, the system will detect the new hardware and a new network adapter will appear in Device Manager called "Microsoft Virtual WiFi miniport adapter".
As a clarification: naturally, the virtual adapter will appear in the Device Manager only if the driver of the wireless adapter you have installed has support for Virtual WiFi technology.
For greater reliability, let's take a look at the Control Panel -\u003e Network and Sharing Center -\u003e Change adapter settings:
As you can see, a new connection "Wireless network connection 2" has appeared here with the status "No connection" (it already exists in the picture. More on that below).
We turn to the launch of the network. From a command prompt running with administrator rights, run the following command:
netsh wlan start hostednetwork
After that, a) the network will start (Microsoft called it "Hosted Network") and b) the software hotspot will work, which can be verified by going to Control Panel -\u003e Network and Sharing Center.

As we can see, the computer is connected to several wireless networks at the same time, and now other wireless devices can connect to our newly created soft access point.
To provide access to the Internet to other wireless devices that will connect to our software access point, go to the tab Control Panel –> Network and Sharing Center -> Change adapter settings and in the properties of the adapter through which the computer - in our case eeePC netbook - gets access to the Internet (we have this WiFi connection, but it can be any of the available ones - Ethernet, WiMax, 3G, etc.) in the "access" tab, check the box "Allow other network users to use the Internet connection this computer."
In addition, in "Home network connection" you need to specify which network adapter - in our case, this is "Wireless Network Connection 2" - you should provide the Internet.

Finally, about the client. Several wireless networks will be visible from the client side, and when connected to an organized access point (previously we assigned it SSID = MS Virtual WiFi), the client will automatically receive an IP address from the internal DHCP server, gain access to the Internet and at the same time be separated from the external NAT (Network Address Translation) networks.
As clients in the test, a laptop and mobile phone with WiFi support were used; in both cases, access to the Internet through a virtual WiFi network did not cause any difficulties.
Simplify virtual WiFi network management
Despite the obvious advantages of Virtual WiFi, using the command line to configure and start the network for windows users who are accustomed to pressing buttons is not to say that it is convenient and familiar, especially since you will have to start the network every time you restart the computer, as well as wake it up from sleep or standby mode.
Unfortunately, there is no built-in graphical interface for Virtual WiFi in the operating system, but, as always in such cases, third-party developers came to the rescue by releasing graphical shells for Virtual WiFi - Connectify and Virtual Router Manager. We recommend using the first one (Connectify), since its developer is constantly working on improving it and regularly releases new versions, and the development of Virtual Router Manager is still at the "beta" stage, with the latest beta version dated 2009.

The principle of using both utilities is very simple: in the appropriate fields you need to specify the SSID of the network and the password for access and click on the Start button, after which the program will start loading along with the startup of the operating system, ensuring the launch of the virtual network. In addition, both the Connectify and Virtual Router Manager utilities show the current virtual network connections.
Hosted Network Management Commands
Finally, for connoisseurs of the command line - new commands for managing a hosted network that appeared in Windows 7 and Windows 2008 R2:
netsh wlan set hostednetwork allowed/disallowed - allow or deny the use of the network
netsh wlan set hostednetwork persistent/temporary - setting network parameters, where SSID is the SSID of the network; key - the security key (password) used by the network; keyUsage - indicates whether the security key is permanent or temporary
netsh wlan show settings - shows network properties and its status
netsh wlan show hostednetwork settings=security - Displays hosted network security settings, including showing the password set in key when configuring netsh wlan set hostednetwork
netsh wlan start hostednetwork - start a hosted network
netsh wlan stop hostednetwork - stop hosted network.
We remind you that attempts to repeat the actions of the author can lead to the loss of the warranty for the equipment and even to its failure. The material is provided for informational purposes only. If you are going to reproduce the steps described below, we strongly advise you to carefully read the article to the end at least once. The editors of 3DNews are not responsible for any possible consequences.
In the case of Windows 7 and Windows Server 2008 R2, this is just one of the many innovations that has gone almost unnoticed, although it is extremely easy to find materials on this topic on the Web. Strictly speaking, the Wi-Fi specification implies that the network operates in two main modes - either point-to-point (ad-hoc mode), when all clients connect to each other, or in access point mode (infrastructure mode), when data exchange between two hosts goes through a third party. The operation of one physical adapter simultaneously in these two modes is theoretically impossible.
In practice, Microsoft decided to turn their attention to the now fashionable virtualization technologies and created a layer that abstracts the wireless adapter. In fact, we can have several Wi-Fi modules in the system, each with its own settings, which in reality use the resources of only one physical device. This subsystem is called Virtual Wi-Fi. Intel has a similar development - Intel MyFi (My Wi-Fi). We will not go into the technical details of the implementation of each of the technologies - it is important for us that we can make the adapter work in the Software Access Point (SoftAP) mode.
So why would you need SoftAP? Firstly, to quickly organize a local wireless network to which you can connect another computer, smartphone, and so on. Secondly, you can distribute the Internet from the main machine inside our small network. In this case, the clients will be behind NAT. It doesn't matter how we access the Network on a machine with SoftAP - via Ethernet, WiMax, 3G, Dial-Up (anything happens) or something else. It is noteworthy that a computer can be connected to any wireless network and at the same time be an access point.
Thus, it is easy to create a repeater by placing a laptop on the edge of receiving the main wireless network and setting the same SoftAP settings as the parent access point. Thus, we will expand the range of the network, and all clients, if necessary, will automatically reconnect to the repeater and vice versa. Another possibility is the easy "institution" of wireless client traffic to any available network interface, for example, to a VPN tunnel. There are other possibilities for using a software access point that go beyond the moral framework of our rubrics.

To implement SoftAP, we need a Wi-Fi adapter whose drivers support this mode. In principle, almost all modern wireless modules, built-in or external, have this capability. Moreover, Virtual Wi-Fi support is one of the prerequisites for the adapter to be included in the list of certified compatible devices for Windows 7. Do not be too lazy to find out this point before starting the setup and update the drivers just in case from the official website of the Wi-Fi module manufacturer. However, in most cases, the driver that “arrived” along with system updates will work as it should. Unfortunately (not very big, really), now we can create only one virtual access point with mandatory WPA2-PSK / AES encryption.

In order to create an access point, it is enough to launch the console (command line) as an administrator and execute a single command:
netsh wlan set hostednetwork mode=allow ssid="SoftAP Tst" key="Yourpassword" keyUsage=persistent
Naturally, in the ssid parameter, you must specify the name of the access point, and in key, set the password for accessing the network. In the future, you can change the AP parameters in the same way. After executing the command, the OS will install the required driver and the Virtual Wi-Fi we need will appear in the list of wireless adapters. To remove an adapter, specify mode=disallow in the command and omit all other parameters.

Now you can start the point with the command:
netsh wlan start hostednetwork
To stop the work, we logically change the start parameter to stop in the command.
Highly discouraged when working inSoftAP disable physical adapterWi-Fi for example pull it outUSB ports - this can lead to an emergency shutdown of the OS !!!

To view the current settings of a virtual access point, you can use the commands:
netsh wlan show settings
netsh wlan show hostednetwork setting=security
When SoftAP starts, the built-in DHCP server will automatically start. To “share” an Internet connection for users of a newly created wireless network, you need to go to the “Sharing” tab in the properties of the network interface that just has access to the Network. There you need to enable permission to share the network and select our virtual adapter in SoftAP mode.

To simplify working with a software access point, two programs can be recommended: VirtualRouter and Connectify. The first is absolutely free, but a little outdated and does not always work out of the box, and the second asks to pay money for access to some functions. However, it's worth it. The functionality of the utility far exceeds the built-in capabilities of the OS for working with a virtual access point. It has an UpnP server, it allows you to choose a different type of encryption, it has more convenient management of wireless clients, and much, much more. In general, a real little software monster for organizing a hot spot. If you really need this advanced functionality, then $30 a year doesn't sound like much. You can also create a software hotspot on Linux or Mac OS X. True, in the first case, you will have to tinker with the settings, and there will be fewer opportunities than in Windows 7. In the second case, in the best traditions of Apple's OS, everything is done elementarily. In addition, with the advent of AirDrop and AirPlay, the exchange of information between i-devices has been greatly simplified. On this, as they say in these your Internets, we will consider the topic open. Good luck!


In order to distribute the Internet via wi-fi, you need a router - a special device. But in most cases, especially at home, you can not even buy it, but turn any computer into a router. All that is required for this is a computer with a built-in or external wi-fi adapter and a small Virtual Router Plus program - a free virtual router.
Thanks to a virtual router, you can distribute wi-fi to all devices in the nearest area - computers, laptops, tablets, smartphones, to everything that can receive a signal.
Virtual Router Plus - free virtual router
Virtual Router Plus is a free virtual router in Russian. Thanks to him, any computer with a wi-fi adapter can distribute the Internet to other devices that can receive a wi-fi signal.
Virtual Router Plus is lightweight, easy to use, intuitive interface, stable, and does not load the system. This is one of the simplest and most understandable programs for creating a wi-fi point on a computer.
 Virtual Router Plus Interface
 When you run this program, a window will open in front of you. You need to fill in the following data:
- Network name (SSID). Write down the name of your wi-fi network. I do not recommend using Cyrillic.
- Password. Create a password to prevent neighbors from stealing your internet.
- General connection. Select the Internet connection in the list that you want to distribute through this virtual router. If the required connection is not in the list, then click on the "Update" button next to it.
When all the data is filled in, click on the "Launch virtual router plus" button. When wi-fi starts to be distributed, you will see a message in the system tray. After that, you can try to catch the Internet with a variety of devices.