In Windows 7, the operation of deleting files and folders is implemented very in a convenient way. To begin with, the user can destroy objects either individually, separately from each other, or in entire groups. In the first case, in Explorer you just need to place the cursor on the required file or folder. For group deletion, you must first select objects using the mouse and the Ctrl and Shift buttons.
Launching the deletion procedure itself after selecting one or more objects can be done in different ways. In particular, the user can simply drag and drop marked files and folders into the Trash located on the desktop.
Another option is deletion via the context menu. To use it, the operator must click on the “Explorer” window right click mouse, select “Delete” in the menu that opens and confirm your desire in the dialog box that opens. Those users who prefer to use the keyboard can destroy files and folders using the Del button. Its action is similar to using the “Delete” command from the context menu.

Please note that all the methods for deleting files described above are actually one operation. Its essence is not even in destroying objects from the computer’s hard drive, but in transferring them to the Windows Recycle Bin. In the future, a computer user can restore files and folders from it at any time (and they will return to their old location). In the event that you need to permanently delete objects, you need to empty the “Trash” (right-click on its shortcut and select context menu"Empty Trash" item).

However, in Windows 7 there is also a “direct” deletion, when used, objects are destroyed rather than moved to the Recycle Bin. To use it, you need to select the necessary files and folders in Explorer, press the Shift+Del button combination and confirm your desire in the dialog box that opens.

But even seemingly irretrievably deleted files can be restored using a special software. This feature of the work of modern file systems must be taken into account in cases where it is necessary to destroy confidential information. Today there are two ways to guarantee data deletion. The first one is the most common. It is based on a single or even multiple rewrite of the sectors in which the contents of the files were located. In this case, all information is actually destroyed, not just entries in the file allocation table.
The second option for guaranteed data deletion is to first encrypt the information and then destroy the encryption key. After this, the files can be deleted as usual. Even if someone restores them, it will be almost impossible to decipher them. True, this method requires the user to have at least a superficial familiarity with cryptographic technologies.
In conclusion, it should be noted that deleting files and folders without the possibility of restoring them using Windows 7 is impossible. This will require special software.
Many are faced with the problem of shortage free space on your hard drive. The disk on which the operating system itself is installed becomes especially clogged. This is due to the fact that there are a lot of folders on it, which the system itself fills with the information it needs. This problem is also relevant for Windows 7. You can clean system folders of unnecessary garbage either manually or using special programs.
Windows 7 system folders: the need for cleaning and possible consequences
Each of system folders has its purpose and stores information of a certain kind. Before cleaning the disk, carefully read what function a particular folder is responsible for, otherwise you may lose important data or cause serious damage operating system, which will lead to its breakdown:
Video: what files can be deleted on the system disk
What not to do when cleaning system folders
Please read the features of the above folders carefully. Before you empty one of them, consider whether you might need its contents in the future. Some folders, such as Windows or System32, should not be touched at all. And don't try to empty folders by simply deleting their contents. This will lead to the fact that remnants of them are stored in the computer’s memory, which in the future will begin to clutter and overload the system. There are only a few folders that can be cleaned manually:
Do not delete the folders themselves under any circumstances, this will lead to critical errors during system operation, you only need to erase their contents. Also, before clearing system folders, make sure you can free up memory using other methods, for example, by uninstalling third-party applications and games.
Methods for cleaning up Windows 7 system folders
If you still decide to clear hard drive from accumulated third-party files, the easiest way is to use the built-in Windows functions. There are two initial options - standard and advanced cleaning.
Standard cleaning
Using the standard cleanup method, you will get rid of the following files and folders:
To spend standard cleaning hard drive, follow these steps:
 Open the properties of the system disk
 Go to the “General” section
 Select the files we want to delete
 Click the “Clean” button in the “System Restore and Shadow Copies” section
Advanced Cleaning
With the advanced cleanup option you will remove the following folders and files:
To perform an advanced disk cleanup, follow these steps:
 Launch Command Prompt as administrator
 We write the cleanmgr command
 Select the disk on which to perform cleaning
 Selecting the files to be deleted
Video: disk cleaning using Windows
Disk cleanup using third-party programs
Before you start manually cleaning each folder individually, you should use special third party programs created for automatic search and clean the disk from unnecessary files:
 Download the CCleaner application
 Go to the “Cleaning” section
 Selecting the partitions to be cleaned
 Click the “Analysis” button
 Before deleting files, you can view information about them
Video: Removing system files using CCleaner
Features of cleaning individual system folders
If the previous cleaning methods did not solve your problem or you need to clean one of the folders selectively, then find it in the sections below and follow the instructions provided.
But many folders are hidden by default to prevent the user from accidentally damaging them. To display hidden folders in the general list do the following:
 Open Explorer
 Expanding the “Service” menu
 Go to the “Folder Options” section
 Go to the “View” section
 Changing hidden folder settings
Winsxs
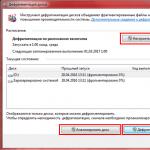
Cleaning the Winsxs folder on Windows 7 is done through standard disk cleanup. This method has already been described above. Before you start cleaning, you are presented with a list of files that can be deleted. Check the "Files" section. backup update package."
 Check “Update package backup files”
Video: how to empty the Winsxs folder in Windows 7
System Volume Information
To clear the System Volume Information folder, you must first access it:
 Open the properties of the System Volume Information folder
 Go to the “Security” tab
 Click the “Change” button
 Click the “Add” button
 Enter the username
 Granting full access to the folder
 Go to computer properties
 Go to the “System Protection” section
 Click the “Configure” button
Consistently click the “Apply” button, OK.
DriversStore
To remove outdated drivers from a repository called DriversStore, follow these steps:
 Open the command line
 We write the command pnputil.exe –e
 We write and execute the command
Installer
The Installer folder may contain files necessary for the system or programs, but there is a special third party application PatchCleaner, which will automatically determine what content can be removed:
 PatchCleaner searches for outdated update files and allows you to move them to another media or completely delete them
 Click the Browse button
 Specify the path to the Installer folder
 Click the Delete button
 Confirm the action by clicking on the Yes button
Pagefile.sys
If you are confident that your computer will cope with the required tasks without the Pagefile.sys page file, you can remove it by following these steps:
 Go to the “Advanced system settings” section
 Click the “Options” button
 Click the “Change” button in the “Advanced” tab
 Set the required parameters
 Reboot the computer
Folders with history, cache and browser cookies
Browser files can take up a large amount of disk space. The easiest and safest way to remove them is through the settings of the browser itself:  Marking the files. which should be deleted from the browser history
 Set the “All time” parameter and clear the history
Problems with disk cleanup
If, after you have deleted any files from the system folder, errors appear or the computer begins to slow down, there is only one thing left to do - perform a system restore. This could happen due to incorrect disk cleanup or deletion. necessary files. System recovery is only possible if there are restore points on the computer:
 Start the computer in safe mode
 Open the System Restore application
 Click the “Next” button
 Selecting a restore point
Video: Restoring Windows 7
What to do if there is no “Clean up system files” button
If, when trying to free up disk space using the standard cleaning method, you are faced with the absence of a “Clean up system files” button, this means that you have UAC (User Account Control) disabled, and the program immediately starts with the ability to clean up system files. That is, clicking the “Clean up system files” button gives you administrator rights and with them the ability to edit and clean up system folders. But if UAC is disabled, then you have access to changing system files immediately and clicking any additional buttons no need.
 If the "Clean up system files" button is missing, User Account Control is disabled
If you want to clear disk space or are sure that system files part of the virus has been preserved, then in this case the operating system itself has a standard and advanced disk cleanup function. You can also use third-party programs or clean each folder separately. But you shouldn’t delete everything, otherwise it will damage your computer, and the only way out will be to roll back the system to the last restore point.
Greg Shultz explains how to remove Windows Explorer from the navigation bar.After publishing the article “,” I immediately received several letters from readers asking if it was possible to remove it from Windows Explorer 7 also Homegroup. I’ll say right away that for me personally Home group seems to be a very useful innovation in terms of effectiveness and safety. At one time, I even wrote several articles devoted to the capabilities of the Home Group.
Homegroup in Windows 7 is an improved version of peer-to-peer working group. It is designed for simple exchange of files and folders within a Home or small office network. In the article "" I explained how to create a Home Group and how to join it.
In the article "" I showed how to use libraries to provide public access to files and folders, and also described other possibilities for publishing content within a HomeGroup in Windows 7.
In the article "" I explained how to open computers under Windows control XP and Windows Vista accessing folders and printers in a HomeGroup and vice versa - how to connect to shared resources in Windows XP and Windows Vista from a HomeGroup.
But if even after reading these articles you still want remove Windows 7 Homegroup from the Explorer navigation bar (Figure A), I will explain how to do this by disabling the services responsible for its operation.
Figure A: HomeGroup is an important component of File Explorer, even if you don't use it.
Notes
Homegroup can be removed from Explorer simple editing registry, but in this case the services responsible for its operation will still run in background. The method described in this article not only allows you to remove HomeGroup from the navigation bar, but also saves system resources.
Leaving a Homegroup
Even if you don't use a HomeGroup, it's likely that you joined one when initial setup Windows 7. Therefore, the first thing you need to do is exit it. If you haven't created or joined a Homegroup, you can skip straight to the next section.
To leave a HomeGroup, click the Start button and type in the search bar key phrase"Homegroup" (without quotes) and click when the "Homegroup" link appears in the list of search results. In the Change Homegroup Settings dialog box (Figure B), click the Leave the Homegroup link.

Figure B If you have a HomeGroup configured on your computer, you will need to log out of it before disabling the associated services.
In the dialog box that appears (Figure C), click the “Leave the Homegroup” link.

Figure C: In the dialog box that appears, click the "Leave HomeGroup" link.
When a message appears indicating that you successfully left the HomeGroup (Figure D), click the “Finish” button.

Figure D To complete the operation, click Finish.
Disabling HomeGroup services
To disable the services responsible for the Home Group, run the Services utility. To do this, enter “Start” menu in the search bar. keyword“services” (without quotes) and press . In the window that appears, find the HomeGroup Provider service (Figure E) and click the Stop the Service link.

Figure E: Find the HomeGroup Provider service and click the Stop Service link.
After this, you need to change the service settings so that it does not start when the system boots. Double-click the service name in the list to open the Properties window. Select the Disabled option from the Startup Type drop-down menu (Figure F) and click OK.

Figure F. Select the Disabled option from the Startup Type drop-down menu to prevent the HomeGroup provider from starting at system startup.
Now double-click on the name of the HomeGroup Listener service that was automatically stopped when the HomeGroup provider was disabled. In the properties window that appears, select the “Disabled” option from the “Startup Type” drop-down menu and click “OK.”
After that, launch Explorer to make sure that HomeGroup is not in the navigation bar (Figure G).
operating room Windows system implies the ability to create several users on one computer. This way you can use the PC with the whole family and not interfere with your personal files. However, extra accounts can only clutter disk space. It is better to delete unused accounts on your computer. When you need a new guest room account, just create it again. In this article you will see visual instructions to delete a user account in Windows 7 in two ways: through the control panel and through the Computer Management folder. Do not forget that this algorithm can also be applied to Windows 8, 10, but the interface in these systems is slightly different.
How to remove a user in Windows 7 through the Control Panel
- The most in a simple way is to delete the user's personal folder in the control panel. Go to the “Control Panel” field through Start in Computer Explorer.
- Configure the display of sections by category. To do this, in the very top right corner you should have the value “View: Category”.
- Select the “User Accounts and Family Controls” tab.


- In the window that appears, you will have access to almost all access settings for the user’s personal folders. Find the “User Accounts” section at the top, and in it “Adding and removing user accounts.”


- A window will open in front of you with all your personal folders on this computer. You need to click on the one you want to delete or change.


- A menu will open with a small list of options for the user. Click on the “Delete account” link.

You will have two options to choose from:
- “Delete files” – completely erases all data about the account and its owner. All documents from your desktop and personal folders will be deleted.
- “Saving files” – personal data will be transferred to the administrative account, you will save some of the data.
Choose the one that suits you best.


Confirm your action by clicking “Delete account”. Now the user's personal folder is erased and you will not see it in the list of users. Restoring the deletion is only possible by rolling back the system to the nearest point backup, so think carefully before deleting a folder.


How to delete a user in Windows 7 through computer management
This method is somewhat more complicated than the previous one, but it is great if you have any problems in the control panel or the account has not been deleted.
- Go to the “My Computer” directory. On the left you will see a list of root folders, find “Computer” there and right-click on it. Select “Management”. Please note that there is a small sign near this point. This means that only the administrator of the computer has access to this add-in, so you must be in an administrative account.


The Computer Management folder will open. In the list on the left, find the line “Local users”. Inside this section there will be two points:
- Users.
- Groups.
Go to the “Users” folder.