IN modern world It is difficult to imagine our life without the use of high technology. So, probably, many have heard about such a thing as UPnP. We’ll try to figure out what UPnP and DLNA support are. Plus, there will be some basic tips for setting up equipment, since this is not always done completely automatically.
UPnP. What is UPnP?
From the point of view of modern computer, mobile and media systems, UPnP represents the universal connection of multiple devices when combined into one system. This is the so-called Universal Plug&Play standard. In other words, this technology can be called universal device connection with its automatic initialization.
In fact, it is this approach that allows you to create a single home UPnP server based on an existing one. In this case, information stored on one of the connected devices will be available on any other. Most often, the source is computers, laptops, mobile devices, video or music players, and media content is played on the TV. But! In most cases, such devices should support the DLNA standard.
What is DLNA?
DLNA is a universal set of standards used when connecting equipment to transmit media data. A regular home local network is used as a data transmission medium based on the automatic assignment of IP addresses to connected devices.

In this case, the external user address does not change. IP is assigned exclusively within one local network. The main component that uses DLNA (UPnP media server) is the router, which is responsible for automating the assignment of appropriate IP addresses to devices. Most often this is a (A)DSL modem or router, although gradually obsolete connections using
Device connection options
Let's start with the fact that in this case the main step is to create a connection between the router and the TV. Today you can find three main options:
- connection using cables (Ethernet);
- connection using an internal or external Wi-Fi adapter;
- connection via the electrical network without any use of cables at all.
However, here you need to clearly understand that automatically combining devices into a single whole will not get by. You need to create a virtual UPnP DLNA server(if you already have one, say, on a TV like Smart TV, that’s generally great). The corresponding software, which will be discussed a little later.
Benefits of a Home Media Server
If we consider the list of basic capabilities using UPnP (DLNA) transceiver technologies, they are quite diverse, although they are used only for working with media content.
For example, when creating a home media server, you can easily view photos and videos on your computer or laptop, smartphone or tablet on a large TV screen. But the matter is not limited to this.

Few untrained users know that with the help of such technologies it is possible to broadcast online television or watch videos on the same YouTube hosting not on a computer (if you have the appropriate software or a regular Internet browser), but on a television panel. And this, in turn, makes universal remedy for watching programs, clips or movies, listening to music, etc.
Now a few words about the main points regarding setting up a home media server. Understanding UPnP technologies alone is not enough here. What is UPnP, we have already figured out a little. Let's see how such knowledge can be applied in practice.

First, you will initially need to enable the use of these protocols on your router and on your TV (or, if you have one, a cable or satellite TV set-top box). On a router, as a rule, such settings are enabled by default, but to be completely sure, you should go to the appropriate section and make sure that the UPnP parameter is in the Enable state.

But that's not all. In the OS, if this service is not enabled, it also needs to be activated. To do this, you need to go to the Programs and Features section in the Control Panel (in older systems, the Add/Remove Programs menu), where you can view the installed and used Windows components.

In network services, you need to enable the discovery (management) client service and also enable UPnP. What is a PNP client in this case? A universal bridge that can automatically recognize any media devices, even without installing the appropriate drivers. To make it clearer, in local wireless network when connecting a smartphone or any other mobile gadget, they are simply not needed.
Programs used
At this stage, let's move directly to the software that allows you to create, use and manage a home media server. Today you can find quite a lot of such packages. But they may have completely different capabilities.

For example, if you install a server based on Samsung apps All Share, on the TV you can only select music, videos or photos stored in the devices’ shared folders. There is no talk of any broadcasting of TV programs from a computer here.

It is much more convenient to install a more serious package like Plex Media Server, which has such an impressive list of features that few programs can compare with it. In addition, the software itself is released in Russian and is distributed completely free of charge.
Regarding mobile systems, for example Android, for such devices it is appropriate to use a small applet called MediaHouse or Bubble UPnP. Both applications can be easily found in the service Play Market and install it on your device absolutely free. The advantage of such programs is that when installing the appropriate computer client, DLNA settings are not required at all. It is enough that the smartphone, tablet and computer (laptop) are connected to the same private virtual network. After launching the application from the computer terminal, a list of all available devices will automatically be displayed. To be sure, in the computer version you can “expand” required folders(create general access). That's all.
Conclusion
I would like to hope that this brief information will give many novice users an idea of UPnP/DLNA technologies. In general, even when setting up a home media server, there shouldn’t be any particular difficulties, except perhaps enabling UPnP support on the router, TV and in the operating system itself. But, as practice shows, on all modern devices and in the latest Windows versions all these services are enabled by default. The only thing left to the user is to solve the problem by choosing the software that best suits his requirements.
If you want to create a home entertainment network based on your TV and computer, which will provide all the capabilities for playing content of various formats, then you should be interested in learning how to set up a home media server. Let's learn how to install the server creation software and then see what features it provides to users.
Connecting a computer and TV
Before you start installing a home media server, you need to resolve the issue of connecting your computer to your TV. It is better to make a wired connection between devices using LAN cable and a router. Of course you can use wireless connection, however, then you become dependent on the antenna power and the presence/absence of obstacles.
To avoid possible problems When playing movies in Full HD format, it is better to use a LAN cable, carefully laying it between the computer, router and TV.
The router, of course, must be configured to access the network, otherwise no media server will work. If you have figured out the question of how to set up the Internet on Windows 7, then you can proceed directly to installing and configuring the program.
Installing the program
Download the program distribution package to begin installing it. It is better to download from the official website, since the current and verified version of the utility is located here. You can choose two types of download - as a *.exe file or in an archive format. There is no difference between them, so choose according to your taste.
The installation process itself is extremely simple: you only need to specify the directory in which the application's executable files will be stored and decide whether to create a program shortcut on the desktop.
After assigning installation parameters, click the “Install” button. Wait until the installation is complete to begin setting up the program.
Setting up the program
When you first start the program, it should appear with initial settings where you need to select your media device.  Depending on the type of hardware you specify, the Native Support field will display a comma-separated list of supported formats.
If your TV can play some formats that are not in the “Built-in support” field, then check the “Custom device” checkbox. Manually write the formats supported by your equipment and click “Next” to move to the next settings window.
In the “Media resource directories” window, you need to make directories visible to your device (“share”) either local or network drives. Open by default standard folders, but to avoid confusion with them, it is better to allow access to local disks. To perform this procedure, check the boxes of the drives that you want to make accessible through the media server and click the “Scan” button. 
You can also manually add directories or external media. To do this, click the “Add” button, select the directory you need and start the scanning process. 
After scanning local and removable drives in the program interface you can see full list audio, video and photos stored on your computer.
Remember that the more multimedia information the program has to check, the longer it will take to start, so do not overdo it with the number of “shared” directories.
The next setting item is parameters backup. You can specify your storage path backup copy, used to restore program data, or leave everything as is. 
After clicking the “Run” button, the backup process will begin. You can specify which parameters you want to save in the backup file by checking the boxes. After completing the data backup procedure, click the “Close” button.
Starting the server
After setting up all important parameters you can proceed directly to switching on DLNA servers on the computer. To do this, click on the “Launch” button - a message will appear on the screen that the start was successful. 
After starting the server, you need to turn on the TV. If the connection is established correctly, it will appear on the “Playback Devices” tab in the program. If the list is empty, update it with special button on the panel on the right. 
Test the server by running files from your computer on your TV screen:

If the Home Media Server program is configured correctly, the file you launched from your computer will appear on the TV screen. But opening media files from a computer is not always convenient, so you need to learn how to additionally launch them directly on the TV. 
To prevent the program from disturbing you on your computer, close it by clicking on the red cross. The work of the home server will not be completed, since the application will not turn off completely, but will only be minimized to the system tray.
Viewing files on TV
After setting up the server on your computer, you can go to the TV and try to open “shared” folders through it. On different models The TV connects to the created server in its own way. For example, LG devices have built-in Smart app Share. 
Select the created home server as the signal source. If this item is not on the list, update the list of sources.
Don't forget to configure your firewall by temporarily disabling it; otherwise, the firewall will block the TV's attempts to connect to the home server.
After selecting the signal source, you will see a directory of folders, among which there will be directories “shared” on the computer. You can launch available files and watch them on your TV screen.
Possible applications
Program " Home Media Server" provides users with several interesting opportunities, allowing you to expand the functionality regular TV to the level of a true home entertainment center.
Interactive television
To enjoy all the benefits of interactive broadcasting, you can set up Rostelecom television. But there is another option that allows you to do without concluding an additional agreement with the provider - download the playlist interactive television and run it through your home media server.

For IPTV to work, you need to install the VLC Player program. Installing this application will not be difficult even for a novice user, since the convenient installation wizard does everything automatically - all you have to do is click the “Next” button.
The next step is to restart the home media server, which is done by clicking a special button on the top panel of the program. 
After this, you can go to the TV and select the “Internet Television” folder in the media server directory. If you downloaded the working playlist and installed it correctly, you will see a list of channels presented in it. 
Of course, this is not the most convenient option for playing interactive television, especially if the user has a Smart TV or has configured the IPTV function from the provider. However, if you have nothing but a home server, then using the “Home Media Server” program can be called the most adequate solution.
If your TV does not support Smart TV, but you want to be able to watch online broadcasts, then you can delegate some smart TV functions to the Home Media Server program using installed podcasts.
Podcasts in this case are files that allow you to directly launch online cinemas on your TV. For example, on the forum of the official website of the Home Media Server application, it is possible to download a podcast to play and manage video files from social network VKontakte.
Download the desired podcast to your computer and drop it into the main program window, as you did with the interactive television playlist file. 
Expand the Podcasts section and select the app you downloaded to online broadcasts. Click on it right click and select "Update". 
Wait for the update process to complete and go to your TV. Find the “Podcasts” folder and select the application downloaded through the media server inside it. 
I recently realized that televisions are still in the last century. If mobile gadgets and computers are becoming more convenient, faster and simpler, then the only thing that changes on TVs is the screen size and resolution. There’s no point in talking about convenience yet.
A TV without a media server on your computer or a special device is practically a useless thing, unless you like to hang out. Therefore, I have selected the 5 best media servers for a computer that will upgrade your TV and make it much more functional.
Plex
PlexPlex is the most popular and perhaps convenient option. Having launched the server on your computer, you can manage it from a browser, set up a media library, add subtitles, etc. Plex downloads all the information about the movie automatically and does it perfectly in 9 cases out of 10. The TV sees the Plex server without any problems and plays everything perfectly. The only disadvantage of Plex and others similar programs is that the TV does not see the subtitles built into the film, but for most this does not matter.
Plex is free, but additional functions you'll have to buy a subscription.
Plex
I used this server for a very long time on an old TV. It works quite well and unlike Plex, HMS is a whole combine, the functionality of which knows no bounds. The only drawback will be the program's terrible interface, but since it is needed to play movies on a TV, this will not big problem. The program is absolutely free and is only available in the Windows version.

Initially, PS3 Media Server was distributed as an add-on to the PlayStation 3, allowing you to play movies on your TV using the console. Then the program began to live a separate life. Like previous alternatives, it supports DLNA playback and requires no fiddling with setup.

Serviio is far from the most popular media server, but it also deserves a place in our top. The app is free, but can be purchased for $25 PRO version, which allows access to your content from anywhere, not only home network, and allows you to play content from the web (this function is provided as an introduction and in free version). Serviio has Android apps, but they act as a secondary control panel for the back end on the computer.
Kodi (formerly XBMC)

XBMC was created to bring video playback functionality to the Xbox. Then the project split off and now Kodi is one of the most popular media centers, supporting almost all platforms due to open source. Kodi has apps for iOS and Android that allow you to use your smartphone as a remote control. The service relies on donations and is absolutely free.
KodiFor me, Plex is a clear favorite. What do you use?
Now every Internet user has the opportunity to store their media files on a home server without using computer memory. This is very convenient if you collect your favorite films, videos or video clips, and you can view all this not only on your PC, but also on your LG TV. This review is devoted to a detailed discussion of this topic and answers users' questions about how to set up home media upnp server dlna for LG TV.
To be able to use all the benefits of a home server on your LG TV, it is necessary that the computer and TV are connected to the Internet via the same network, this can be either wi-fi or cable.
To synchronize devices you will also need special program, it is called “Home Media Server”, you can download it from the official LG Store. In the case of a PC, the program can be downloaded from the manufacturer’s official website, but you need to activate it on both devices, and then agree to the offer to synchronize them.

- If it is not possible to handle the settings yourself, take advantage of the very convenient offer that is presented on our website: calling an LG service center technician to your home.
How to set up upnp dlna home media server for TVLG: Access folders and files

Open the settings interface of the “Home Media Server” program and select “media resources”, here specify the path to all folders and files that you want to play on the TV. To make your task easier, you can open access to local disks, then you can play all the files. Once you have decided on the access rights, you can launch the dlna server itself; the corresponding button is located at the very bottom of the main screen of the “Home Media Server” program.
All will be shown here visible devices To connect, you need to select your TV.

In turn, on TV you can activate the Smart Share application; on smart TV it is installed by default. Open Smart Share, on the main screen you will see an icon with a picture of a folder and the inscription DLNA server. This icon will appear if you have already activated and configured the “Home Media Server” on your computer or laptop and both devices are connected to the same network.
Open the server folder and select the video or music folder, now you can play them on your smart TV.
Local service "Home Media Server" (HMS), deployed on the user's computer with an IP address 192.168.1.2 will be available from playlists, but requires some additional configuration.
Installation and configuration of HOME MEDIA SERVER (user manual Baryon)
The advantages of watching videos in this way over watching them with the built-in player via DLNA:
- no lag when viewing files m2ts, while rewinding works;
- viewing files from a media server located outside your local network using all the features of HMS
I recommend version 1.19, it seemed to me that in this version the WEB interface works more stable (in other versions it sometimes opens empty window in the browser). Direct link to the file: http://www.homemediaserver.ru/files/119/ setup_ms.exe
If you have not encountered this program, here are the basic settings:
Select on tab "Devices" "Samsung TV(DLNA, 16:9, 1920x1080)"
and click on the tools icon in the "Default device type" line. In the device settings window, check the box Web

Here, on the bookmark "Additional" you need to uncheck the box "Creating playlists of media resources in Web navigation mode"

HMS will now be available at: http://Your IP:45397. The port number is determined on the tab "Server".
To be sure to disable video transcoding, which is turned on for no reason or no reason, I recommend deleting everything except tsmuxer And hmsmpeg in the window "Transcoder-Profiles" having previously checked the box "Transcoding buffer - no disk usage"

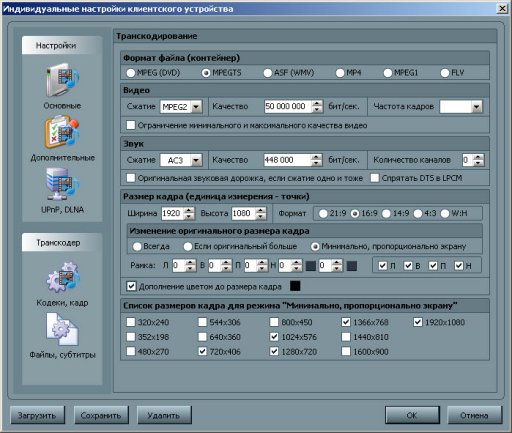
Note: transcoder tsmuxer does not recode the video stream, but only changes the container of the source video file to MPEGTS (while the extension remains the same), which does not degrade the image quality at all; transcoder hmsmpeg in combination with tsmuxer transcodes only the audio stream (DTS, DTS-MA, AC-3) to AC-3 (helps when the sound on BD-Remux is interrupted).
Transcoding loads the processor of a computer with HMS and, if the computer is weak, it may not cope with this task, which in turn will cause “slowness” in the image.
In most cases, for built-in Samsung player There is no need to recode or transcode anything, and in order to play the file unchanged, you need to navigate in the HMS directory tree in the following sequence:
Movies-Transcoding-Media resource directories-Directory name-(T)File name-Original-(O)File name
- Important to know:
- rewinding is possible only when viewing files that are not transcoded;
- pause works when playing both original and transcoded files;
- in files m2ts with a single track DTS-MA Neither pause nor rewind works
http:// IP of a computer with HMS installed:45397
A window with the directory structure should open in the browser:

If the IP address of the computer on which HMS is installed is different from 192.168.1.2 , then in order for the HMS directory structure to open in the application, you must either change the computer’s IP to the specified one, or add a block with your IP to the application’s start playlist: start.xml:
- For application nStreamLmod
<!]>
tsnakeman
http://site/widget/logo/hms.png - For application OVP (Online Video Player)
<!]>
Please note that the application message:
Not correct server response status: 1007!
may appear if port 45397 is blocked by a firewall.


