The Android system is an open source operating system. source code, available for modifications and extensions. Why is it necessary to flash the device?
Come out official updates, in which bugs have been fixed and additions have been made, but not for every device on this system it is possible to offer automatic updates, although technical capabilities allow .
There are many unofficial firmware available that allow you to change the design, remove pre-installed applications, add useful features.
The need to flash the device arises for many. You can do this in several ways:
- OTA updates. They are downloaded via wi-fi or Internet traffic, they “arrive” themselves automatically.
- Through a computer. Enough safe way, the firmware is installed when the device is connected to a PC.
- Through the Recovery menu on the device itself. To flash, you need 100% battery and a downloaded firmware zip file.
Preparing for flashing
To reflash android, you need to prepare:
- Through the device settings, find out the firmware version that you already have. Path "Settings -> About phone -> Firmware version".
- Charge your device to 100%. Turning off the device in the process can lead to unpleasant consequences for the system.
- Download from the Internet the firmware version for your device that you want to flash. If you install unofficial firmware, read the reviews about the work in addition before sewing.
- Make a backup of the android device: if something does not suit you in the new firmware, you can.
Firmware via PC
- Place the firmware version on drive C.
- Download the Odin3 program, place it on the C drive.
- Connect your android device to your computer via USB cable.
- On the switched off device, enter the firmware mode.
- Run the program, find the firmware file, click "flash" (or start).
The flashing process will take approximately 7-10 minutes. During the process, you can not disconnect the android device from the computer. If you have a laptop, it's better to connect it to the network or make sure that the battery is fully charged, otherwise, instead of flashing the device, you can turn it into a brick and then suffer for a long time with recovery.
Firmware using a zip file through the device itself
- Get root rights. For each android device, the options for obtaining rights may be different.
- Install a Recovery backup program, for example - ClockWorkMod.
- Copy the firmware to an SD card or the device itself.
- Install an SD card, enter Recovery mode. The combination of buttons for each device is also different.
- Reset settings, then reboot your device.
- You take desired firmware on the map and start the process.
- After the flashing process is complete, reboot the device again by selecting reboot system now from the menu.

Read in this article how to flash Android through a computer. How to flash a smartphone, what is Android phone firmware, why is it needed - common questions from novice users who first encountered problems on a device controlled by a "green man".
As a rule, flashing comes to the aid of users whose gadgets refuse to work or are unstable. With the widespread use of Android devices from China that cannot boast long-term support from the manufacturer, third-party firmware has become popular, allowing you to upgrade to latest version OS. So that you do not get confused, let's go in order.
What is Android flashing, why is it needed
The term "flashing" itself has become widely used with the filling of the market with smartphones running the Android OS. The new system opened up a bunch of possibilities for the user, including openness, which allowed everyone to change Android as they wish.
You can reflash not only a smartphone, but also a regular one mobile phone- they also work on the OS, albeit a simpler one.
What does the term “flash Android” hide behind? Any modern smartphone, as we have already indicated, runs on an operating system (complex software tools, which provide correct work hardware), which is characterized by errors, glitches and other problems. The OS of the phone can also crash, just like Windows on your computer. And in this case, the way out is to reinstall the system or flash it.
However, flashing can not only fix errors. Installation new firmware brings updates that ensure the stable operation of the smartphone, and often make the process of interaction between a person and a device more understandable and enjoyable.
Firmware can be divided into two classes:
- Official (stock). Firmware released by the manufacturer of the Android device. Because they are designed specifically for specific model, the likelihood of errors during flashing or during operation is minimized.
- Third party (custom, unofficial). Firmware developed by ordinary users or small groups. Android is taken as the basis (the OS is open, so everyone can work with it program code), which will be revised later. Third-party firmware does not guarantee perfect performance on your device, may contain various errors unnoticed by the developer.
Unofficial firmware, as a rule, is developed for those that have not acquired system localization into other languages or do not receive updates. Developers are especially interested in inexpensive devices with good hardware, which are popular among users.
How to flash a smartphone on Android?
There are some pretty simple ways.
- OTA-update. In fact, this is not firmware. You simply update the OS version using the device's regular means. The process is very simple, besides, we have already talked about it in detail,. The only thing worth noting is that not every smartphone receives updates “over the air”, and owners of models from little-known companies may never see them at all.
- Flashing with a smartphone. Using only a smartphone and a couple of applications, you can easily install a new firmware that you downloaded from an official or unofficial resource. The method is quite simple, but you should first familiarize yourself with what we also wrote about.
- flashingAndroidthrough a computer. A way to flash Android, which we will talk about today. It is, let's say right away, somewhat more complicated than those presented above. But it offers much more options.
Before flashing
Let's not rush. To begin with, you should warn against possible undesirable consequences and some of the nuances that may arise when flashing Android through a computer.
Data backup
The very first thing you should do is back up your important data. Necessarily! During the flashing process, absolutely all files from the device memory will be deleted. So save ahead necessary information on the Personal Computer or in cloud storage so that after a quick recovery.
Backup copy of the installed firmware
It will not be superfluous to make a backup of the system itself, so that in case of problems during the flashing, there is something to recover from. To create a backup copy of the OS, the simplest tool is, which we have already written about.
Quality wire, fully charged battery
Quite often, the cause of errors in the process of flashing Android through a computer is a low-quality USB cable bought for a few cents. Often, a smartphone is not detected by a PC at all due to a bad wire. Therefore, we recommend buying a high-quality cable in the store, but more expensive.
Be sure to charge your smartphone battery to 100%. Firmware can take a long time, and power from the USB port is intermittent.
Possible problems
Remember! You do flashing at your own peril and risk. This process, although not so complicated, is often accompanied by errors that can lead to the inoperability of individual smartphone functions or to corruption (complete failure). Although most of the problems that arise can be corrected, some cannot be treated even in service centers.
Be careful when flashing. It will be very useful to first familiarize yourself with the forums where users share what can destroy your particular device. Feel free to clarify the nuances that you do not understand.
The market is just filled with a wide variety of Android devices, so it is difficult to predict what errors may occur in your particular case. The reasons may be incorrect user actions, "clumsy" third-party firmware, problems with the cable, drivers, and so on.
By flashing your device, you lose the manufacturer's warranty.
If you are not confident in your abilities, then it is better to contact service center. Specialists with a guarantee will reflash your device, and you do not have to read the article further.
How to flash an Android device through a computer

So, the readers who got scared possible problems, and we are moving from theory to practice.
USB debugging mode and required drivers
To get started, pick up a smartphone or other Android device to activate the USB Debugging mode. This is done so that the computer can make changes to the device connected via USB. So the instruction:
- first of all, we will acquire developer rights so that a special menu in the settings becomes available to us;
To gain access to the developer menu, you need to make multiple clicks on the "OS version" item. It is located in the “About phone” section (the very last item in the device settings).
- after the rights are obtained, go to the "Developer Menu", which will appear in the settings;
- here we find the item "Debugging via USB", make the switch opposite it active.
The smartphone can be put aside. Let's move on to the drivers that are useful for flashing Android through a computer.
Drivers for each device are different. You can download them on the official website of the manufacturer or on one of the forums.
To install drivers:
- connect the device to the computer;
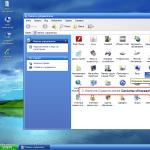
- go to the "Device Manager" (use the search or find the section in the "Control Panel";
- find the item with the name of your device (the smartphone or tablet may not be detected by the system, in this case a line with an unknown device will appear, next to which is a yellow triangle);
- right click call context menu for this device;
- select "Update driver" from the list;
- click on the item "Search for drivers on this computer";
- then click "Select a driver from the list of already installed";
- by clicking on the "Install from disk" button, specify the path to the downloaded drivers;
- restart your PC and smartphone for the changes to take effect.
Often, a smartphone driver alone is not enough. For some devices it is necessary to install additional drivers USB ports so that the PC can detect them. In addition, numerous devices require the installation of the ADB tool.
Android Debug Bridge (Android debug bridge) is a console application that is used to manage Android devices through a personal computer.
Returning to the fact that Android devices are countless, for individual devices you have to download a whole bunch of special software. The list of software can be found on the official websites of manufacturers or on thematic forums dedicated to flashing your particular gadget.
Programs for flashing Android through a computer
We are approaching the choice of software, which we will use directly to install the firmware on a smartphone or tablet. For these purposes, a whole bunch of programs are presented, but all of them can be divided into two broad groups:
- Firmware for specific models. Proprietary programs produced by companies exclusively for their devices. Almost every major manufacturer offers to download free version. Programs for flashing certain models provide quick and error-free installation of new firmware, and also have additional tools, which will allow you to backup the system and rollback in case critical errors. Similar software presented by the following companies: Samsung (Odin); Lenovo (Flash Tool); HTC (Fastboot); LG (KDZ Updater); Sony (Flashboot); Nexus (Fastboot).
- Universal software for firmware. Programs that can be used to flash any android devices. There are also a lot of them, but the possibilities are about the same. The most popular tools were QFIL and SP Flash Tool: the first for flashing devices with processors Qualcomm Snapdragon, the second - Mediatek.
Unlock Bootloader
So many smartphones, so that the user cannot freely make changes to the system, are presented with a locked Bootloader (bootloader). Bootloader is a special program that is responsible for accessing the kernel. From which we conclude that while it is blocked, we will not be able to flash anything.
Bootloader is unlocked using special software provided by the manufacturer with the right instructions. As a rule, it all comes down to installing a special program (for example, HTC has Bootloader Unlock), activating USB debugging mode on the smartphone (how to do this is described a little higher) and pressing just one button - “Unlock” (Unlock).
Choosing the firmware
When all the drivers are installed, the bootloader is unlocked, and the program for flashing Android via a computer is downloaded, you can proceed to select the firmware. Here it all depends on your device: there may be darkness or no firmware at all. There are several types of firmware:
- Official. Presented by the manufacturer without any changes.
- Unofficial on the basis of the official. Firmware that has been finalized by third-party developers, but with a minimum of changes (language support added, bugs fixed, and so on).
- Unofficial. There are also redesigned firmware, which are simply crammed with a variety of features. They are developed based on Android, ready to offer a bunch of new features, but often contain bugs. The most famous of them: CyanogenMod, Lineage OS, OxygenOS and others.
You can download firmware on official websites, forums and other resources.
As we have already noted, the principle of operation of all programs for flashing is approximately the same. We will talk in more detail about the firmware using the SP Flash Tool.
We remind you once again that the SP Flash Tool is a tool for flashing only devices with processors from Mediatek. You can find out which chip your smartphone has on the official website of the manufacturer or using special applications (AIDA64 and similar).
So, smartphone is not connected yet, we work only with the program on the PC:
- unpack the firmware if it is in the archive (it is better to do this in the root of drive C);
- run the SP Flash Tool program (recommended on behalf of the administrator);
- specify the path to the scatter file by clicking on the "Scatter Loading" button, which is located on the right side of the window (the file is located in the folder with the firmware, the name ends like this - emmc.txt);
- necessarily uncheck the Preloader item (if your device runs on an MT6575 or MT6577 processor, then uncheck the dsp_bl item as well);
- select Download Only from the list;
- press the Download button, next to which there is a blue or green arrow icon (depending on the version of the program);
- just now we connect the Android device to the computer without using any adapters - only one wire;
The device must be turned off.
- the program will start searching for a smartphone (if it does not find it, remove and insert the battery; if the device with non-removable battery then disconnect and reconnect the cable);
- after the device is detected, the flashing process will begin, which may take a long time;
Do not disconnect the device from the computer!
- we are waiting for the appearance of a window with a green circle;
- only now we disconnect the device from the computer and try to turn it on.
The first launch process can take quite a long time (about 10 minutes), just wait.
Approximately according to the same scheme, devices are flashed with other programs. However, do not neglect the instructions for use. Study them thoroughly, only then proceed to the firmware.
Conclusion
Flashing an Android device through a personal computer is a rather complicated task, with a lot of nuances, but even beginners can do it. The main thing in this matter is not to lose sight of every moment, so that later you don’t look on the Web for how to reanimate a brick. Take your time, carefully study the instructions specifically for your smartphone, since there are a lot of them on the Internet, and figure out the sequence of actions. Well, we can only wish you good luck with the flashing!
Today we will talk with you about how to independently reflash an Android smartphone through a computer. The procedure is not easy and the firmware of each gadget has its own nuances that you will have to clarify on specialized forums. But in general terms, you will understand that with the right approach, you can restore the device at home, put it on third-party firmware or update stock to new version.
Firmware smartphone on Android using a computer
To begin with, we will warn you that in this way you can “kill” your gadget. In the language of understanding people, turn it into a “brick”. In this case, you won’t be able to get off without going to the service center. It’s not worth taking on the NoName firmware of gadgets from China at all, if you break it, they may not be restored in the service center.Be that as it may, we live in the age of technology, the age of the Internet - world wide web, where, if desired, you can learn literally everything: even the firmware of Android phones. Actually, what are you doing now. Well, let's get started....
Search and installation of software required for firmware
It's no secret that for different manufacturers devices need different drivers. Fortunately, they can also be downloaded from the Internet. For example, you have a smartphone from Samsung- drivers for its subsequent firmware can be found on the official website. There is also an alternative option without searching for drivers - just connect the phone to the computer, after which the operating system will independently select and download them (applies to owners of Windows 7 and newer versions of window operating systems).The next task is to download the firmware itself. The most popular Russian-language resource with official and custom firmware is w3bsit3-dns.com. Go to the forum, look for your device and firmware for it there. Choose the most interesting for you and download to your computer.
Then you need to assign Superuser rights to the program, that is, give Root access. How to provide it, see the article we wrote earlier.
Now we return to the already familiar site w3bsit3-dns.com, or rather, to its forum and download the CWM-recovery file for your gadget (it is important that it is for your device, otherwise you risk turning it into a “brick”).
We write to the memory of the device a zip-archive with firmware and Recovery, downloaded earlier, or better - to an SD card.
Again we return to installed program Mobileuncle MTK Tools, run it and it's in automatic mode will find CWM-recovery on your smartphone, you will only need to confirm the update process by pressing the "OK" button.
Preparing for the firmware
Without a backup - nowhere! It will be useful to us in case unsuccessful firmware to restore the functionality of the device. Go:
So, the backup is created. To restore it, go to installed application CWM recovery, tap on the "Backups" item and select the newly created one there.

You should also save as a backup copy all the data that can be erased during the firmware of the device - contacts, photos, etc.: 
To restore data from a backup, use the nearby button "Restore" - that is, "Restore". You will only need to specify the path to the previously created backup and confirm its installation. As you can see, absolutely nothing complicated.
Installing firmware on an Android smartphone
So, the new Recovery is installed, now you need to go into it. First, fully charge your device. Turn it off and, using the combination of the Power and Volume Up buttons, go into Recovery. Depending on the manufacturer of the device, the combination may differ.

Here we select "Wipe cache partition" and confirm our actions;
And now let's move on to the most interesting - to install operating system. Click on "Install from sdcard", then on "Choose zip from internal sdcard" and find the file with the firmware downloaded earlier;

We confirm our consent;

We wait for the installation process to complete, then reboot the device and wait for it to boot. Do not be afraid if the first boot takes longer than usual - it should be so.
What to do if the phone does not start after flashing
If the process of launching the smartphone has not progressed beyond the logo, it makes sense to restart it again. Didn't that help either? Then reflash again. Otherwise, we need to roll back to the standard firmware and restore the backup. You already know how to restore a backup, but how to roll back to an earlier installed version firmware? There is only one answer - no way, it will have to be installed through a computer.Consider the process using Samsung devices as an example:
If the method did not work, but it also happens, the road to the service center is paved for you. We warn you: the name of the programs and the driver for all programs are different, but in general the installation process is similar, so it will not be difficult to figure it out. We hope that everything worked out for you!
Reaches 80%. They attract buyers with their low cost, since Android is installed even on the most budget models, as well as the ability to customize everything to your taste and even change the firmware if you wish. It is about the latter that today's material will be. We will answer the question of how to flash a tablet without a computer via a USB flash drive.
Many users, after a while after purchasing the gadget, are thinking about a new model with more functionality.
Despite the fact that tablet manufacturers do not welcome self-flashing, in addition to the official possibility using a computer, craftsmen have developed several ways to do without it: through custom recovery or using a special mobile application. Let's take a closer look at how without a computer: find out what is needed for this, as well as the firmware process itself.
Preparatory stage
In order for the process of flashing your tablet to be successful, you need to stock up on the files necessary for this. What do you need to preload?
- Firmware. Surely this point needs no explanation. Usually, without a computer, you can only flash custom firmware, since the official ones are sewn through a computer. If you don’t know exactly what firmware you need, but you are sure that the standard firmware does not work the way you want, read specialized forums, for example, w3bsit3-dns.com or others, and pay attention to reviews from owners of the same tablet as yours. You can also check out for your device. At worst, download and check in practice several options.
- Rooting program. Without it, you simply will not be able to complete all the necessary steps, because at a certain stage a significant intervention in the system is expected, which is possible only with superuser rights. The most popular root application is KingRoot, which allows you to complete the procedure with just a few clicks. You can download the app at the bottom of the page.
- Custom recovery. Absolutely every device is equipped with a special recovery mode, with which you can reset the settings, clear the cache and some other operations. But the recovery installed by default is quite limited in its capabilities, so custom ones were developed. On the this moment the most popular are TWRP Recovery and CWM Recovery. The first has an interface tailored for use on touch screen, and the second one is very similar to the default one, only with a large set of functions. Recently, there has been a trend of priority use of TWRP. You can download them either through special applications in automatic mode, or manually on specialized sites. The main condition is compatibility with your tablet model.
- Application for installing recovery. The most popular are Flashify or ROM manager. It is preferable to use the first one, since the program has a more intuitive interface, and is also regularly updated.
To use all the software, move the files to the root of the memory card. Programs must have an APK extension, recovery - IMG, and firmware - ZIP.
The easiest way without a computer is to use special utility for android. The most popular and at the same time the most compatible program with most devices is KingRoot.
- At the very beginning, allow the installation from unknown sources to be able to install the program not with Play Store: Settings - Security and check the box "Unknown sources".
- Install the KingRoot program and run it.
- In the main window of the program, click the big blue button in the middle of the screen.
- Wait for the procedure to finish and reboot your device.
In rare cases, the program may not be compatible with your device model, so you will have to use another option, for example, Baidu Root or 360 Root, the principle of which is completely identical.

Installing third-party recovery
Having received root rights, you can proceed with the installation of custom recovery. Use one of the two most popular programs: Flashify or ROM Manager. Let's dwell on each of them in more detail.
flashify

ROM manager
Since the program is semi-Russian and has not been updated for several years, be careful what you click, especially if you do not speak English.
- Install the program and run it.
- In the main menu, click Recovery Setup - Install or update Recovery and select the recovery you need.
- Next, the program will determine . If she did it correctly, confirm the choice and click on the button recovery settings. The download will start immediately. With a stable and fast connection, the file will be downloaded in a few seconds.
- Give the utility root permissions so that it can install. After a few seconds, you will see a success notification.
Having prepared everything, it's time to go directly to the firmware of the device. Consider the procedure using several types of recovery.

Firmware via CWM Recovery
We want to immediately note that moving between items is done by pressing the volume buttons, and the choice is made with the power button.
- Put the device into recovery mode. To do this, you need to hold down a certain combination of tablet buttons. They may differ depending on the model:
- volume up + power button;
- volume down + power button;
- one of the volume buttons + power button + mechanical home button;
- both volume buttons + power button.
- Do it first full reset tablet settings. To do this, go to wipe data / factory reset - Yes - Wipe all user data, then return to the main menu.
- Go to install zip - choose zip from / sdcard and select the firmware file previously saved to the memory card. Confirm the request with the Yes - Install command.
- After the firmware process is completed, return to the main menu and reboot the tablet through the reboot system now command.
Attention! The first activation will take quite a long time.
Firmware via TWRP Recovery
In this recovery, the selection of items is done by pressing the screen, and the confirmation of operations is by swiping at the bottom of the screen.
- Switch to recovery mode (see previous paragraph).
- Go to Cleaning - Advanced and check all items except the memory card. Swipe on the bar at the bottom of the screen to delete all data recorded on the tablet. After that, do not try to reboot, as nothing will come of it, since you simply deleted the system.
- Click on the button in the form of a house to go to the main Recovery menu.
- Click "Install" to go to the menu for selecting firmware files. Since the necessary data is stored on the memory card, click on the "Select memory" button, find the firmware file, click on it and confirm the operation with a swipe at the bottom of the screen.
- At the end of the process, you will see a notification about its successful completion. After that, click the "Reboot" button. Please note that it may take up to 10 minutes for the system to start up for the first time.
 A backup made in time can save you nerves and save you from unnecessary headaches if you “ruined” the system during firmware
 or other operation.
Firmware via ROM Manager
With this application, your communication with the recovery mode is minimized, since you mainly work through a convenient graphical interface. At the right time, you will only need to confirm the start of the recovery mode to continue the procedure. Since all the preparatory work has been completed, you can proceed to the firmware.
Today, you can update or change the firmware of your device without contacting specialized centers. You are basically just wasting your money and time. How to reflash the phone yourself? We will give specific answers to this question in our article.
Firmware Features
Now we will list a few important items that are necessary for flashing your cell phone.
- First, make sure the battery is 50 percent or more charged ( best option- this is a full charge), since the flashing process can be quite lengthy.
- If you are afraid of losing important data on your cell phone, then back up your files and the information you need.
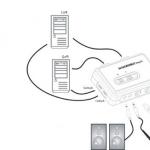
- For flashing, you will need a standard USB cable that comes with the phone.
- The PC must have the appropriate software to flash your phone. You can find all drivers on the official websites of manufacturers or in numerous alternative sources. There are pirate licensed versions Software that differs significantly in its functionality. It should be noted that official ones are not always better than pirated ones. After successful installation, you need to restart your smartphone.
- Your device must have a clean ESN, that is, not be in the database of stolen or lost.
- Next, you need to find out (for some models) MEID and ESN, where the first consists of 18 (starting with 2) or 15 digits, and the last of 8.
- Today there are 3 types of firmware: from a ZIP archive, a TAR archive, or a three-file one. Below we will go into more detail about each of them.
Are you still thinking how to reflash your phone? Believe me, it's not difficult at all. A little later you will see for yourself.

Firmware: "Android" from the ZIP archive
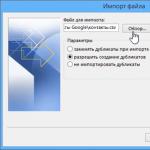
This is one of the best methods used by many users. So, how to reflash a phone ("Android") from a ZIP archive? First, you need to install root rights. It is worth noting that not all devices have this feature. Plus, having achieved root rights, you will immediately lose the warranty on the device. Secondly, you need to make a backup, that is, a backup copy of important files. What is needed for this? You can, for example, set special program to restore the system, an excellent example of which is ClockWorkMod. It is designed to flash phones on the Android OS, and in case of any failures, it allows you to return to the source code. To make a backup using the above program, you must take the following steps:
- Launch ClockWorkModRecovery.
- Select "Backup & restore".
- Further "backup".
- Confirm by pressing the "YES" button.
- Reboot your device by clicking "Reboot system now".
After completing these steps, a backup should appear on your MicroSD in the "clockworkmod / backup" folder. At the end of all the above operations, you can proceed directly to the flashing. So, how to reflash a phone ("Android") from a ZIP archive?
- After downloading the ROM file, write it to the memory card. The firmware name can contain Latin letters and numbers, and the file itself must be in a ZIP archive.
- Disconnect your phone from PC and charger.
- Next, turn off the mobile phone and start the recovery mode.
- In the menu we find the item “Wipe”, which erases the current information of the system.
- After that, you need to return to the root of the menu and select the item "Flash Zip from SD-Card" or "Install zip from sdcard".
- We find the ROM firmware located in the ZIP archive.
- We confirm the firmware and follow the instructions on the screen.
- If everything went well and without errors, reboot the phone by selecting "Reboot system now".
We are done with the first method. Now let's move on to the 3-file firmware.

How to flash Android with three-file firmware
For this method, we need the Mobile Odin Pro app, which is another Android flashing program. If you decide to flash it in this way, then you can not get root rights. How to flash a phone with 3-file firmware? Let's move on to the algorithm of actions:
- First you need to write files to a smartphone or tablet (3 files that have the words CSC, CODE, Modem in their names). It is desirable to throw all 3 files in one folder.
- AT mobile application Odin Pro select "Open file".
- Next, a window should appear where you need to select a file that has the word "CODE" in its name. Click "OK".
- Then select the "Modem" item and press the "OK" button.
- We check that all sections have data.
- At the end of the check, click "Flash Firmware".
- We are waiting for the firmware process to end, which can last over 15 minutes.
Finally, we go to the last way firmware.
How to flash Android from a TAR archive
Not the most popular method, since there are very few firmwares that are packaged in a .TAR archive. Generally speaking, most of the process is the same as the previous method. How to flash a phone from a tar archive?
- In Mobile Odin Pro select "Open file".
- In the window, find and select the downloaded firmware, which has the format .tar or .tar.md5, which was previously written to the “Firmware” folder. Click "OK".
- After we check that all sections have the necessary data.
- Next, click "Flash Firmware".
- We are waiting for the installation to complete and reboot the device.
I would like to say a few words about the firmware Chinese phones. Such devices are updated in exactly the same way, but there are a number of nuances. Firstly, it is very difficult to find high-quality firmware, and for some gadgets it is completely impossible. Secondly, various fakes (like the iPhone, Galaxy S4 and others) are unreliable, which is why custom firmware can cause irreparable harm to the device. That's all, we hope that our instructions answered your question on how to reflash a Chinese phone and original devices in order to update an already boring system. However, remember that flashing Android is an operation at your own peril and risk, which may not have very rosy consequences.
How to flash a Samsung phone
In this section, we will describe flashing using the MultiLoader application. After downloading it, you need to run and select the "BRCM2133" item. Then follow these instructions:
- We pass to the "Download" mode by holding down the off (lock) and volume keys. If the message “Download” appears on the screen, it means that everything went well.
- We connect the phone to the PC using a USB cable. After detecting the device, press the "Download" button and wait a couple of minutes.
- Disconnect USB and reboot smartphone. If the mobile phone starts on English language, then we do a simple “Preconfiguration” by typing “*#6984125*#” → “Pre-configuration”, after which we enter the password “*#73561*#”. Select your country of residence and reboot. Next, in the window we drive in “*2767*3855#”, which will help reset the settings.
- All is ready. The system has been updated. We think you understand how to reflash a Samsung phone.

Nokia Firmware
New models support the over-the-air flashing function, that is, without connecting to a PC. All you need is high speed internet. So, how to reflash a Nokia phone? First of all, go to the "Settings" => "Phone" => "Manage your phone" => "Device update" section. You will be presented with all important information about phone model and firmware version. Select "Functions" => "Check for Updates". If newer versions of the software are found, you will be notified and prompted to update old firmware. Everything is done automatically.
If you wish to update the system via a computer by connecting a USB cable, simply download the Nokia Software Updater application and run it. Then follow the instructions that will appear on the screen of your smartphone.

How to flash an HTC phone
First you need to download the firmware itself. In addition, it is important to get root rights and make a backup according to the method described by us earlier. backup can also be created using the Titanium Backup application. Let's get down to the process:
- First we do a full "wipe". How to do this, we have already told.
- Next, select "install zip from sd-card" in recovery.
- After you need to enable or disable signature verification "toggle verification mode".
- We find our firmware and run it. We are waiting for the update to complete and reboot. At the end, "Installation completed" should be displayed.
As you can see, the firmware of phones of this model largely coincides with the method of flashing from a ZIP archive that we described earlier.

Sony Xperia Firmware
For the firmware, we need the Flashtool program and a USB cable. Let's start the process. So how to reflash sony phone Xperia?
- First, we download the firmware we need, which will have the .ftf format.
- We drop this file into the / flashtool / firmwares folder.
- After you need to run the FlashTool utility, turn off the phone and wait 30-60 seconds. Next, click on the button in the application where the lightning is drawn, and select "Flashmode".
- A little later, you will be given a message that the firmware is ready for installation, and you need to connect the device.
- We hold down the key responsible for lowering the volume, after which the Flashtool program identifies your device.
- We are waiting for the end of the firmware until the inscription "Flashing finished" appears. We reboot the device and enjoy the updated software.
We turn to the last phone, for which we will tell the firmware process.
Fly Firmware
So how to reflash mobile phone? Follow the algorithm:
- We connect the phone (turned off) to the PC via a USB cable.
- Download, install and run the same FlashTool.
- Go to the "Download" section, where we indicate the COM port and speed (we do not recommend setting it above 460800).
- Specify the bootloader ("Download Agent").
- We load the memory allocation scheme of your smartphone (“Scatter-loading”) and then check the lines with the areas of the device’s flash memory that are subject to programming.
- Click "Format FAT", where we select "Manual Fat Format". In "Begin address" and "Format Length" in hexadecimal format, you must specify the starting address (0x0), as well as the size of the smartphone's memory to be cleared. Be careful as it is possible to inadvertently delete the calibration data.
- Click "OK", then press the power button of the device.
- To start the firmware process, you must click the "Download" button.
- After the update is completed, disconnect the phone from the USB cable and reboot it (several times if necessary).
As you can see, everything is quite simple.

Finally
Many users of phones on the Android OS sooner or later wonder about changing the firmware, as the original one becomes obsolete, which affects the overall performance of the phone. Along with this, interruptions in the operation of the system very often occur, which is especially true for Chinese phones. Nevertheless, for various reasons, not everyone wants to go to a service center, preferring to reflash their smartphone themselves. In this article, we have given many illustrative examples of this process. We think you were interested.