In Windows XP, organization public access to folders, drives and printers is performed at the user level. On the one hand, this is, of course, very convenient: when trying to access a particular folder, you don’t need to remember and enter different passwords. But at the same time, it is necessary to create accounts on each computer for all users who will need access to the resources of this computer over the network. If you don’t want to create accounts for all users on computers, you can activate a guest account. True in this case, any user inside local network will be able to access your shared resources. But let's talk about everything in order.
When we have it at our disposal, we can begin to use it directly. One of the options for using the network is to provide sharing drives and folders computers.
You cannot share any individual file on a local network; to make a file available to other network users, you must share folder in which it is stored. Remember that by sharing a folder, you thereby give access to all folders and files located in it.
On Windows XP networks, there are two sharing modes:
- Easily share computer resources
- Enhanced computer resource sharing
Easily share files and folders
Simple file and folder sharing is enabled by default. You can verify this by clicking “Start” – “Control Panel” – “Folder Options” – “View” tab. There should be a checkbox next to the “” item:  If there is no checkbox, then your computer is using advanced sharing.
So, let’s say I want to “share” the “Reports” folder, which is located on the local drive C on my computer.
To share access to a folder or drive, you need to click on the required object right click mouse – select “Properties” – go to the “Access” tab.
If we are sharing a disk or folder for the first time, we will need to click on the following link:  And then select “Just enable file sharing”:
  In the window that opens, check the box next to “Share this folder”:
  This way, you will give network users access to the files contained in this folder in read-only mode. They will not be able to change the files located in this folder or write their own files to it.
In the “Share Name” field, you can enter network name folder under which it will be displayed in the list of shared resources on the local network. But this is not necessary.
If you check the box next to “ Allow modification of files over the network”, then allow users to copy their files to this folder, as well as change the documents contained in it.
Then click “Apply” – “OK” in this window. After this, the folder will become public and a hand symbol will appear on it: 
For security reasons, you should not give full access to system folders(Windows, Program Files) and folders containing important data. It's best to create a special folder or folders for shared network files and give full access to only those folders.
To allow users on your network to access shared folders– on the computer where they are located, you must enable the “ Guest" This will allow any user to access the shared folder from any computer on the network.
To check whether a guest account is activated on your computer, right-click on the “My Computer” icon on the desktop and select “Manage”. In the window that opens, on the left, in the “Utilities” section, select the “Local users and groups” item. Having opened it, go to the “Users” folder - in the right field we find “Guest” and double-click on it with the mouse:  In the next window, the “Disable account” checkbox should be unchecked:
  That's all there is to it easy sharing to files and folders. As a rule, this mode is sufficient when working in home network. However, on a local network of an organization, a more serious delineation of user rights is required. In this case, you must enable “Advanced file and folder sharing.”
Advanced file and folder sharing
If you want to use advanced sharing of files and folders on network computers, then you need to go to “Start” – “Control Panel” – “Folder Options” – “View” tab and here uncheck the box next to “ Use simple file sharing (recommended)”. Account“Guest” must also be disabled for security reasons.
Allowing shared access for folders in advanced mode is the same as in simple mode: Click the desired folder or disk with the right mouse button - select “Properties” - go to the “Access” tab and check the box “Share this folder”:  In the “Shared resource” field, you can enter the network name of the folder under which it will be displayed in the list of shared resources on the local network.
In the “Note” field, if you want, you can enter a description of the folder (for example, “working documents”, etc.).
You can also limit the number of users who can use the shared folder at the same time. But it makes sense to do this only in very large networks or on weak computers.
And now we come to the very interesting moment in the organization of shared access - differentiation of access rights for network users in relation to the folder. Differentiation of access rights - this is the creation of certain rules, according to which network users (each individually or a group of users) will be able to perform certain actions with the contents of a shared folder: full access, change, or read-only its contents.
To set these rules, click the “ Permissions" You will see a window like this:  Here you can add a user or group to the list and define permissions for it by checking the boxes next to the appropriate items.
Please note that the method described above (advanced mode) will work without problems if both computers (on which the folder was shared, and which is trying to access it over the network) have same usernames with same passwords. In other words, if you, working under the user Vova , have posted a folder for public access, then in order to access it from another computer, a user must also be created on it Vova with the same password (as on the first computer). Moreover password must not be empty, otherwise Windows will refuse to share the folder. If the above condition is not met, problems may arise with access to shared directories (drop-down windows with messages like “access denied,” etc.).
So let's add users here and set permissions for them:
Click the “Add” button. In the next window, click “Advanced”:  In the window that opens, on the right, click the “Search” button:
  I want to allow access to the folder to users registered with this computer(including the user Vova
). Therefore, at the bottom of the window, scroll through the entire list and find the name “Users” - select it and click “OK” - then “OK” again:
I want to allow access to the folder to users registered with this computer(including the user Vova
). Therefore, at the bottom of the window, scroll through the entire list and find the name “Users” - select it and click “OK” - then “OK” again: 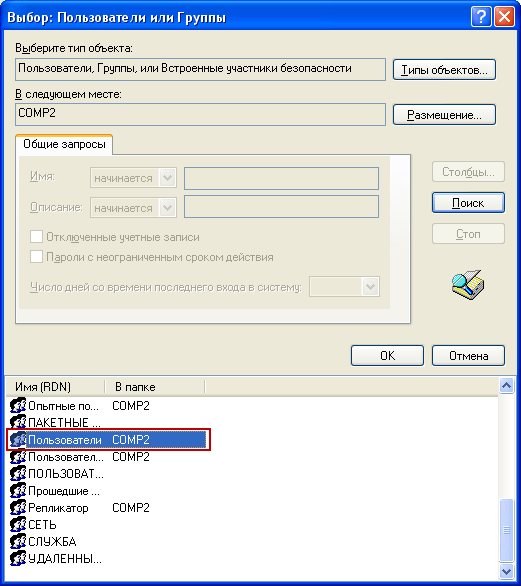 In the next window, I decided to give rights to read and change files in this folder - so check the appropriate boxes and click “Apply” - “OK”:
  That's it! Now I can easily access this folder from another computer (where the user is registered Vova
) and change the files in it.
That's it! Now I can easily access this folder from another computer (where the user is registered Vova
) and change the files in it.
To see all computer resources open for public access, go to “ Network environment" Then select “Show workgroup computers.” At double click mouse on the name of any computer – its resources open for public access to other computers on the network will be displayed.
Many users, when administering their home local network, are faced with the need to map network drives. If you are also interested in this issue, then this article should help you. Here we will tell you how to connect network drive, and also correctly open access to the folder for the network drive.
Step No. 1. Open access to the folder (preparing the first computer).
The first thing to do is to open access to the folder that should be used as a network drive on another computer. It's not difficult to do, but there are a few details you need to be aware of.
First you need to configure the network correctly. To do this, open the “Network and Sharing Center” and click on the “Change advanced sharing settings” link (screenshot below).
In the window that opens, you need to enable “Network discovery”.

Also here you need to disable “Password protected sharing” (if you don’t need it).

Sharing in Windows is a very convenient solution if you have several computers, tablets, and phones at home. This is convenient because you can download everything onto one computer, open it for general access and log in from different devices to it over the network. This method is convenient for transferring movies, music, documents, etc. This method Suitable for all Windows operating systems starting from XP.
First, you need to create a folder on any of your drives and give it public access.
Step #1. Create a shared folder
To create a shared folder, create any folder on drive C or D. In the example, I will create a Movies folder and share it
Step #2. Give the folder access to everyone
In order to give a folder public access, right-click on the folder, select Properties - Access - Sharing - From the list, select All and add. If you need to make it so that you can only read from the disk (but not add new files), then select where Read and Write - Read  Properties - Access - Sharing
Step #3. Advanced sharing setup
Now put a tick. To do this, click on the Access tab. Advanced settings, check the box (Share this folder) and click OK.  Access - Advanced Settings
Step #4. Setting up sharing in the Network and Sharing Center
Go to the Network and Sharing Center. To do this, right-click on the network connection and select. 
Set the general, guest and home network settings as in the screenshots below
Private

Guest or public

All networks

Step #5. Find out the network address of the computer.
In order to find out network address computer, download and run the Ip2 program (the most quick way find out ip)
Download ip2 (1.04)
Now run it and click Find My Ip Addresses, then copy the network address by clicking on Copy 
After we have opened public access and know the IP of the computer, we can already go to the shared folder
Step #6. Checking shared access from another computer
To do this, open any folder (on another PC or laptop) and enter two slashes and the IP address at the top, which we found out in step 5.
Example: \192.168.1.139
Great! Our sharing is almost set up. For convenience, we can create a network drive so that our shared drive can be seen in shared drives.
To do this, open My Computer (This Computer) - Map Network Drive - and paste the path to the folder. I shared the movies folder, so my path looks like this: \192.168.1.139movies
Step #7. Sharing between Android phone/tablet and your PC
To set up Android and Windows sharing, use the article: How to set up a local network (shared Android files and PC)
How to share on Windows (video)
Conclusions
As we can see, setting up sharing is not difficult. The main thing is to set read and write if you are sure that no one will throw a couple of Trojans onto your network shared drive.
I look forward to your likes, reposts and comments!
We have already organized a local network and now we need to figure out how to share access to drive D.
Perhaps someone will ask: why this particular disc? Yes, because, ironically, this is the most popular unit when setting up network connections, since it comes immediately after the system C. At least when setting up a network in accounting offices, this is definitely the most popular letter.
So, guys, in fact, a very similar topic has already been discussed in detail on this blog, only there the conversation was about organizing access to the folder:
Although, to be honest, these processes are absolutely identical. But today we will additionally consider some new nuances. So let's start the story slowly.
It is also worth saying that all settings will be carried out using the example of Windows 10. But there is a complete analogy with earlier systems such as Win 7 and 8.
So, first of all, look for the “My Computer” section on the desktop:
In it we find the treasured disk and right-click on it. In the opened context menu select “Properties”:

Then follow the path “Access-Advanced Settings”:

In the next step, check the box next to “Share this folder”:

In principle, the settings described above are enough for all users of the local network to gain access to the drive with the letter D. But with this layout, they will only be able to view all the files stored on it.
If you need to give rights to edit or change content, then you need to click on the “Permissions” button and specify the necessary permissions:

That's all, in fact, general access to the disk is open. Similar steps should be taken on all computers on the local network. Now let's talk about the nuances.
If suddenly all of the above steps did not lead to anything and there is still no access, then the first step is to restart the computer. According to the author, this is the most effective technique when working with technology 😉
There are also cases when, when accessing a disk with open access the system still asks for a password. Then you need to go back to the settings section, which is shown in the picture above, and select “Add”. Then click on “Advanced”:

In the window that opens, click the “Search” button, after which in the list that appears, place the cursor on the line “All”:

Now click on “OK” and see the result of the entire operation:

What else can be said about this topic? For example, you can take note of the fact that all the described actions and settings are very convenient to perform in a popular file manager Total Commander:

At least much more convenient than in the standard operating room guide Windows systems. And if you consider that we will already be connecting a network drive, then this is simply an irreplaceable program.
Well, okay, this completes the topic of how to share access to drive D. Although in fact, why does this particular letter pop up again, because the partitions on the hard drive
That's all for now. As always, ask your questions in the comments to the post. We will definitely help you in any way we can.
Lately I’ve been encountering this problem very often - users cannot open full access to disks over the network in Windows 7. After all, it used to be the same (in XP): right-click on the disk, open the access tab, enable full access and that’s it. Well, everyone does this out of habit. They set permissions and think that the problem is solved. When it comes down to it, it turns out that the system refuses to allow access to the supposedly shared disk.
Trying to solve this problem, I googled the entire Internet (maybe I searched poorly), but I still couldn’t find a simple and clear method. Everywhere they offer to create some users, assign them some permissions and passwords, someone is being clever with command line and all this is described in terms that would make an unprepared user faint.
All these options didn’t suit me either and I had to invent my own. I can’t say 100% that it will work equally for everyone, but in any case it’s worth a try.
First of all, go to “Control Panel” - “Network and Internet” - “Network and Sharing Center” - “Change advanced sharing settings” and enable: network discovery, file and printer sharing, access to shared folders and printers. We also disable shared access with password protection.
Then we check that the computers have the same working group and they belonged to the Public or Work network types (set when the computer first connects to the network, can be changed later in the settings).
Now let’s carry out a few simple manipulations and open full access to system disk.
1. Right-click on the disk and go to “Properties”:
3. A window called “Advanced security settings” pops up:
4. In it, select “Change permissions...” and get into almost the same window:
5. Here, click on the “Add” button and in the field for entering the names of the selected objects, write “All” and click on “OK”:
7. Afterwards, press “OK” all the time until we receive the following message:
8. Here, as well as in several more such messages, click “Continue”, then “OK” again (I don’t remember how many times) and enjoy shared access to files and folders on the system drive (with the exception of Windows folders, Program Files and series system files located at the root of the disk).
If you are just going to install Windows 7 on your computer and you do not need access to the system drive over the network, you can use another method:
To open full access to a non-system (one on which the OS is not installed) disk, you can first format it with any third party utility. The main thing is not to use Windows products. And when you install Windows, you will need to check all the boxes in the “Allow” column for the “Everyone” user in the disk sharing settings (“Properties” - “Access” - “Advanced settings” - “Permissions”).
Those. you can split it with any third-party utility like Acronis hard drive format it as you please and only then install Windows into the finished partition.
Don't even ask why this works. I don't know.
I hope my little instructions are useful to someone. In any case, all these manipulations helped me open full access to drive C.


