Hello admin! For the second time in my life I buy a laptop for myself and I can’t figure out the hidden partitions on its hard drive! I bought my first laptop a long time agofrom before installed Windows 7 in 2009 and there were two hidden partitions, yesterday I bought a laptop with Windows 8.1, and it already has three hidden partitions, and after upgrading to Windows 10 there were already four, and one IT expert said that there is also a fifth partition, but you can see it only via command line or special program! Explain to a non-professional why they are needed, because in total they take up 20 GB disk space my laptop.
What are the hidden partitions of a Windows 10 laptop?
Hello friends! For everyone modern laptops with Windows 7, 8.1, 10 operating systems installed, you will see hidden partitions on your hard drive. Why they are needed, how to view their contents and what will happen if they are deleted, I will talk about all this in today's article.
Hidden partitions on laptops appeared along with operating system Windows 7. There were no hidden partitions on Windows XP, along with laptops there was an installation disk with the operating system, if the XP-ic was unstable, then it could easily be reinstalled using the distribution kit.
With the advent (in 2007) operating system Windows Vista the rules have changed, when buying a laptop, no installation disk was no longer attached, but on a laptop it was possible to create DVD discs recovery and, if necessary, restore Vista using them. Many laptop models already included ready-made recovery discs.
Windows 7
In 2009, on laptops with Windows 7 preinstalled, I first saw two hidden partitions, the first 9 GB in size Good (recovery partition) and the second System Reserved (Reserved by the system) with a volume of 100 MB.
Note: on laptops from many manufacturers, on the contrary, the first was the partition System Reserved 100 MB, and the latest (third or fourth) recovery partition 9-15 GB.
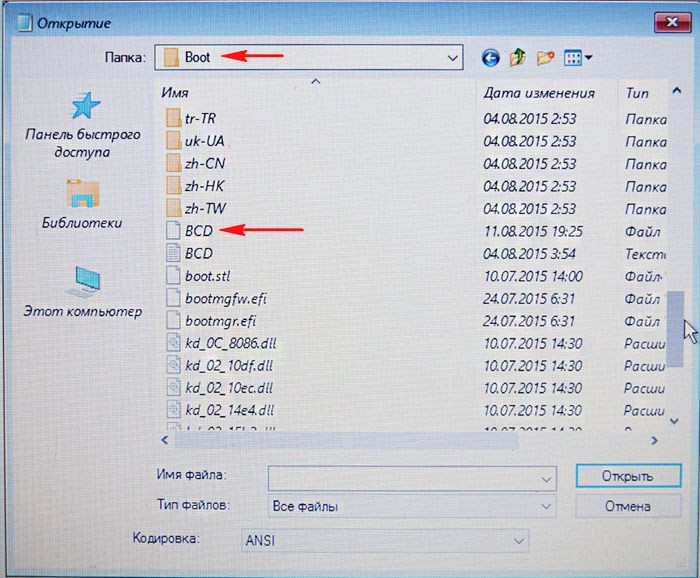
Naturally, I immediately wanted to know what is inside these sections! E If you assign a letter first hidden partition -System Reserved System Reserved 100 MB, it turns out that the section containsin itself Boot storage configuration files (BCD) Boot folder and system boot manager (bootmgr file)- these files are responsible for loading the operating system.

The second section (9 GB) contained ( compressed file Windows image 7 divided into several parts and the Recovery rollback program, with which you could return the laptop factory condition even if it didn't load.

Windows 8, 8.1, 10
On October 26, 2012, laptops with Windows 8 installed appeared, and a year later Windows 8.1 and they already had UEFI BIOS with the protocol safe boot Secure Boot, and contained four hidden partitions, including a third hidden MSR service partition not displayed in Disk Management(size 128 MB), you can see it using the command line

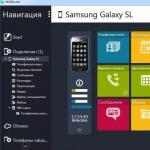
or any hard disk partition manager, for example .

When updating Windows 8.1 up to Windows 10 has another (fifth) hidden partition


You can see all the existing partitions of your laptop's hard drive not only with the help of AOMEI Partition but also using the command line. Run the command prompt as administrator, enter the commands:
diskpart
lis dis
sel dis 0
lis par

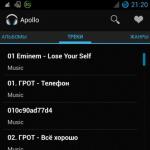
So, what do the hidden sections of the new laptop upgraded from Windows 8.1 to Windows 10 contain?
How to enter a hidden section and see what's there?
Friends, if you enter the Laptop Disk Management and right-click on the hidden partition, only Help will open, that is, assign hidden section letter and enter it will not work.

You can do this in another way. For example, let's take a look at the hidden partition (463 MB) that was created when updating from Windows 8.1 to Windows 10.
Run the command prompt as administrator, enter the commands:
diskpart
lis vol
sel vol 1 (1 hidden section number created when updating from Win 8.1 to Win 10), you may have a different number.
assign
Assignment of the drive name or mount point was successful.
exit
exit

Windows 10 assigned the letter (E:) to our hidden partition and it is visible in the explorer, we go into it.

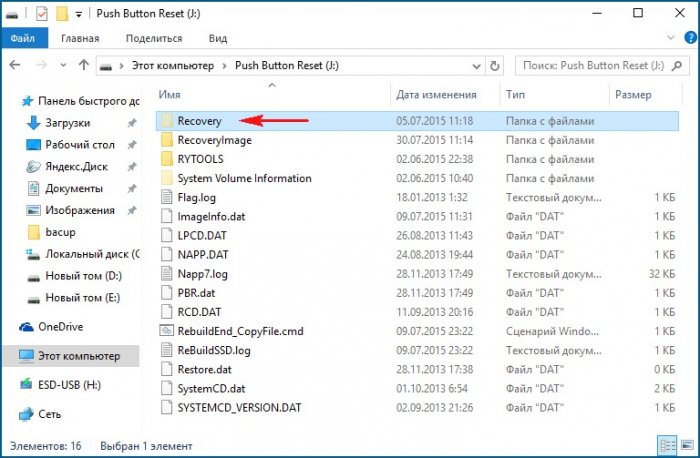
The hidden partition contains the Recovery folder.

The Recovery folder contains a folder WindowsRE and is already in itcustom image with environment tools Windows recovery 10 (Winre.wim).


So we guessed the secret of this hidden section created when windows update 8.1 to Windows 10, it contains all the tools for emergency system recovery. If this hidden section is removed, then we will not be able to restore Windows 10 in the recovery environment.
Let me remind you how the recovery environment works.
Rebooting Windows 10 with a key pressed Shift.
And enter the Windows 10 Recovery Environment,
Diagnostics -> Extra options. We see all the available tools of the operating system recovery environment.

Now we format or completely delete the hidden partition.
We enter the recovery environment and see that not a single tool is available to us.

Also, we will not be able to create a USB flash drive or a Windows 10 recovery disk, an error will occur"We can't create a recovery drive on this computer. Some required files are missing. To troubleshoot when the computer does not boot, use the installation Windows media". That is, when restoring Windows 10, we will have to boot from the distribution of the operating system, since it also has recovery environment files.

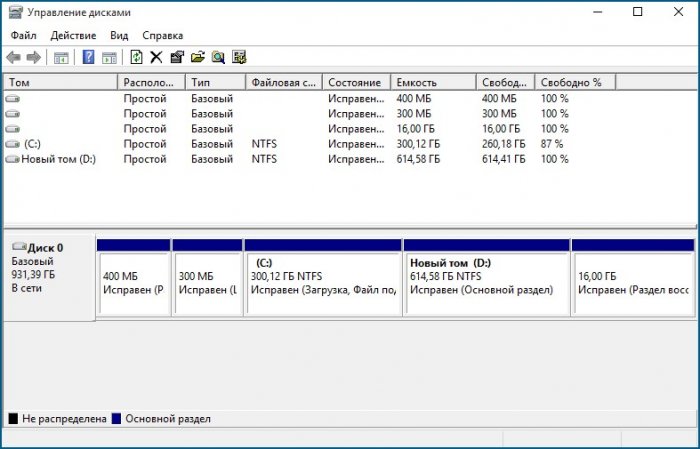
At the end of the article, let's see what is contained on other hidden sections of a Windows 10 laptop:

1. The first hidden partition is 400 MB in size contains Windows 8.1 Recovery Environment files, in Windows folder RE is located a custom image with Windows 8.1 Recovery Environment tools (Winre.wim). H o since we have upgraded to Windows 10 and are not going to roll back to Windows 8.1 , then we no longer need this section and we can delete it.

2. Second hidden partition 300 MB in size Healthy (Encrypted (EFI) system partition) FAT32 contains the Boot Storage Configuration (BCD) files - the EFI\Microsoft\Boot folder. In no case should this section be touched, otherwise you will not boot into Win 10.
3. The third MSR service partition, hidden and not displayed in Disk Management, required for GPT partitioning on UEFI systems, file NTFS system, size 128 MB.

4. We have already dismantled the fourth hidden partition of 400 MB, on it, like on the first hidden partition of 400 MB, there are recovery environment files, but not Windows 8.1, but Windows 10.

5. On the fifth partition, in the Recovery folder, there is a factory install.wim image with Windows 8.1. With the help of this section, you can restore the factory settings at any time, that is, Windows 8.1.

Total: Of all the hidden partitions of a laptop that has been upgraded from Windows 8.1 to Win 10, only the first 400 MB partition can be deleted without consequences (but what will it give you). The rest, whatever one may say, are still needed.
Surely any user of Windows operating systems knows that in the event of unforeseen critical failures, their performance can be restored. The Windows Recovery partition is responsible for this, which stores the files necessary to perform such a procedure. However, they take up quite a lot of hard disk space (sometimes up to 15 GB, as in Windows 8). This is especially felt on hard drives with small volumes. And many quite rightly begin to wonder about freeing up space, which is occupied by the notorious recovery partition.
How to remove it and whether it can be done at all, we will consider further. But I would like to immediately warn all users that when performing this procedure, you will have to sweat, as they say, and you should perform such actions only at your own peril and risk.
What is a recovery partition and is it needed?
The partition itself, as is already clear, is a reserved space on the hard disk, moreover, in the system partition where the installed OS is located.
As a rule, depending on the modification of the system, its size may vary, but usually it is about 300-500 MB. The Recovery folder is located here, in which there is a WindowsRE directory with the Winre.wim image nested in it. It also looks completely logical that all this is hidden from the user’s eyes so that he does not accidentally (or intentionally) delete the necessary recovery tools.

But the matter is not limited to this. There are two more hidden partitions on the disk, the existence of which the user does not even know. This is an EFI system partition with a volume of about 100 MB and a 128 MB MSR partition responsible for GPT partitioning. Thus, for example, the question of how to delete the recovery partition in Windows 10 comes down to removing from system disk not one, but three sections to attach them to the available space.
I must say that not all users realize that system recovery tools can also be found on installation media, and on special discs to roll back and fix system errors. Therefore, in some cases, you can not only hide the recovery partition, but also delete it, as they say, without a twinge of conscience. Several methods can be proposed for this.
Will reinstalling remove the recovery partition?
First, a few words about reuse Some users naively believe that reinstalling windows 10 or any other modification with full formatting of the system disk will also destroy the above partitions.

Nothing like this! Yes, at the stage of choosing a disk for installing the OS, absolutely all partitions will be displayed, and formatting will really merge them into one. But in a "clean" system, which the user receives immediately after installation, automatic recovery system is activated by default, so that the OS itself, whether you like it or not, again reserves space on the hard drive, where it writes necessary information At once.
Recovery partition: how to delete via command line?
So, let's start with the most difficult, but absolutely effective method, which involves the use of command console(cmd), which must be run with administrator rights.

But before that, you need to do a few simple actions. First you need to create a recovery disk. If the "Recovery" menu is used in the "Control Panel", you will need a USB flash drive, if the backup and restore partition is used, use optical media. A flash drive with a capacity of 64 GB or more is convenient in that you can perform full data on it from the recovery partition itself (but more on that later).

Next, the solution to the problem of how to delete the recovery partition from hard drive, is to select the line of special boot options (for Windows 10) in the update and security menu, which is located in the options section, or set removable media as the first boot device in the BIOS.
After the restart, at the beginning of the installation of the operating system, the combination Shift + F10 calls command line, which contains the following commands in sequence:
- diskpart;
- lis dis (list of all partitions);
- sel dis 0 (select drive with OS installed);
- lis par (view sections);
- sel par 1 (select the first section);
- del par override (delete the first section);
- sel par 2 (selection of the second section);
- del par override (removing the second section);
- sel par 3 (selection of the third section);
- del par override (removing the third section);
- create par efi size=100 (create an EFI encrypted partition with a size of 100 MB);
- create par msr size=128 (create an MSR partition with a size of 128 MB);
- lis vol (section view);
- exit (exit from diskpart);
- bcdboot C:\Windows (set boot partition);
- exit (full exit from the console).
Disk management with AOMEI software
The reload field should, for ease of further operations, use the AOMEI application, select the disk to which you want to attach the place, and then use the resize / move line in the menu on the left side.

Next, the partition is selected to be moved, and the slider is dragged to the limit (in order to completely allocate all the space for drive C. Be sure to note that after such actions, there are zeros on the “Unallocated space before” line.
Click "OK" and "Apply". In the pending operations window that appears, the transition button is pressed, after which you need to agree with the instructions in the message. After that, a black free space mode window will appear. Upon completion of the process, the recovery partition will be deleted, and the freed space will be attached to the system partition.
Method for Windows 8 and higher
Now about how to delete the recovery partition in versions of Windows 8 and above (in the seventh modification and below, this solution does not work).

Remember, it was about creating in the first stage bootable flash drive? So, if you check the box next to the line Reserve copy, the entire partition, user files and programs can be transferred to this media. True, this may even require several hours and a flash drive larger than 64 GB in volume.

But at the end of the process, the system itself will offer to delete the desired recovery partition. We agree and immediately see how much space is freed up.
Conclusion
It remains to be said that it is advisable to delete the desired partition only in cases where recovery in any situation is planned to be carried out exclusively from removable media, which must be created in advance. If for some reason it is not at hand, it will be absolutely impossible to roll back the system even to the factory state without reinstalling.
Do not know how to recover data from damaged partitions in full on your own? Do you want to recover information from logical partitions after formatting, erroneously repartitioning disks, or after completely destroying the structure of the NTFS/FAT file system?
How to restore a logical partition
program:
Starus Partition Recovery
Installing the Starus Partition Recovery program will help you easily cope with the tasks. The entire structure of files and folders will be restored, and the data will be saved as it was. The product is a fundamentally new tool for recovering logical partitions and resuscitating data after errors in NTFS/FAT operating systems. The uniqueness of the program lies in the ability to reconstruct the data location structure from scratch in case of severe damage or complete absence of the file system.
To simplify the task of recovering deleted data, let's consider the program's work in two directions - fast data recovery and data recovery from damaged partitions.
Instant Analysis
In the case when the media is detected by the system, the logical partitions are available, the file structure of the system is not damaged - it is possible to restore the necessary information in a matter of seconds.
The process comes down to a few simple steps:
- Choose desired disk on the left side of the program, which contains deleted files.
- In the window that appears, select the type of analysis "Quick Scan"
- Upon completion of the scanning process, all found directories and folders will be displayed on the left side of the program. By highlighting the required folder on the left, you can view its contents in the main part of the program. Next, select the necessary files, folders and save to the media or folder we specified.
You can also use the following options for your convenience:
- the "Search" option to find the required file;
- the "Filter" option in the "View" menu to see only deleted, only existing or all found files;
- if the option " Preview”, then by selecting the file, you can immediately view its contents in the upper right part of the program.

Data recovery from damaged partitions
In the case when partitions with your data are not displayed by the system, you need to search for remote volumes.
To do this, on the left side, select the hard disk on which you want to find the deleted partition, and in the "File" menu, select the "Find disks" option. In the window that appears, specify the type of file systems you are looking for and the scope of the search. All found disks will appear in the explorer tree, and you can work with them as with existing partitions.

Complete Analysis
The main stage of data recovery from damaged or formatted disks is scanning selected partitions. After you select a recovery area, the "Analysis Type" wizard window will open. If the NTFS or FAT file system is damaged - partitions exist as drive letters, but an error occurs when reading the directory, or an empty directory, use the "Full analysis" of the disk.
The program will scan all file system disk and find all files that can be recovered. The process may take a long time, however, the data and the structure of their location will be restored in full.

Safe recovery from an exact copy of a disk
Using a virtual disk image, you can recover the necessary deleted data without worrying about the safety of the original data on the physical media. In addition, the physical media can be used further and work as usual.
Another nice point is that the created image can be used in any program.
To create an image, select the required logical partition or physical disk and click the Save Disk button on the toolbar. In the window that opens, specify the area of the disk to save, as well as the name and location of the image file to be created.

Deep Scan
It is not always possible to restore the location structure of data deleted in time for a very long time due to overwriting of superficially different information. However, the files themselves can still be found and restored. In parallel with disk analysis, the program looks for deleted files by their signatures (search by file content). The found files are located in the "$ Deep Analysis" folder at the root of the drive and are sorted by extension.

Saving recovered data
To restore a scanned partition while preserving its structure, or to restore only some files of the selected directory, select the selected volumes or files and click the "Restore" button on the main panel. You will be prompted to choose one of four save methods:
- saving on HDD
- recording on CD/DVD
- creating a virtual ISO image
- saving to the Internet via FTP server

With tool Starus Partition Recovery the data recovery procedure for an ordinary user will not be difficult. The Windows Explorer-style interface, combined with a handy step-by-step wizard, makes the recovery process an easy task. At the same time, the program is not deprived of options for recovering information at a professional level:
- The HEX editor built into the program allows you to view the contents of files, partitions or physical disks.
- Disk Manager - given function allows you to view the location of logical partitions on physical media, taking into account their size and sequence. All disk management functions are available in this window.
- File start selection – an option that allows you to accurately determine the beginning of a file (the first sector of its contents).
Remember - the success of your data recovery primarily depends on the speed of their recovery!
Increasing smaller Windows technical partitions - the recovery and EFI encrypted partition on a GPT disk, and the System Reserved partition on an MBR disk - may be required if there is not enough free space to perform update type operations on one Windows versions to another, later. The performance of such a task by staff Windows tools Impossible, but doable third party programs to work with disk space, in particular, the well-known AOMEI Partition Assistant. The task is difficult, however, it can be performed by means of the basic edition of the Standard Edition program, which can be downloaded from the creators' website for free. Below, we will consider in detail how using this program you can increase the size of any of the technical sections of Windows.
Important: Before performing the operations described below, it is advisable to create a backup a copy of Windows and get an emergency backup program media. Protection measures in the form of creating a restore point or system snapshot are not enough. It is necessary to create a complete backup, which in case of failure will be able to restore not only the system partition C, but also technical windows partitions. As such backup programs, you can use EaseUS Todo Backup, company products and Paragon. When carrying out the following operations on the laptop, you must connect it to the mains to prevent AOMEI Partition Assistant from being interrupted in pre-boot mode due to battery drain.
Using AOMEI Partition Assistant, we will slightly reduce the system partition C and move it, and attach the freed disk space to technical partitions. Attaching space to technical partitions for each of the disk partition styles will be considered separately. But the operation to reduce partition C and move it will be the same - both for MBR disks and for GPT disks.
1. Reducing and moving section C
To shrink partition C, click it in the AOMEI Partition Assistant window. AT context menu select resize partition.
First of all, activate the option "I need to move the partition." After activating this option, a slider will appear in the graphic block of the section on the left. The slider must be moved to the right until it is free right amount Mb. The freed space will be displayed in the "Unallocated space before" column. In this column, the value of the freed space can be edited using the "more / less" buttons. Or you can even enter a specific number using the keyboard. It will even be more convenient if, for example, you need to take away very little space from section C. Having decided on the freed space, click the "Advanced" button and allow partition alignment. This is an optimizing operation that will be carried out along with the main assigned operations. We press "OK".

2. Increasing the "System Reserved" partition on the MBR disk
As you can see in the screenshot, in our case, 229 MB is disconnected from section C. To attach them to the "System Reserved" section, call the context menu on the latter and, as in the previous case, select the operation to resize the partition.
 3
3 Pull the slider of the graphic block from left to right until it stops. Next, click the "Advanced" button and activate the partition alignment operation. Click "OK".

Now it remains only to apply all the planned operations. To do this, click the "Apply" button.
 5
5 After that, we confirm our decision twice more - first in the window with the list of pending operations by pressing the "Go" button, then by pressing the "Yes" button in a small window warning about the program switching to preload mode. Then it remains only to wait until AOMEI Partition Assistant performs all the assigned operations.
3. Enlarging an EFI Encrypted Partition on a GPT Disk
On a GPT disk, there are usually two technical partitions - the Recovery partition and the encrypted EFI. But in some cases there can be as many as three technical partitions: in addition to the two mentioned, a GPT disk may also contain a small MSR (Microsoft Reserved Partition) partition. If the latter exists, it must be moved closer to the C partition. As a result of this operation, the MSR partition will be swapped with unallocated space freed up to be later attached to the EFI partition. You cannot delete an MSR partition.
3.1. Moving an MSR Partition
In our case, we have an MSR partition with a size of 16 MB. Click on the context menu on it and select the operation to move the partition.
 6
6 We grab the display of the section in the graphic block with the mouse and move it to the right, to the very end. Click "OK".

3.2. Resizing an EFI Partition
Now we will work directly with the EFI partition. We select it and in the context menu we launch the operation to resize the partition.
 8
8 In the graphic block of the section, drag the slider to the right to the end. Click the "Advanced" button and assign additional partition alignment. We press "OK".

Everything - the increase in the EFI partition is planned, now you can start applying all the assigned operations. Click "Apply" and confirm the start of operations.
 10
10 
4. Increase the recovery partition on a GPT disk
To increase the recovery partition of a GPT disk, you need to reduce partition C, as described in paragraph 1 of the article, and move the MSR partition, if present on the disk, as indicated in paragraph 3.1 of article. In the same way that the MSR partition was moved, then the EFI partition must be moved. After that, the recovery partition and the freed space will be next to each other. On the EFI partition, we call the context menu, select the move operation.
 12
12 The display of the section in the graphic block is captured by the mouse and moved to the very end. Click "OK".

Last operation will, respectively, merge the unallocated space and the recovery partition. In the context menu of the latter, select "Resize partition".
 14
14 Drag the slider from left to right to the very end. Click the "Advanced" button and enable partition alignment. Click "OK".

All the necessary operations are planned, it remains only to start the process of their application.
 16
16 Have a great day!
A feature of the Windows 7 operating system, as well as a big surprise for users who first installed this system on their computer, was a hidden partition System Reserved(Reserved by the system). In this article I will try to reveal the features and benefits of this innovation.
Assigning a Hidden Section
If Windows 7 is your first operating system, then you may not suspect anything about the existence of this partition. AT Windows Explorer he is not visible. Over time, if the main purpose of the computer is not playing or surfing the Internet, you will reach the "Disk Management" and see that there is little space on the hard disk besides one or two partitions. It looks like a separate section, but it does not have a letter, it is called incomprehensibly. What is it for then?
The main purpose of this partition is to protect the boot files of the operating system. This partition contains the boot storage (BCD) configuration files and the system boot loader (the bootmgr file). There is an opinion that using this partition you can perform a system restore (sometimes called the recovery partition). This is not entirely true, since the volume of all files located on the partition System Reserved, does not exceed 30-35 MB, while the volume of recovery files is about 150 MB. Although you enter the recovery environment using this partition, there is no recovery environment image on this partition. He is in hidden system folder Recovery on the operating system partition

Do not confuse a hidden partition reserved by the system for boot files and a recovery partition created by manufacturers to return the computer to a "factory state". Such sections have completely different attributes. At the same time, on modern computers(especially laptops) both of these sections are necessarily present.
Automatic partition creation during operating system installation
To be honest, it was a mystery to me why in one case, when installing the system, a hidden partition is created, and in the other it is not. The answer to the question appeared as a result of experiments.
There are several prerequisites for creating a section:
- The first and main condition is loading from external device(DVD, USB), as when you run the installer from under Windows, you will not be able to work with hard disk partitions;
- Total number of main (primary) partitions of the hard disk before installation should not exceed 3. That is, if prior to installation your hard disk space has already been divided into 4 such partitions, in this case a hidden 100 MB partition will not be formed, and the download files will be located on the already existing active partition. Moreover, this may not be the partition on which the system is installed. The number of logical partitions on the extended does not matter.
- The section in which the installation is performed must be the first in a row (top, on graphical representation disk space);
- The operating system must be installed to the unallocated area of the disk. If the disk is already marked, then when choosing a partition for installing the system, you need to not only format it, but also create it again, that is, the installation partition must first be deleted. Accordingly, if you do not want a partition to be created on the hard disk System Reserved, do not delete the existing one;

One point is interesting in this connection. If the system installation partition and the active partition are not the same, after the installation is completed, the active partition becomes invisible. This is because the installer first puts the files Windows boot 7 to the active partition and then "unmount" it - removes the letter. That is why many users since the beta version of Windows 7 (and even now, sometimes it happens), when installing the system on an inactive partition, “lost” the partition with the already installed system(with Windows XP, for example). The cause of "invisibility" is easy to fix by assigning active partition letter in the disk management snap-in.
Advantages and disadvantages
As I already noted, the purpose of the hidden section is to protect the download data store. Because the this section is not related to the others, such an operation as shrinking disk space does not affect boot files, which avoids the annoyances associated with compression, such as messages on boot "bootmgr is compressed". With certain knowledge and skills, boot recovery is not such a complicated process, but it takes some time. In their absence, the case may end with a reinstallation of the system.
The second advantage is the less time-consuming process of reinstalling one of the systems if you have several of them on the same computer. You can read about this in the article " Restoring the joint boot of Windows 7 and Windows XP when reinstalling one of them" - section " Option two - the recovery partition has been created".
Finally, having a hidden partition is another kind of foolproof.” Needless to say, the experience of helping users in solving problems with the operating system allows us to conclude that problems often arise due to a lack of experience and knowledge, as well as a misunderstanding of many processes that ensure the stable operation of the operating system.
A few words can also be said about the shortcomings, although it is more correct to attribute them to inconveniences. They are connected with the fact that when organizing a joint boot with Windows XP, you have to assign and delete the letter of a hidden partition to place XP boot files on it. But I think the advantages of this section outweigh this disadvantage.
Conclusion
The hidden "System Reserved" partition in Windows 7 was another step in the development of Windows boot, which has undergone significant changes in Windows Vista. Thanks to this section, system boot becomes more reliable and less dependent on user actions.
I express my deep gratitude to Vadim Sterkin for reviewing the article and assistance in publication.