A full-fledged operating system on a small external media is very convenient. You can run the system on almost any computer, and have all your files and data always at hand, and you no longer need to keep a large number of systems on the main drive.
It is for these reasons that many computer users are interested in how Linux is installed on a USB flash drive, is it possible, and if possible, how to implement everything correctly. In this article, we will try to answer such questions. We will also analyze in detail the installation process on a USB flash drive for one of the most popular distributions - Ubuntu.
Despite all the advantages of using an operating system from a USB flash drive, many people say that this is not necessary. And not in vain, because such intensive use of a flash drive can simply destroy it.
Non-volatile flash memory has one significant drawback - it is a limited number of overwrites of one cell with data. There are no restrictions on the number of data reads, and the write limit is very significant - tens of millions of times. For the intended use of flash drives, this is not critical, since the recording frequency is not very high there and the flash drive lasts for a long time.
But when you install the system on a flash drive, the kernel, the file system, programs are constantly saving their temporary files, constantly working with data and writing something to disk, the file system journaling complicates the situation, since it logs data about any change to files in the log that further increases the number of flash drive block overwrites.
You can say that there are SSDs made with the same technology used in computers. But everything is not quite right, SSDs are designed for such a load, because they have a rewrite limit of several billion, as well as the ability to hot-swap already failed blocks with backup ones.
Therefore, when you agree to install an operating system on a USB flash drive, you must understand that the flash drive will work much less than it could. But not everything is so bad, you can perform some optimizations that will make the system write less information to disk. If you agree with the risk, then next we will look at how to install Linux on a USB flash drive.
Installing Linux on a flash drive
The Linux operating system allows the user to do whatever they want, and if you want Linux on a flash drive, that's fine too. We don't even have to resort to any special tools.
We will consider the whole process using the example of Ubuntu and everything will be done using the official installer. We will not be interested in the usual recording of an image to disk or work from RAM. In the end, we will get exactly a full-fledged operating system on a flash drive.
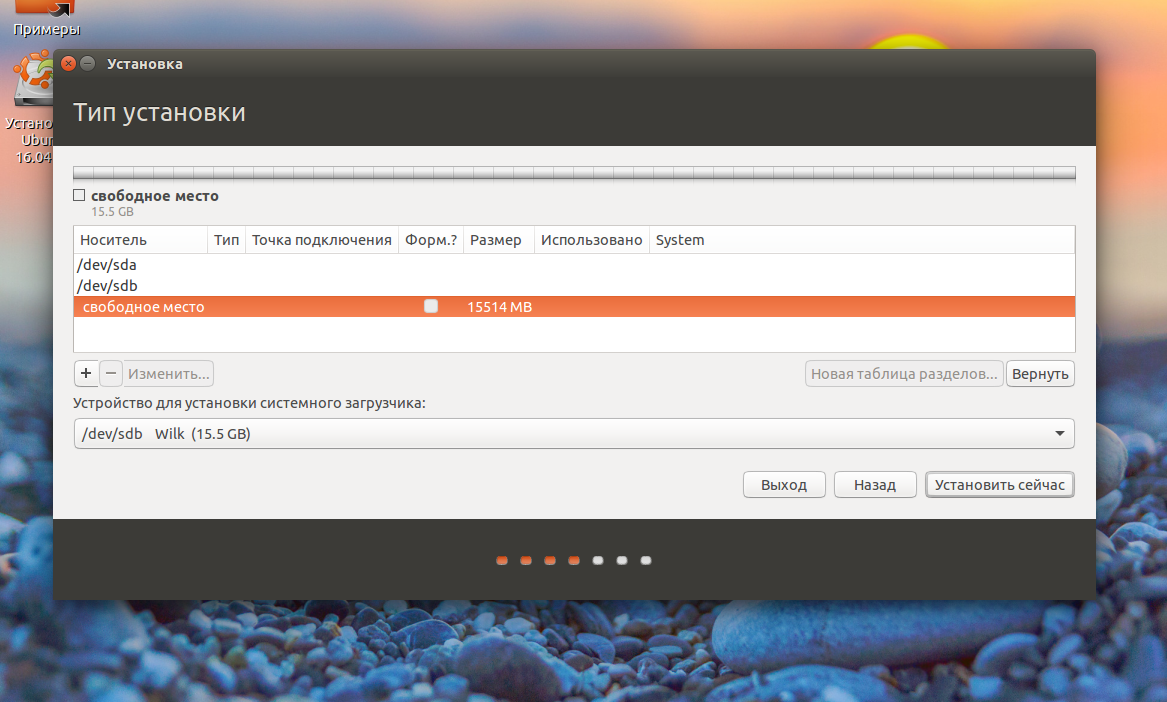
First, do everything as usual, select the language, software settings and updates. The differences begin at the disk partitioning stage. Here you need to choose the manual option, because the automatic markup does not allow us to do what we need.
There will be one remark here, it is necessary that the system is not loaded from the USB flash drive on which you are going to install it, otherwise you will not be able to install ubuntu on the USB flash drive. That is, in addition to the installer, another clean flash drive must be connected to the system. If everything was done correctly, then in addition to the main disk /dev/sda, a flash drive /dev/sdb will appear in the markup window:
For a flash drive, its size, disk label will be indicated, and, most likely, it will also have only one partition. This section must be removed to get free space.
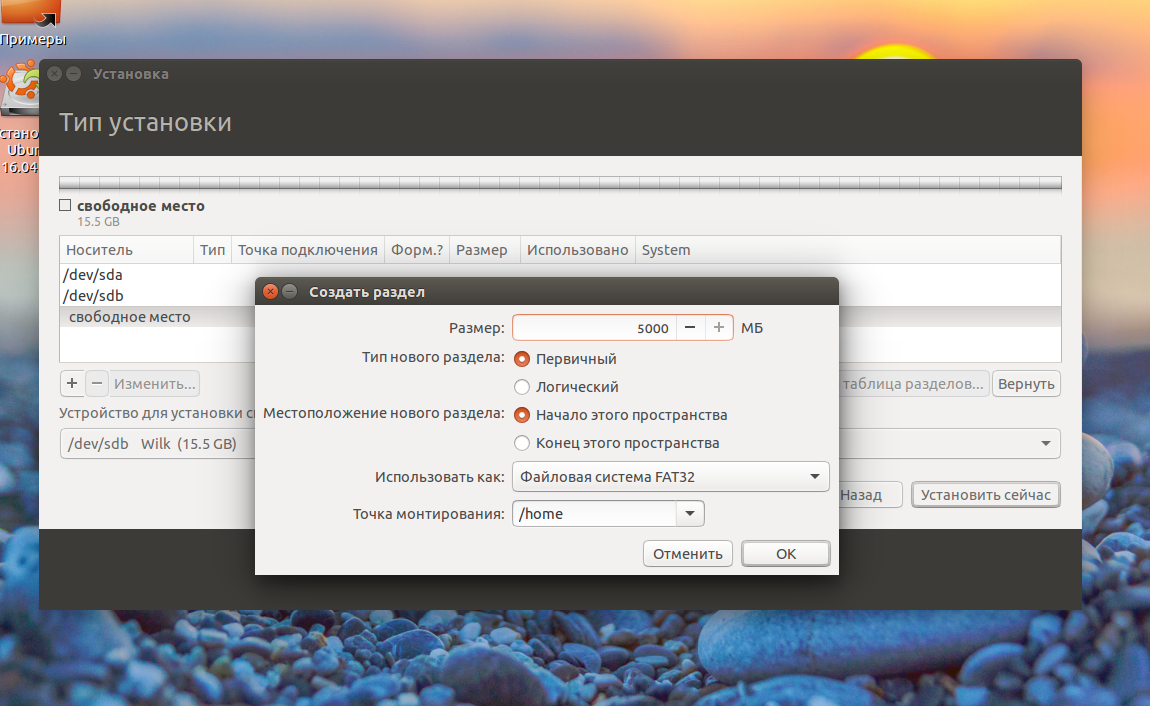
The first partition must be created with the FAT32 file system and it is the first one so that Windows can work with it. For example, if you have a 16 GB flash drive, then 5-4 GB can be given for data. The mount point for this partition is /home:
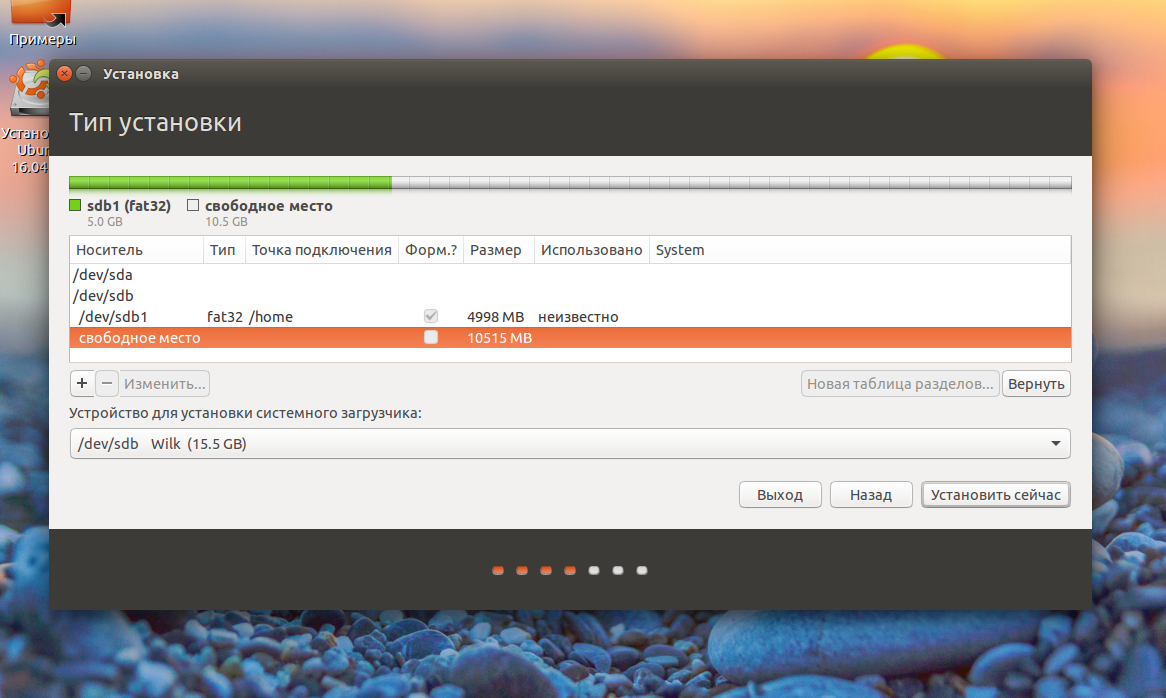
The second section is used for system files, here we need at least eight gigabytes. The file system is better to take Btrfs, since we do not need journaling ext4, and btrfs has compression and optimization for ssd. Specify / as the mount point:

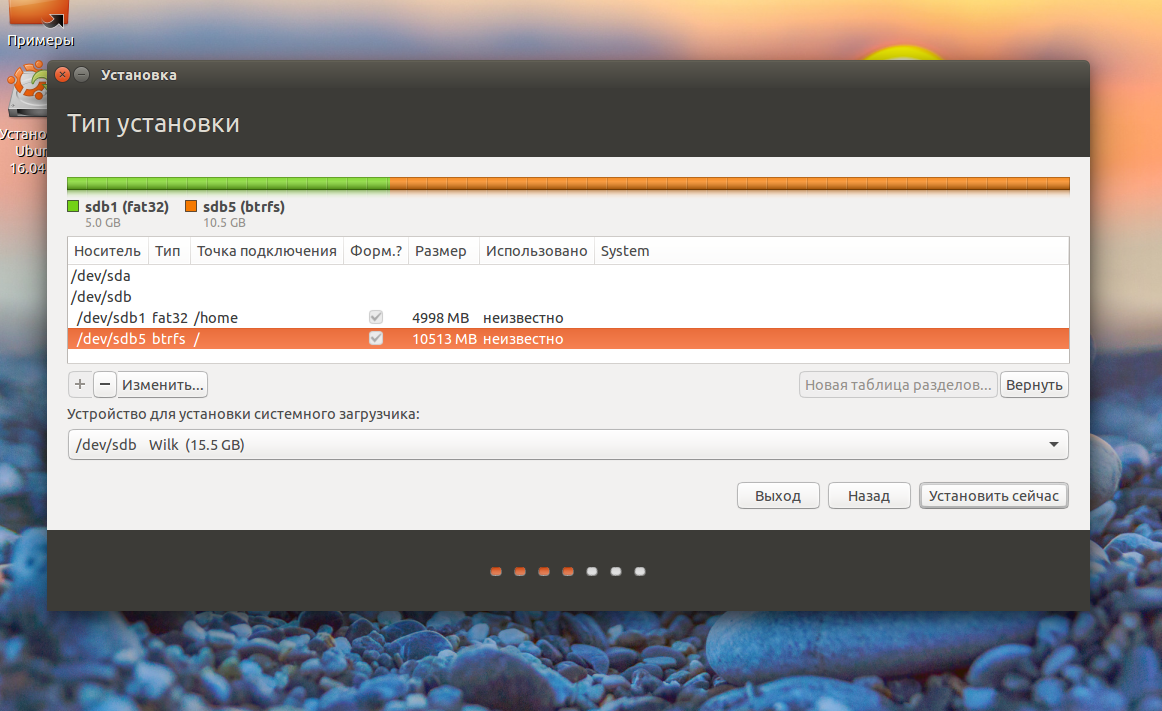
The last action on this step of the wizard is to specify the device for the bootloader, it must be the same flash drive on which you are installing the system.
Optimizing Ubuntu to run on a flash drive
Installing Ubuntu on a flash drive is complete, but now we just have to make it work in such a way as to write data to the disk at a minimum. All this must be done in an already installed system.
Most of the settings will be done in the /etc/fstab file, first we enable compression of all files and optimization for ssd in btrfs, which is used as the root. We used the /dev/sdb2 partition for the root, since we used /dev/sdb1 for /home:
/dev/sdb1 / btrfs errors=remount-ro,noatime,nodiratime,compress=lzo,ssd,commit=60 0 1
You may have disks in fstab named by UUID, then you will have to find the entry that specifies the mount point / and the btfs file system, and therefore already change it. Consider the options:
- errors=remount-ro- remount read-only during errors;
- no time- do not update file access time;
- nodiratime- do not update folder access time;
- compress=lzo- use lzo compression, this is the fastest zlib algorithm gives more compression but takes longer;
- commit=60- by default, the file system writes all information about file changes every 30 seconds to disk, but using this parameter you can specify your own value, but not more than 300;
- ssd- a set of optimizations for solid state drives.
Some folders in which temporary system files are most often written can be moved to RAM, for this, add the following lines to the end of the /etc/fstab file:
tmpfs /tmp tmpfs rw,size=100m 0 0
tmpfs /run tmpfs rw 0 0
tmpfs /var/lock tmpfs rw 0 0
tmpfs /var/log tmpfs rw,size=10m 0 0
The kernel does not immediately write data to disk, but caches it in memory, and writes it when the disk is not loaded or it can no longer be stored in memory. Files /proc/sys/vm/ are used to configure the parameters for flushing data to disk. The settings below reduce the number of entries by increasing the consumption of RAM.
Maximum time between data writes to disk:
sudo sysctl -w vm.laptop_mode=120
$ sudo sysctl -w vm.dirty_writeback_centisecs=12000
$ sudo sysctl -w vm.dirty_expire_centisecs=12000
The maximum amount of memory for the cache in percent:
sudo sysctl -w vm.dirty_ratio=10
Write data to disk when only % of memory is free:
sudo sysctl -w vm.dirty_background_ratio=1
After these settings, the installation of ubuntu on a flash drive is complete, the system is more or less ready for use on a flash drive and will not harm it so much. But still, do not forget to back up important data from time to time, because everything can break at the most inopportune moment.