In this article, I will tell you how to burn an image to a USB flash drive (in this case, a Windows image) for subsequent installation of the system on a computer. Nowadays, many people have laptops and netbooks where there is simply no optical drive, or there is no way to install windows from a disk, and here the creation of a bootable windows 7 flash drive comes to the rescue. First of all, this article is focused on these tasks.
We will write the image to a USB flash drive in two ways. The first method will be implemented using a very good ultra iso program, and the second using WinSetup From USB. We will start by considering the steps for working with ultra iso, since this method is less labor-intensive and the process of creating a bootable windows 7 flash drive will be quite fast. The second method will remain for those who, for some reason, “did not work out” with the first option.
Method number 1
So let's go. To get started, download the program Ultra ISO. After the program has been downloaded, installed and launched (we press the trial period if there is no desire to buy), you can begin the rather simple process of writing Windows to a USB flash drive:
1. You must specify the path to the image that should be placed on your hard drive:
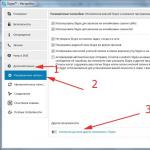
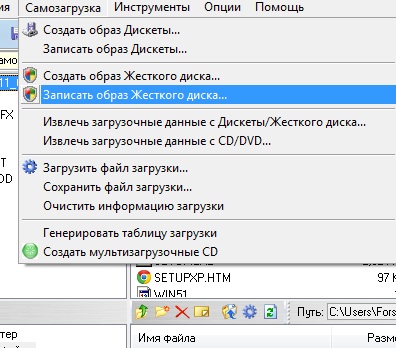
Click "File" => Open (Fig. 1)
Fig.1
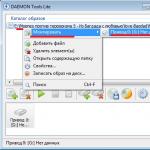
Rice. 2

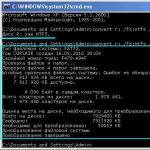
Rice. 3
Method number 2
This method will also tell you how to write windows to a USB flash drive. What you need for this option:
1. A little free time;
2. Computer (with iron, which supports booting from a USB flash drive);
3. Program for preparing a flash drive ( download);
4. Actually the flash drive itself (even an SD card will do);
5. An image of the operating system we want to install.
For example, I will show how we will write an image of the operating system to a 4GB SD cardMicrosoft Windows 7Home Premium 64-bit. Immediately I want to draw your attention to the choice of operating system. If your computer has less than 4GB of RAM (RAM), then you should install the 32-bit (x86) version of the operating system, since the 64-bit one will simply clutter up the RAM with unnecessary processes.
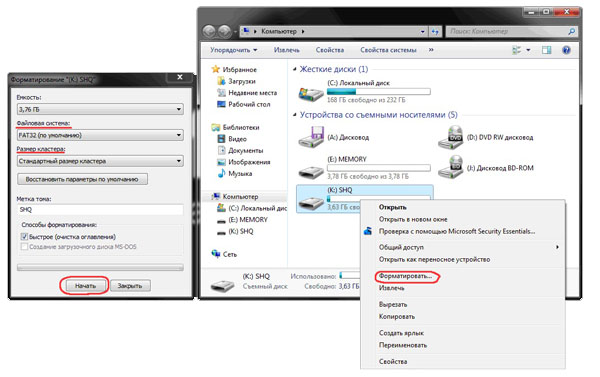
We insert the USB flash drive into the USB port and format it in FAT32 or NTFS using Windows tools. To do this, go to My Computer, find the flash drive there and right-click mice by her badge. In the context menu, select the "Format ..." item. In the format window, select the FAT32 or NTFS file system (the latter will be better if the flash drive is larger than 4GB), and also select the cluster size "Standard cluster size" and click the "Start" button. Everything is shown in the picture:
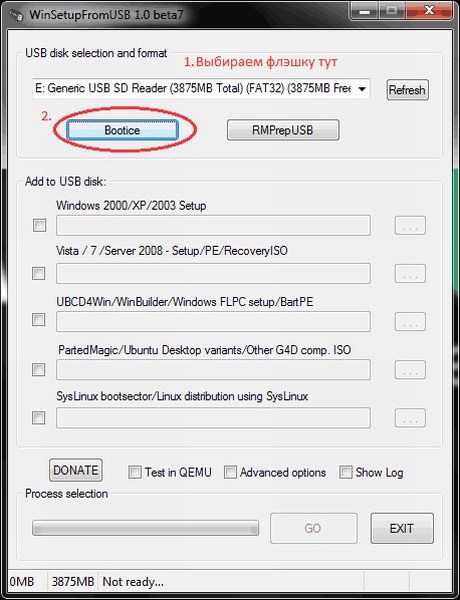
Next, we download a small program in which we will do all the operations we need. There are several programs of this type, but I chose WinSetupFromUSB because it does not require installation, it almost does not take up space on disk and easy to use.
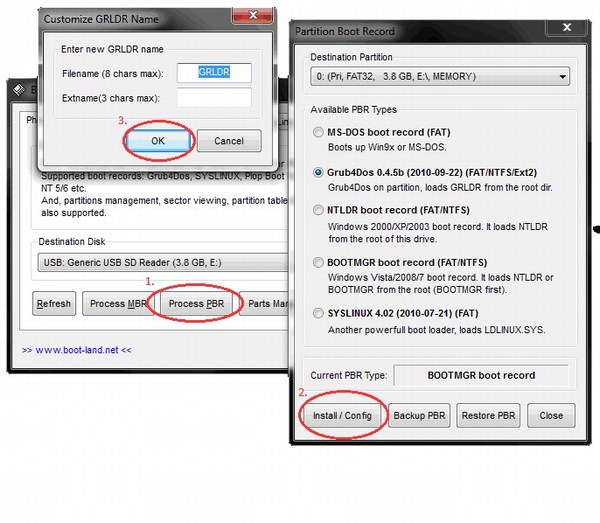
We start the program. First, we need to select the device on which we will write the image. This is done in the drop-down menu at the top (if the flash drive is not displayed in this menu, click on the Refresh button). Next, we need to prepare the flash drive for burning the image, because if we just copy the image, it will be impossible to enter the system installer, because there is no boot sector. To create it, click on the Bootice button.
In the Bootice utility window that opens, press the Process MBR button, then see if Grub4Dos is checked (if not, check it) and press the Install / Config button. In the Config Grub for DOS window, click on the "Save to disk" button, the program will display a window that the boot record has been successfully written to storage device.
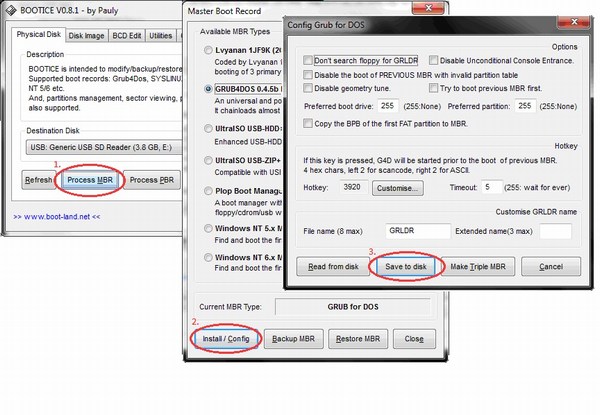
We return again to the Bootice utility window, where we press the “Process PBR” button and do the same, without changing anything in the last window, click OK.
Everything, now we just have to write the image to a USB flash drive, this is done in the main program window, which we saw immediately upon startup. It is necessary to put the necessary checkmark in it - if you are going to install Windows XP, then this is the first checkbox, if Vista or Seven - the second. Next, click on the “…” button on the other side of the checkmark and set the path where our unpacked image is stored on the hard drive, or simply mounted into a virtual drive using DaemonTools or Alcohol. Click on the "GO" button and wait until the process is completed.
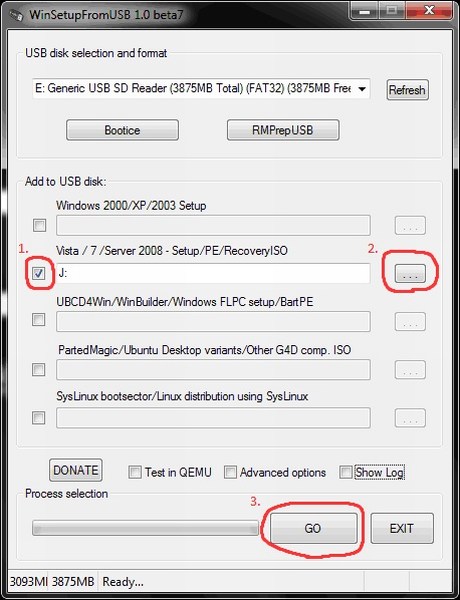
At the end of the program will display the message "Job Done!". All, dear friends, you can reboot and start installing the operating system.
Also, I advise you to read the article on