Sound Forge Pro 10 is an effective and reliable recording, editing and mastering tool for the composer, producer, and sound engineer. In the studio or outside, Sound Forge Pro 10 is used as a complete solution for professional recording, mastering, analysis, and sound restoration.
The main part of the program interface is the “Workspace” or “Workspace”; all audio files torn off are placed in it. In order to open a new audio file, we will use the “New” command located in the “File” menu item. An open audio file is a “data window” with an image of sound waves (diagram). The program allows you to work with several files at once, but only one of them can sound at a time. You can arrange the “data windows” on the workspace at your discretion, then save the location to a special file using the “save as” command in the “Workspace” sub-item of the “File” menu item. Subsequently, you can download it, thereby quickly and easily setting up Sound Forge for a new project.
On the right side of the screen are the “Playback Meters” or “Peak Meters,” which display the output level of the audio data being played.
To navigate through audio data in Sound Forge, there is the concept of “current position”, it shows the current position of the playing file on the timeline in the format: hours: minutes: seconds: milliseconds. This can be seen digitally on a small display located at the bottom of the “data window”, and at the beginning of the playing file, it looks like “00:00:00:0000”. During playback, time is continuously counted, measured to the nearest millisecond.
Also, the “Current position” is displayed by the “current position indicator”, which looks like a vertical line running from the top to the bottom edge of the “data window”. During file playback, the “pointer” moves along the image of sound waves in the “data window”, graphically displaying the value of the “current position”.
The series of numbers at the top of the “data window” is called the “time ruler” or “Time Ruler”. It shows time intervals for an open audio file, making navigation much easier. "Time Ruler" can display readings in various formats, such as: time, number of samples and SMPTE format. To do this, you need to right-click on it and select the desired format from the list that appears.
Search feature in Sound Forge Pro 10
In Sound Forge there is an opportunity automatic search various “amplitude sounds”. They are: unwanted noises, signals exceeding the level you set and areas of silence that appear due to incorrect settings during recording.
Using “search” is useful when editing a file with a long duration, saving a lot of time. Find function starts working from the “current position”, so press the key combination on the keyboard “”Ctrl”+”Home””, which is equivalent to the command "Go To Start", which sets the "current position to the beginning of the file". Let's open Find dialog box, using the command of the same name in the menu item "Tools". In the window that opens, first of all, select the type of “amplitude sounds” you are looking for by opening the tab "Find".
The program provides a list of four types: "Glitch"-finds unwanted noises(clicking and crackling); "Level equal to or above"— finds all signals at the same level specified value, or exceeding it, which can be useful for finding clipped or distorted data that appears when the signal level exceeds 100%; "End of silent region"-finds the end of the nearest “silence area”, which can greatly facilitate the search for individual phrases; "Largest Peak"-finds highest level signal in this file, which is necessary to equalize the maximum volume of several files subsequently recorded on a CD.
Parameter "Threshold slope" works depending on the specified type "amplitude data". Its value is measured in decibels - a unit of measurement of sound volume, the maximum possible level of which is 0 decibels, everything that goes beyond this value is cut off). If the type is specified "Glitch", the parameter determines the “slope of the noise burst” (on the diagram in the data window unwanted noises look like sharp protrusions, the degree of which is measured by “steepness”). With type "Level equal to or above"— the parameter determines the signal level that allows reading this part of the silence data. With the selected type "Largest Peak", parameter value "Threshold slope" no installation required.
"Sensitivity" parameter relates only to type "Glitch", telling the program how carefully to check the data when searching for noise. A high value indicates that any bump in the graph above the specified level will be considered noise. When low, the program will more carefully analyze distortions in the diagram.
For example, if noise is heard, but the program cannot detect it, you need to lower the value of the parameter "Threshold slope" and increase "Sensitivity" value. After pressing the button "OK", “Sound Forge” will check the file using the specified parameters and, if noise is detected, will move the “current position indicator” to the appropriate place. Enable function "Find", using the previously specified settings, you can press the key combination “”Ctrl”+”y””.
1. Interface
2. Navigation in Sound Forge Pro 10
3. Markers
4. Areas
5. Search
Today, both on the Internet and in specialized print media, you can find a lot of materials covering various aspects of working with video. At the same time, an equally important topic is often overlooked - sound editing. But it is a good soundtrack that creates at least half the effect of watching a moving picture. Not to mention that there are a lot of things for which audio plays a decisive role - for example, recording podcasts.
Precisely because the topic of sound processing is somehow less well-known, the user is often faced with the question of which program is best to use. One of the most famous programs in this area is Sony Sound Forge (formerly known as Sonic Foundry's Sound Forge). Having studied the program's capabilities, we will try to understand whether its arsenal is suitable for most users, and will also consider alternative options. The latest, tenth, version of the program came under our “microscope”. For those who are familiar with earlier releases of Sound Forge, it is worth noting that the basic logic of working with this application has been preserved, but some improvements have been added. However, first things first.
Omnivorousness itself
First, it’s worth saying a few words about what can serve as source material for working with the program. These can be digital recordings received from a voice recorder, player, hard drive PC, etc. - the application supports a huge range of formats: both the most popular MP 3, WAV, WMA, Ogg Vorbis, etc., as well as specialized file types created in other Sony products for working with sound. If desired, you can extract tracks from music CDs - to do this, use the item ExtractAudiofromCD menu File.
In addition, you can record your own audio track by connecting a microphone directly in Sound Forge. Moreover, the recording module, despite its simplicity of implementation, provides quite extensive settings (we’ll talk about this a little later). Another interesting feature of the program is the ability to edit the audio track of a video. The soundtrack is opened by the application as a regular audio file.
Attention, recording is in progress!
For recording from a microphone, as we have already mentioned, Sound Forge provides a separate and fairly easy-to-use module. It is called by the Record button on the program toolbar (see the “Everything in View” insert) or by the key combination + . Right in the window that opens you will see recording control buttons, as well as a sound wave intensity scale. When you press the red button that starts the recording process, the program automatically creates a new track for editing and places the recorded material into it for editing. The user is offered several recording modes to choose from (drop-down list Mode): normal mode default ( Automatic retake (automatically rewind)), creating multiple recording options, arranged one after the other and saved in a single audio file, automatically divided into areas ( Multiple takes creating Regions) and without creating separate areas for each option ( Multiple takes (no Regions)), recording each “piece” in a separate window ( Create a new window for each take), as well as recording intervals of a certain length ( Punch-In (record a specific length)). In the latter case, you must specify the start and end time of the recording. In this case, the rest of the track will remain unchanged - this is convenient when you need to rewrite only a specific piece of material.
Everything at hand
When the recording is ready, you can start editing it. Sound Forge provides four main audio track editing tools. The Edit Tool is designed to select the desired areas of the recording, the Magnify Tool is used to change the scale of the sound wave, the Pencil Tool allows you to manually draw a sound wave (works only with a strong zoom), and the Event Tool allows you to move the selected areas. You can switch between them either on the program toolbar by clicking on the button corresponding to each tool, or directly in the window of the edited sample (key D).
In addition, Sound Forge has auxiliary objects that make editing your audio track easier. So, to mark any desired moment in the sample, you can add a marker to the track (Marker). And Region will help you highlight a specific area. It is worth noting that selecting a piece of track between two markers or in an area is done simply double click mice.
Sample stripping
One of the benefits of Sound Forge is that many of the tasks involved in processing an audio file are automated, so you don't have to spend a lot of time tinkering with a track by hand. For example, the tool will allow you to remove pauses and areas of silence Auto Trim/Crop(menu Process). This function works as follows. The program detects a piece of data whose signal level is higher than the specified one and evaluates it as acceptable. When the signal level drops below the level you specify, Sound Forge treats that part as the end of the desired section, or the beginning of a fragment of silence. The program then looks for the next section that has sufficient signal strength and deletes all data between the two sections.
Auto Trim/Crop allows you to use several options for trimming a recording (drop-down list Function). So, Keep edges outside of the selection removes fragments of silence within the selected area without affecting data outside this area, Remove edges outsde of the selection eliminates pauses within the boundaries of the selected area, and also deletes all data located outside its boundaries. RemoveSilencebetweenphrases (createsregions) removes fragments of silence between phrases (when recording a voice). A Remove data from start and limit file length removes silence at the beginning of an audio file, and also trims the end of the recording at a specified point. In addition, the Preset drop-down list contains several preset settings for the most popular tasks.
To create the effect of one part of a recording flowing into another or a smooth fade-out, you can use the function Fade. You can adjust the volume of a track or its individual parts using the tool Volume, allows you to “align” pieces of recording of different quality Normalize. A function Mute It will also help to completely turn off the sound in unnecessary parts of the recording.
A fairly important tool is the Bit-Depth Converter, which changes the bit depth of the audio file. Before processing a recording, it is recommended to increase its bit depth - this will not improve the quality of the track, but will increase its resolution, and further editing and processing of the file will not lead to noise. Reducing the bit depth of a file will also reduce its quality, but in some cases you have to take such a step - for example, to burn a 24-bit file to a CD, you will have to reduce its bit depth to 16 bits, since an analog CD can only use this bit depth . By the way, in such cases it is worth leaving a copy of the original file - just in case.
One more interesting function is the ability to compress/stretch the recording in time without changing the pitch. This is useful, for example, when adjusting the audio track for a video sequence. This can be done using the tool Time Stretch. The program provides 19 different modes (Mode), which are intended for specific type the audio data you are processing. In the Time Stretch settings window, you need to set a special indicator to the desired position on the scale, showing how much the track has stretched or shrunk.
Add some sparkle
The Sound Forge program is equipped with an extensive set of effects (menu section Effects), which can be applied both to the entire recording as a whole, and to its individual parts (this is where areas and markers come in handy). The most interesting of them: reverberation, which creates a set of echo effects (Reverb), a trill effect due to vibration of pitch (Vibrato), sound distortion for vocals or guitar parts (Distortion), adding “cosmic” or “whistle” sounds characteristic of psychedelic music. music of the 1960s - 1970s (Flange/Wah-Wah), effects of choral sound (Chorus) and acoustic coloring (Acoustic Mirror), etc. Each of them needs independent adjustment, so at first you will probably have to use the method of scientific poking J. Fortunately, in the settings of each of the effects there is a function preview action exerted by the effect on the audio track (button Preview). In addition, some settings are similar for most effects. For example, Dry out- volume of the “dry” signal, not processed by the effect, Wet out- effect volume, Rate- modulation speed, Depth - amplitude (range) of modulation, etc. To better understand the effect settings, you should refer to the program help or the Russian textbook on Sound Forge ( http://wikisound.org/Sound_Forge_(Manual)).
What is the result?
When audio processing is complete, the resulting track can be saved to your hard drive in one of the many formats supported by the program, with a choice of track quality (bitrate and sampling frequency). If you plan to further process the track, it makes sense to save it as a Sound Forge project - a file with the FRG extension. This will allow the program to load the song faster in the future.
The finished sound file can also be burned to disk. To do this, in the Tools menu section, you need to select one of the options: Burn Track -at -Once Audio CD or Burn Disc -at -Once Audio CD (read about the difference between these methods in the insert “Burning to the fullest”).
And finally...
The first conclusion that comes to mind after getting acquainted with Sony Sound Forge is that the program is not too difficult to learn - many things are intuitive even for those users who saw the program for the first time, not to mention those who dealt with previous versions of the application. However, in order to perform any complex audio processing tasks, intuition alone is not enough - you will need to stock up on a detailed manual for both the product itself and general textbooks on working with sound. For easy editing musical compositions, for example, cutting ringtones, gluing two tracks or making a light “maraffe” of a sound file, it is still better to use free sound editors (see the box “Why pay more?”). And not because Sound Forge can’t do this, but because the application is aimed at those users for whom sound processing is a serious hobby, as well as at people who write music for commercial purposes. And the price of the product indicated on the manufacturer’s website (from $375) clearly hints at this fact.
Bound by one chain
Effects can be applied to audio tracks in Sound Forge not only one at a time, but also created from them in a sequence. For this purpose, the program contains the Plug-in Chainer module. To launch it, you need to click on the button in the sample editing window. By clicking on the Add Plug -Ins to chain button, you will have access to the effect and plugin manager from which you can select the ones you need. After building a chain of effects, each of them can be configured separately by just clicking on the corresponding button in the chain. Naturally, before applying effects, you can first assess what impact they will have on the recording.
Mass processing
Sound Forge also has a special module for automated processing multiple files - Batch Converter. It allows you to convert multiple records from one format to another. In addition, this module makes it possible to process a group of files with plugins - for example, remove noise from 20 files or normalize their level to a given parameter. In addition, Batch Converter supports group renaming files and entering additional information(metadata).
Let's have a blast
When burning discs in Sony Sound Forge, you can use one of two modes: Track -at -once (TAO) or Disc -at -once (DAO). The difference between them from a technical point of view is that in the first case, the laser records one track at a time, and turns off between each composition, and in the second, it writes the entire array of audio data in one go. What does this give from the point of view of the average user? With the TAO recording method, you can either finalize the disc or burn it without finalization, which allows you to later add it to other data. Due to the fact that the laser turns off between tracks, two-second pauses occur, as a result of which, on some audio playback devices, unpleasant clicks will be heard between tracks. When using DAO, the disk is automatically finalized, and you will not be able to add data to it later. In Sound Forge, the Disc -at -once mode also allows you to embed additional graphics and text, and add various introductions between tracks. In general, it is believed that this particular mode is best suited for recording live concert performances and creating master discs for subsequent duplication at the factory.
Manual automation
Sound Forge provides a special Script Editor module, in which you can not only write the necessary program code, but compile it and run it directly from the shell. This means that if you have the ability to write program code in C++, Visual Basic or Java, you can automate the processes in the program yourself. For example, break up a track with many markers at certain intervals, import tracks from a CD and immediately convert them into any available format, create a certain number of audio files, etc. This approach allows you to save a lot of time.
Everything is in sight
The Sony Sound Forge interface can be flexibly customized - almost all the main functions of the program are displayed with buttons on 12 toolbars, the placement of which can be set individually.
The Standard panel repeats the main menu items File and Edit, and also has a set of four various types editing cursor.
Transport panel: command menu- Loop, rewind, record, play and stop.
![]()
Navigation panel: controls in the sound wave editing window - scaling, setting markers, quick navigation.
The Views panel functions allow you to remember the current visual settings of the sound wave editing window, including cursor position, scale, etc. This panel is very useful when working with large files.

Status/Selection panel: transition from one time grid to another, that is, displaying values by samples, seconds and minutes, and various synchronization protocols.

Regions/Playlist panel: Access region list and playlist windows, control MIDI sync, and display sync status.

The Process panel repeats the twenty functions of the main menu item of the same name and is one of the key windows when working with Sound Forge.
Effects panel repeats key functions the main menu item of the same name.
The Tools panel repeats the key functions of the main menu item of the same name, among which it is especially worth noting CD recording and importing audio tracks from discs.
Levels panel: digital indicator showing the current value of the selected parameter at the cursor position (sample value, percent, dB, Peak, RMS Power). Very convenient as an auxiliary indicator.

Insert panel: Inserts markup objects such as bullets, areas, etc.

The Scripting panel allows you to control the operation of the script creation module to automate work with the program.

Why pay more?
For recording sound and comparatively simple operations to edit it, it is not necessary to use expensive professional packages. You can get by with the Audacity utility - it is free and does not cause any problems with mastering even for inexperienced users, especially since on You can find a detailed Russian-language manual. In addition, the application has a multilingual interface, which includes Russian localization. And the cross-platform nature of the utility generally makes it a universal sound editor for amateurs. Although Audacity may well be suitable for professionals, because its functionality is quite good. The program allows you to record and process sound, provide it with effects, and convert recordings into various formats. And the connection of additional modules and the ability to write your own effects in the simple built-in Nyquist language makes it a serious competitor to paid solutions.
Alternatively
To work with sound, you can use another tool - the Adobe Audition program ( www.adobe.com/products/audition/index.html). It is a powerful audio editor for mixing, editing, mastering and audio effects processing. The program supports combined work with video files. You can view clips of video in the Multitrack View window and work with files in a variety of formats, including AVI, MPEG, Native Digital Video (DV), and WMV. Adobe Audition supports more than 20 popular audio formats. There are built-in CD burning tools and all kinds of audio effects, flexible and precise editing and pre-listening tools. There is a huge collection (there are more than 5000 fragments in various genres) of looped musical fragments. Adobe Audition allows users to edit individual audio files, create loops, import over 45 effects, and mix up to 128 tracks. The cost of the program is $349.
Colleagues or rivals?
Speaking about Sony Sound Forge, it should be noted that in many reviews the Steinberg WaveLab program is called almost the main competitor of this editor. This is a professional multi-channel program for editing, processing, recording music and mastering. The application has the ability to import/export and encode/decode all modern formats, archive information, record/edit/generate CDs and DVDs, create your own databases, graphic design covers and much more. Multi-channel and full support for DVD drives are implemented. The program allows you to work with both audio and video various standards, with text and graphic files in multitrack mode. It is possible to connect up to 10 software effect processors (plugins) for each track. The graphical interface of the program is a fully customizable “transformer”.
Available means
For simple editing of compositions, the Wave Editor utility, which is part of the popular Nero disc burning package, can also be used. She has basic functions for processing and editing audio files, and, in addition, has a large number of built-in filters and effects. In addition, the program allows you to use third-party VST plugins.

Many musicians record guitar at home. Almost always you need to edit the music track. This could be the application of some effects, or changing various parameters. A modern audio editor called Sound Forge. The name translates as sound forge. This fully reflects the capabilities of the program. You can perform some major actions with the entire composition, or remove unnecessary sections of the audio track like a scalpel, or perform “micron” manipulations. This musical forge is completely at your disposal.
Installing Sound Forge
Now we will conduct a short overview of the program's capabilities. We will briefly tell you how to use the Sound Forge program.
On at the moment most current version The program is Sound Forge 11. We will begin the description of Sound Forge by taking a look at the work area of the program.
Sound Forge workspace

This is where all audio data is edited. We see that the audio track is loaded, divided into two channels. On the right are two channel indicators (displaying the level of the output audio signal) in the form of columns. You can also see a simple set of tools for playing a recording; information about the track is displayed at the bottom of the screen (playback sampling frequency, resolution, channel settings, duration active window data and the general area of free memory), and all the powerful tools of the program are located in the menu functions.
Sound Forge Interface Elements (Part 1)
Sound Forge Interface Elements (Part 2)
The Sound Forge audio editor has in its arsenal a large number of processing and effects with which you can change the sound of audio files. Available plugins can significantly improve the sound of files or create completely new sounds. Of the main effects, it is worth noting the following: chorus, delay, distortion, reverb, vibrato, flanger and many others. The range of settings and fine-tuning of each effect or process is amazing.
To fully present the capabilities of the Sound Forge program, it is worth noting that audio tracks can be glued together. Lay them on top of each other, cut out unnecessary pieces, do reverse and much, much more.
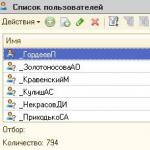
Sound Forge Recording Dialog Box
And one more very useful feature programs are audio recordings. You can record audio through a microphone, via line input sound card, you can write voice or instruments. And then feel free to edit your entries.
Voice processing in Sound Forge 10
Our goal is to provide you with the most quick access to the device's operating instructions. Using online viewing, you can quickly view the content and go to the page where you will find a solution to your problem with Sony Sound Forge V.10.0 Pro SF-10000.
For your convenience
If viewing the manual Sony Sound Forge V.10.0 Pro SF-10000 directly on this page is inconvenient for you, you can use two possible solutions:
- Full screen viewing - To conveniently view the instructions (without downloading to your computer), you can use the mode full screen viewing. To start viewing instructions Sony Sound Forge V.10.0 Pro SF-10000 on full screen, use the Full Screen button.
- Download to your computer - You can also download the instructions Sony Sound Forge V.10.0 Pro SF-10000 to your computer and save it in your archive. If you still don't want to take up space on your device, you can always download it from ManualsBase.
Instructions for use Sony Sound Forge V.10.0 Pro SF-10000
Advertisement
Advertisement
Print version
Many people prefer to read documents not on the screen, but in a printed version. The option to print the instructions is also provided and you can use it by clicking on the link above - Print instructions. You don't have to print all the instructions Sony Sound Forge V.10.0 Pro SF-10000 but only some pages. Take care of the paper.
Boris Nikitin
Date of first publication:
Oct 2009Audio file editing program.
Sony continues to develop the programs it purchased in 2003 from Sonic Foundry. New versions appear almost every year - Acid 7, Vegas 9 and Sound Forge 10 were recently released. We will now talk about the Sound Forge program, and since version 8 was discussed, we will talk about the innovations of versions 9 and 10.
A computer with an operating system was used for testing Windows Vista Home Premium (Service Pack 1), Core processor 2 Quad 2.5 GHz and 2 GB RAM. This configuration is fully compatible system requirements Sound Forge 9 and almost completely - the requirements of the tenth version: operating system Windows XP (SP2 and higher) or Vista (SP2 and higher), 1 GHz processor, 512 MB RAM, 350 MB disk space, DVD drive, DirectX 9.0c and above, Microsoft. NET Framework 2.0. As can be seen, the inconsistency is the use operating system with the first service pack, which, however, did not cause any problems.
Sound Forge 9
An important innovation in version 9 (modification 9e was used - Fig. 1) was multi-track support. The program allows you to open, edit and save multi-channel files of different formats, as well as record up to 32 mono tracks (16 stereo). But you still need to keep in mind that Sound Forge is not a multi-track audio sequencer - the program’s capabilities in this regard are very limited, since it is designed to work with ready-made multi-channel master files. For example, Sound Forge does not have convenient mixing tools - to convert multi-channel files into stereo or mono, the Channel Converter function (Process menu) is used, which allows you to set the relative level of each channel, but is much less convenient than a traditional mixer.

In the mentioned article about version 8, among the disadvantages of the program, the absence of certain types of indicators was mentioned. In version 9, a vector oscilloscope and mono-compatibility indicators finally appeared, which, moreover, (along with the spectrum analyzer and level indicators already available in the previous version) can operate in multi-channel mode.
Sound Forge 9 adds the ability to edit by dragging parts of a file (including between tracks). This function works without problems, but there is a slight inconvenience. By standards Windows interface(and Sound Forge strives to comply with them as much as possible) the shape of the cursor indicating editing, after selecting (in this case, part of the file) should change to a shape indicating movement. Here the cursor does not change until dragging begins, which is somewhat confusing.
After you drag a part of a file to a new location, the Mix/Replace dialog box appears, in which you can specify parameters for mixing the signal of the moved part and the signal present at the place where it is moved. In this case, you can use a crossfade, choosing from 25 different forms.
Options for crossfade, as well as balance between direct and processed signals, have been added for effects processing. Parameter settings are opened by clicking the More button in the effect window.
Using the included Dolby Digital AC-3 Studio plugin, you can export files encoded in this format. But this plugin does not allow you to change parameters (for example, bitrate); for this you need to purchase the Dolby Digital AC-3 Pro version.
Other innovations in Sound Forge 9 include: the ability to customize interface colors (Preferences - Display), support for Gracenote MusicID technology (obtaining information about audio CD tracks), support for operating Windows systems Vista.
Sound Forge Pro 10
The main news of the tenth version (Fig. 2) was event-based editing.

The Event tool has appeared (Fig. 3), when selected, new editing operations become available. For example, pressing the S key splits the file into two parts ("events") at the current playback position. Moving the boundaries of an event allows you to change its duration (however, it cannot exceed the duration of the file). The events themselves can be moved, deleted, copied, cut, pasted, etc. By holding down the Alt key, you can move the contents of an event without changing its boundaries.

Most importantly, event editing is non-destructive. That is, if you divide the file into two events, delete one of them, and then move the border of the remaining one, the contents of the deleted event will appear in it.
At the top of the start and end of the event there is a small yellow triangle, which you can move to create a smooth increase or decrease in volume (fade). By pressing right button on the fade area (it is highlighted by a slight change in the background color) is called context menu, in which you can choose one of five fade shapes.
If parts of events overlap, a crossfade is automatically created. Right-clicking on a crossfade area opens a context menu from which you can select the crossfade shape (25 options). In version 10 settings you can set the default crossfade shape (Options - Preferences - Editing).
Moving the line at the top of the event changes the signal level. All of the above operations are reflected in the waveform. Event editing also works on multi-channel files.
Processing functions and effects are applied to events individually. Naturally, with the exception of functions that change basic parameters, for example, sampling frequency or bit depth. Additionally, processing by multiple plugins in the Plug-In Chainer window only works on the entire file, not individual events.
The second most important innovation in the tenth version can be considered an increase in the included iZotope algorithms. First of all, the set of Mastering Effects Bundle plugins that came with the ninth version has been replaced by Mastering Effects Bundle 2, in which the number of plugins has been increased from four to six (Stereo Imager and Harmonic Exciter have been added to the existing Mastering EQ, Mastering Reverb, Multiband Compressor and Mastering Limiter ). The set uses algorithms from the iZotope Ozone plugin versions 3 and 4, which differ from Sound Forge's own similar algorithms in that they have better sound.
The elastique Timestretch plugin (Fig. 4), also based on iZotope algorithms, complements the standard function of changing duration and key, and works better than it, allowing you to get an acceptable result even with changes greater than 10%.

In addition, the program now includes iZotope 64-it SRC (sample rate conversion) and iZotope MBIT+ Dither (dither) algorithms, which also do their job well.
Concluding the conversation about new algorithms, we should mention the resonant filter that appeared in the tenth version. It sounds rather weak, but it can be suitable for creative use. In addition, it should be noted that the program still comes with a set of Noise Reduction 2.0 plugins (Noise Reduction, Audio Restoration, Click and Crackle Removal, Clipped Peak Restoration).
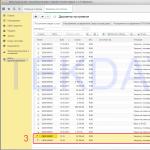
The program has a new window for editing metadata (View - Metadata), which collects general file metadata (Summary Information), specific metadata of BWF (Broadcast Wave format) and Acid files, sample loops, Regions List and playback ( Playlist/Cutlist), metadata for CD recording (Track List and CD Information).
By the way, about the CD. The built-in recording function supports DAO (Disc-At-Once) mode, which allows you to create audio CDs that comply with the Red Book standard. Previously, you had to use the included CD Architect program to do this. However, CD Architect 5.2 is still included. However, having the DAO recording function directly in the Sound Forge program is convenient, in addition, this function combines well with other innovations: event editing allows you to separately process the tracks of the future CD, and the metadata window allows you to enter the necessary information.
The main change in the interface was the ability to customize and save the locations of screen elements (View - Windows Layouts). There are three preset options, and you can save up to ten of your own (Fig. 5). Two others useful additions: opened windows are now shown as tabs at the bottom of the program window and you can create your own layout grid (convenient when working with magnifying glasses). Well, as usual, some menus, toolbars and keyboard shortcuts have been changed. The Special menu has been completely removed, its commands have been distributed across other menus, including the new Insert and Transport. The latter is hidden by default; it must be enabled in the settings (Options - Preferences - General).

Among the remaining innovations: the ability to edit virtual instrument files (DLS, SF2, GIG formats), a shared data buffer in RAM (improves performance), more efficient handling of metadata of BWF format files (also improves performance), added interactive training examples.
Yours: No