Actually exist many ways to change the color of an object in photoshop. Earlier, we already examined how to do this with help, and also learned how to change the color of hair in Photoshop using.
These are far from all methods, today I will show two very simple ones, and in future articles I will talk about a couple of methods using other adjustment layers.
Method number 1
I will briefly talk about the application of this method. Open the image and create a new layer (I recall all the tricks).
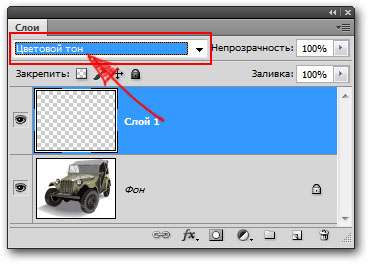
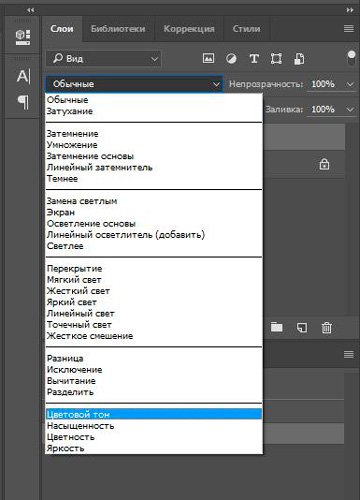
Then change the blending mode of this layer by selecting the Color tone option in the drop-down list at the top of the layers palette (located at the bottom of the list).

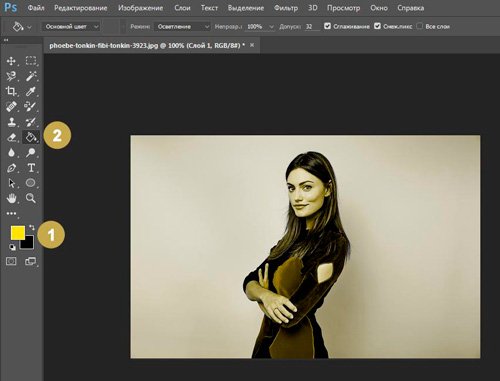
After that, select by pressing the B key, click the foreground color indicator, select a hue in the palette dialog box that appears, and click the OK button. Having previously selected a new layer, draw over the object.

If you paint over, you can temporarily select the Eraser tool by pressing and holding the E key. And you can pre-prevent such situations by adding a layer mask to the new layer and hiding the areas that do not need to be changed in black.
Note
If the repainted area is surrounded by black, white and gray colors, you can safely paint on top of the latter, and they will not change at all. This happens because in the Color Tone blending mode, areas filled with color affect only those parts of the underlying layer that already contain color.
Method number 2
Remember the menu command? A similar menu command Replace color can be used to highlight one shade and replace it with another. This command works very well if the color to be replaced is more or less uniform and concentrated in a certain area, such as the car body in the figure above.
Selecting a command from the menu Image - Correction - Replace color, you will see the dialog box of the same name.

The Eyedropper tool is already selected in it, so click on the shade in the image that you want to replace. It will appear in the box with the inscription Color in the control group Selection at the top of the dialog box.
In the control group Replacement at the bottom of the dialog box, click on the square located above the inscription Resultto select a new shade. When you click the OK button. If you need to adjust the selected shade, you can use the sliders Color tone, Saturation and Brightness (Also located in the selection control group). Here's what happened:

Please note that in addition to the ordinary pipette, there are pipettes next to it with small “+” (plus) and “-” (minus) icons. Use them to expand / narrow the range of shades you need to change.
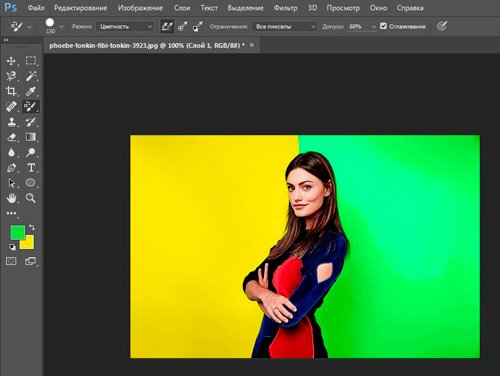
As you can see, I overdid it a bit and my car wheels also turned purple. This suggests that this method may not always be useful.
Noticed an error in the text - select it and press Ctrl + Enter. Thanks!
1 voteHello dear readers of my blog. Today we will again comprehend the basics of working with the Photoshop program. I wonder what would you look like if the color of your hair or skin was completely different? I already talked about.
Today I will tell you how to change the color of a layer in Photoshop without unnecessary problems. I won’t mention yet how to work with them, well, I’ll tell you about various tools: a magnetic lasso, a magic wand and so on.
All relevant articles are already on my blog, and if you accidentally stumbled upon this publication and want to fill in some gaps, then you can easily find out all the information of interest from materials prepared in advance.

Today we’ll quickly go over the main tools, at the end you can find a good video instruction, and over the next 5-7 minutes you will meet a sea of \u200b\u200bscreenshots that will help you figure out what manipulations will be necessary in order to change the color of the picture or her plot.
I will work in Photoshop CC, but if you have a different version, then that's okay. All functions are simple. The software is installed in Russian. By the way, if you have an English version, I can also recommend the article "". Very comfortable, makes life easier.
Color correction
So, I already selected the object, or rather the background of the photo, and transferred it to a new layer using the keyboard shortcut Ctrl + J.
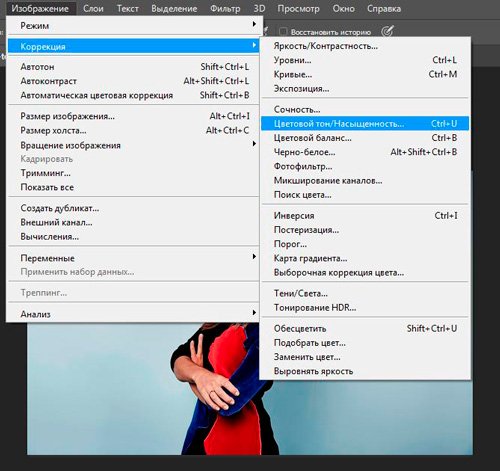
Now I go to the “Image” tab - “Correction”. There are a lot of options that will help change the hue: "Brightness / Contrast", "Color balance", "Photo filter" and even "Gradient map". You can try each of them in order to first-hand understand how a particular tool works, choose an interesting method that you like specifically.
I will use Hue / Saturation.
You can pull on different sliders, achieving an excellent effect.

As you can see, you can’t name the differences striking, but you don’t need to fool your head with the selection so that the layers look uniform and professional, and the object does not stand out from the general background.
Dramatic changes
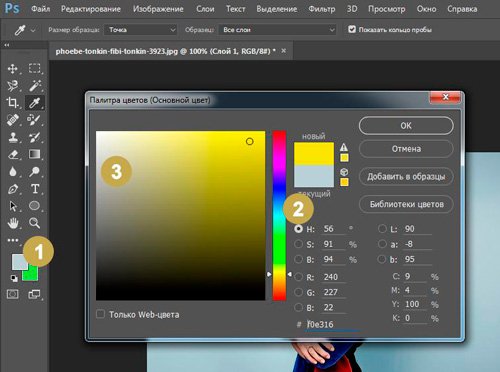
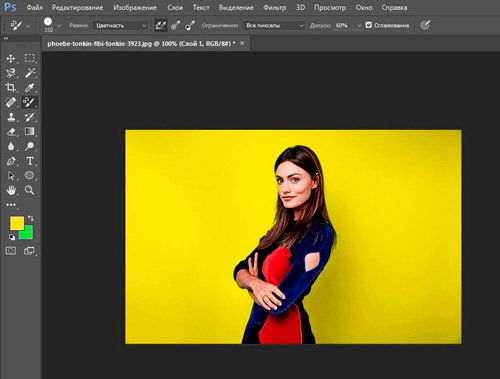
To make the background a completely different color, I will use the Color Swap tool all in the same Correction tab (how to draw a black background for Photoshop -).

After opening the dialog box, your cursor will change. An eyedropper tool will be hidden in it. Just click on the color you want to change. Using the “Scatter” slider, determine the area you are going to work with, and then click on the color bar above the “Result” record or work again with the “Tone”, “Saturation”, “Brightness” sliders.

I chose the first option. I clicked on the “Result” and now I choose the hue and color on the palette so that the soft blue turns into pink.

Professional, fast, easy
The most successful tool for working with the colors of complex objects, in my opinion, is the brush replacing colors. Hold the left mouse button on a regular brush for a long time until an additional menu opens.

Now select the shade by which you will change the color of the layer.
It remains only to paint over the necessary areas, as you can see, all the shades are preserved. Very fast and convenient.
You can repaint in any suitable option.
Video instruction
Bonus
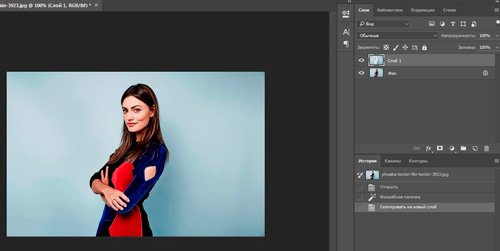
Another way to change the color with a new layer is not too appealing to me, but I suppose that some may like it and certainly someday come in handy in the future. So, I create a new layer, and then I select the blending mode “Color Tone” for it.
This is how it should end up.

Now I’ll take any color, for example, yellow, the “Fill” tool and fill in the layer just created.
You can try other blending modes. Do not be afraid to experiment.

With the eraser, you can return the girl a normal complexion.

By the way, do not forget that many professionals use as an eraser. Still not able to work with her? Then you need a publication, a link to which I gave.
Well, if you want to know the maximum about all the tools that are in Photoshop, I can advise Zinaida Lukyanova’s course “ Photoshop for beginners in video format ". You do not have to wait for anything. Just a few weeks and you will know everything that this program is fraught with.

Until we meet again and good luck.
Everyone knows that in order to change a photo or picture, you should "go" straight to Photoshop. This graphic editor can work wonders, because in its arsenal - a huge number of various tools. All are aimed at making sure for every user.
By the way, in this application, you can not only add brightness, contrast, etc., in it you can generally change the color, say, from a yellow car to make red. Moreover, this is done very simply, and generally does not require any skills or specific knowledge. Are you intrigued? In this case, I think the topic of how to change the color of an object in Photoshop will be interesting to you.
Replace color
There are several ways to “conjure” over color in Photoshop, and in this article I will talk about the two most popular. The first method uses the tool “Replace color”, and here is how it is implemented in practice:
Hue / saturation
I bring to your attention another way of replacing color. After opening the image in the layers palette, click on the small icon at the very bottom in the form of a half-filled circle, and then select the “Color tone / saturation” item. Next, select the color to be replaced. Next, use the eyedropper cursor to click on this color. Now move the slider in the “Tone” field until you get the desired hue, do not forget to adjust the brightness and saturation. 
Now activate the layer mask. Use a black brush to go through areas where color replacement is not required. Save the changes and enjoy the result.
When editing images in Photoshop, it is often necessary to change the color of some object or its part, and make it so that it retains its texture, shadow, transition effects, and other attributes exactly. For obvious reasons, simple brush repainting is not applicable here, this method is valid only when working with plain objects.
When replacing the color of textured or non-uniform objects, the use of additional tools is indispensable. So, how to replace the color of an object in Photoshop.
Color Swap with Layer Change
The easiest way to replace color in Photoshop is to use the blend mode. We will not analyze how the color interaction works when using different modes, we better get down to business right away. In our example, we will change the color of the inner circle of the drawn gear. Now it has a blue color, but we want it to turn red and at the same time retain all its gradients and effects.
Open the images in Photoshop, create a new layer and change its blending mode to.

Select the desired color in the palette and start painting with a regular brush right on top of the object. Is it too easy?

Yes, if the areas adjacent to the edited object have black, white or gray (any gradation) color. In all other cases, the repainted area will need to first select a lasso, a magic wand or applying a mask.
Replacing color by color grading
This method is more suitable for replacing the color of objects having a more or less uniform tone, for example, clothing, flower, car body, etc. Open the image in Photoshop and select from the menu Picture -> Correction -> .

In the window that opens, take the dropper and click on the color to be replaced, after which it will immediately appear at the top of the window.

Then click on the square with the color (Result) at the bottom of the dialog box and in the palette that opens, select the desired color.

Changes can be viewed in real time. To more accurately determine the object to be repainted, you can use the scatter and pipettes option. «+» and «-» allowing you to add and remove adjacent areas.
Change color with a special brush
In recent versions of Photoshop, there is a special brush that allows you to replace the selected color, including neutral, with any other. It is in the same group of tools as a regular brush. The essence of its work is to replace the colors of adjacent pixels, the error of which is determined by the user. So, upon admission 1 percent only one specific color will be replaced, which will fall into the focus of the brush.

At admission 30 percent the brush will replace the color of not only those pixels that are in its focus, but also adjacent ones that have a similar color cast. At 100 percent Tolerance will be replaced by all colors. The main difficulty when working with a brush "Color swap" in that the user has to select the tolerance empirically. As in our opinion 14-17 percent for starters it’s enough, if necessary, this threshold can always be raised.
The ingenious developers of the Adobe pearl, probably, did not even suspect that the Color Swap tool in Photoshop would become, among other functions, one of the leaders in frequency of use.
Repainting brush
You'll find a brush with the name Color Replacement in the Brush tool group (in Photoshop CS3 and younger). This tool is good for its simplicity (for repainting objects, you can do without laborious selection), but at the same time it is not entirely predictable.
In fact, this color substitute with a cursor in the shape of a circle with a cross works like an ordinary brush, painting the area first while preserving the texture and structural features of the image, but with some reservations.
Firstly, unlike a normal brush, in its settings, in addition to size and hardness, you can set intervals (when moving), the angle of inclination and the shape of the print, as well as adjust the pen pressure (when using graphic tablets).
In the process of painting, the program continuously analyzes the paint within the brush print, replacing it with the specified color as the primary color in accordance with the selected mode.
The default mode is "Color", in which the color and saturation change, but the brightness remains the same, and the new hue, of course, will not exactly match the selected color.
In the "Brightness" mode, the original tone is retained, but the brightness changes.
In the "Color Tone" mode, the color changes to the declared paint tone, and the original brightness and saturation remain.
Choosing the "Color" option, we will change the saturation, while maintaining the brightness of the original paint.
In the "Saturation" mode, brightness is maintained, but the tone of the original color and its saturation change.
To the right of the mode window in the settings panel at the top are three options for sampling.
Selecting the first one ("Continuous"), we instruct the program to constantly scan color in the area of \u200b\u200bthe brush print while we hold the button, painting over the object.
If we select “Once,” the color sample taken at the first click will be used as the sample. This option is suitable for uniformly colored areas.
In the third version ("Background Pattern") only areas related to the background color will be repainted.
The Constraints option determines the extension of the substituted color, as the hover prompts.
The "All pixels" option provides for the replacement of all pixels in the "cursor-sight" area of \u200b\u200bthe brush. Selecting "Adjacent pixels" (set by default), we paint over within the brush print only those that are adjacent to the color pixels immediately below the cross. In the "Edge Selection" mode, all pixels of the sample will be repainted, but with an emphasis on the edges.
In principle, by choosing the appropriate brush size, you can confidently repaint in the boundary areas of the object, even accidentally crawling into a different color, if the "Tolerance" parameter is correctly selected, which determines the error when choosing relative colors, as the prompt says. With increasing tolerance, the spectrum of replaced tones expands, and vice versa.
Thus, we can conclude that the “Color Swap” brush in “Photoshop” is a fairly flexible tool, and despite its “straightforwardness”, it can do a lot of “skill” in skilled hands.
All commands that can dramatically change the color without destructive consequences for the image are in the "Correction" list in the "Image" menu. These are features such as Color Balance, Hue / Saturation, Selective Color Correction, and Replace Color.
In the mode "Color tone" - object "chameleon"
Another undeservedly rarely mentioned and infrequently used method of color transformation lies in the modest blending mode "Color Tone". Having selected the adjustment layer "Color" and indicating the desired paint, the blending mode on this layer is then changed to "Color Tone". The object, of course, will not be repainted exactly in the given color, but the hue will change. If you double-click then on the thumbnail of the fill of the adjustment layer, the color palette opens, and you can iterate over the options, observing the effect of the chameleon on the canvas.
The excess is erased with a soft black brush on the mask of the adjustment layer, which is why it is good.
Of course, there will be more fuss with colored objects, so it is better to repaint objects that are more or less uniform in color in this way.
Instead of the adjustment layer, you can create a new layer, change its blending mode to “Color tone” and, after choosing the desired color, paint over the object with a brush, then correct the flaws with an eraser.

A bit about color balance
Having chosen the "Color balance", we can pre-repaint the selected object using the color pairs "Blue - Red", "Purple - Green" and "Yellow - Blue". The tone balance is adjustable in shadows, highlights and mid tones.

Hue and saturation
Tone correction and saturation adjustment functions are very often used for tasks such as replacing colors in Photoshop.
The color change algorithm in the dialog box called by the "Hue / Saturation" command is based on adjusting the hue, saturation and brightness parameters. Here we can shift the overall color gamut of the picture or the selected fragment (object) and adjust the colors individually in different parts of the color range, choosing the desired tone with a pipette.

In the list of ranges below (under "Style"), where the default is "All", there are six more color ranges that can be processed simultaneously, but with separate parameters.
Given the power of the tool in terms of color correction, repainting the selected object here is not difficult.
Selective color correction
This function allows you to change colors according to the model, not HSB (hue, saturation, brightness), but CMYK, controlling the amount of cyan, magenta, yellow and black in the selected color. Selecting the object to be repainted in the image, select the necessary color group in the "Colors" window and adjust its composition using the sliders.
Sometimes, instead of the Selective Color command in the Image\u003e Correction menu, it is better to use the same adjustment layer (Layers\u003e New adjustment layer or the button on the layer panel at the bottom). In this case, it becomes possible to correct the effect on the mask of the adjustment layer with the removal of all unnecessary black brush.

Replacing white and black
Changing the color with the help of the corrective functions, you may notice that the white color does not lend itself to repainting in this way. Replacing the white color in Photoshop is very simple: if you select this area first, and then, after deleting, repaint it.
However, this cardinal decision is destructive. It is justified only if it is not the original drawing itself that matters, but its color. And if you just want to give the white color a different hue, try putting the picture in CMYK mode and using the "Selective Color Correction" function, and then return to the RGB color space.
Depending on the uniformity of the color, you can use any tool from the extensive arsenal of Photoshop tools to highlight “Quick Selection”, “Background Eraser”, “Magic Eraser”, etc.), but the “Color Range” menu in the “ Highlight. " And how the new color takes root at the place of the removed white, directly depends on the quality of the selection.
By the way, if you need a replacement in Photoshop, all the arguments regarding repainting white are also valid for this case.
Replace color
This command from the Correction list in the Image menu (or the corresponding adjustment layer) is easier to use than Color Tone / Saturation, and its results are more predictable.

In the dialog box, we draw with the help of pipettes the paints to be changed. Slider "Color tone", "Saturation" and "Brightness" achieve the desired effect. To control the selection, it is better to select the "Selected area" checkbox (the image will be displayed as a mask). The "Spread" slider is used to correct scatter beyond the border of the selected area.
This color replacement method is most effective for contrasting and not-so-colorful images.
Lab mode repainting
One of the most quick and relatively simple ways of repainting objects is to replace the colors in Photoshop using the Lab color mode, although to effectively use this method it is advisable to have at least some idea of \u200b\u200bthe Lab color space.
So, the L coordinate sets the brightness (luminosity) value, determined in the range from 0 (darkest) to 100 (lightest), and the color parameters are set by the coordinates A (color in the range from green to red) and B (color in the range from blue to yellow).
Thus, in Lab, the brightness value is separated from the chromatic color parameters, which makes it possible to separately influence the brightness, contrast and color of the image. It is this circumstance that sometimes allows you to speed up image processing, for example, if it is necessary to replace the color.
True, for repainting colorful colorful objects and objects with complex contours (hair, fur), this option is not suitable. Let's say you need to change the color of a passenger car. In Lab, replacing the color in Photoshop involves, first of all, translating the image into this mode.

We translate the picture into Lab mode (Image\u003e Mode\u003e Lab), then select the desired color from the libraries by going to them by double-clicking on the main color in the toolbar, and remember the values \u200b\u200bof the channels L, A and B.
In the "Eyedropper" tool group, select the "Color standard" and put a label (control point) in the representative area of \u200b\u200bthe auto color to be replaced, thereby calling up the "Info" panel.
Now we add the “Curves” adjustment layer and for each channel we find the position of the curve in accordance with the fixed values, referring to the “Info” palette.
The curves of channels A and B must necessarily intersect the center of the graph, and the curve of the channel of brightness L must certainly keep the angle of inclination.
Now double-click on the image layer to open the window "Layer Style, Blending Options". We shift our attention to its lower part (“Overlay, if”). Here, by manipulating the engines for each parameter (L, A and B), we separate the car from the background or other objects.
Repaint everything
Having mastered the above methods of replacing color, you can repaint almost any object. Depending on its complexity, one method or another may be preferable. For example, replacing the hair color in Photoshop is easily accomplished using the correcting functions “Color Tone / Saturation” and “Color Balance”, but the main task here is to qualitatively select an object with such a complex (as a rule) contour.
Most often, a quick mask is used for selection (a button with a dotted little ring at the very bottom. Then the selection is adjusted using the special features of the "Refine Edge" command in the "Selection" menu.
The selected area is usually copied to a new layer (Ctrl + J), then the painting tools mentioned above are applied to it.
And such simple tasks as replacing eye color in Photoshop, where standard selection tools are used, are generally solved in two ways. The eye can be distinguished by selecting "Lasso" or "Oval" (for the pupils), then, as in the previous case, replace the color by applying the correction "Color Tone / Saturation".
The "Color Swap" brush also does a good job of this.
Everything is still with color
Most of the user requests related to repainting objects in the Photoshop program, as a rule, do not specify a specific version of the editor, and if indicated, the color replacement in Photoshop CS6 is of much interest to others.
Perhaps this is due to a more significant update of the program in relation to the previous version than it did before. The changes affected the background save and autosave functions, selection, cropping tools, Magic Wand and Eyedropper, brush options, some filters, fill functions, layer editing, interface color, and much more.
There are new opportunities for working with RAW files in the new Camera RAW7 version, gradient fills, artistic stylization of images, video editing, searching for the desired layer in multi-layer documents, as well as a new color correction Color Lookup, etc.
Nevertheless, the correction functions in the “Correction” list in the “Image” menu did not undergo any significant changes during the program modernization, therefore repainting objects, for example, in CS2, and replacing the color in “Photoshop CS6” practically do not differ in essence. for those owners of earlier versions who believe that new versions have more options for replacing colors.